services
Support
IRS Support Page
Have a question? Start by searching here
- Alaya
- POS System
- F&B System
- Hardware
- 1. IRS POS IntroductionMore
Home - Item Master
- Home – Item Master
- Setup the master item with Product Information.
- This page allows users to maintain and manage Product Information.

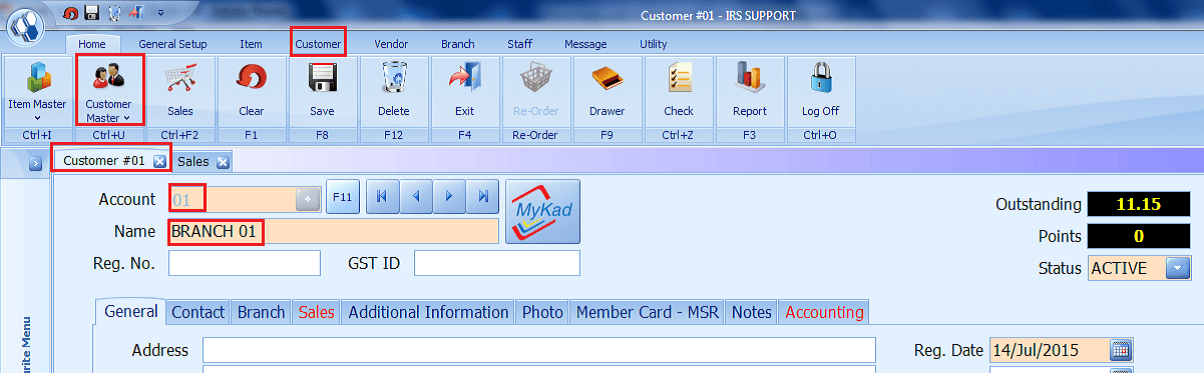
Home – Customer Master
- Setup the master customer with customer Information.
- This page allows users to maintain and manage Customer Information.
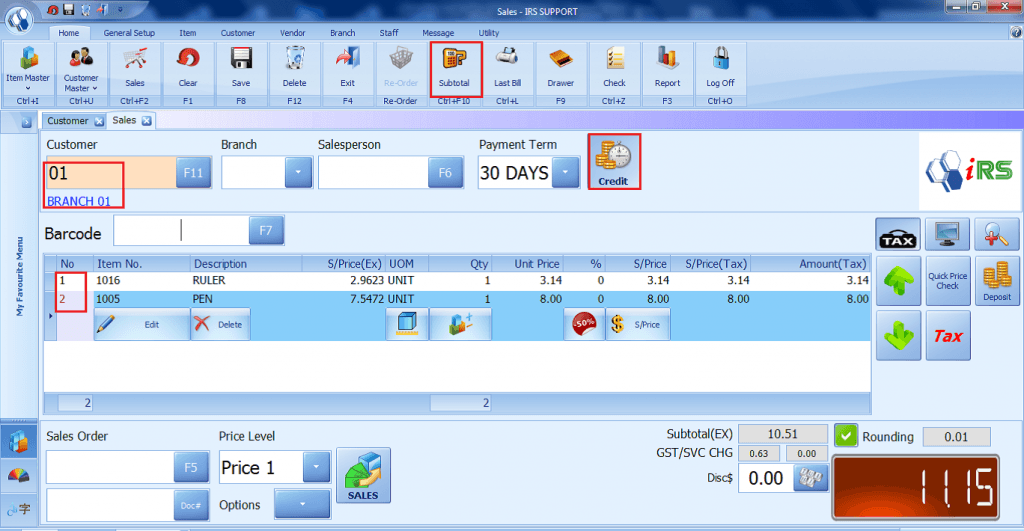
Home – Sales
- Click to Perform Sales.
- System enables “Subtotal” and “Last Bill” Sessions.

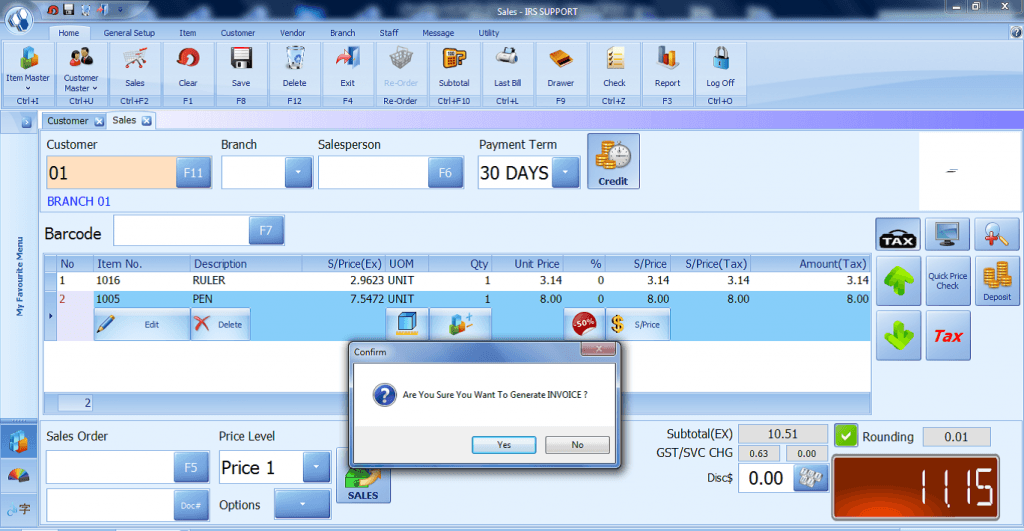
Home – Subtotal
- Click to make payment.
Home – Last Bill
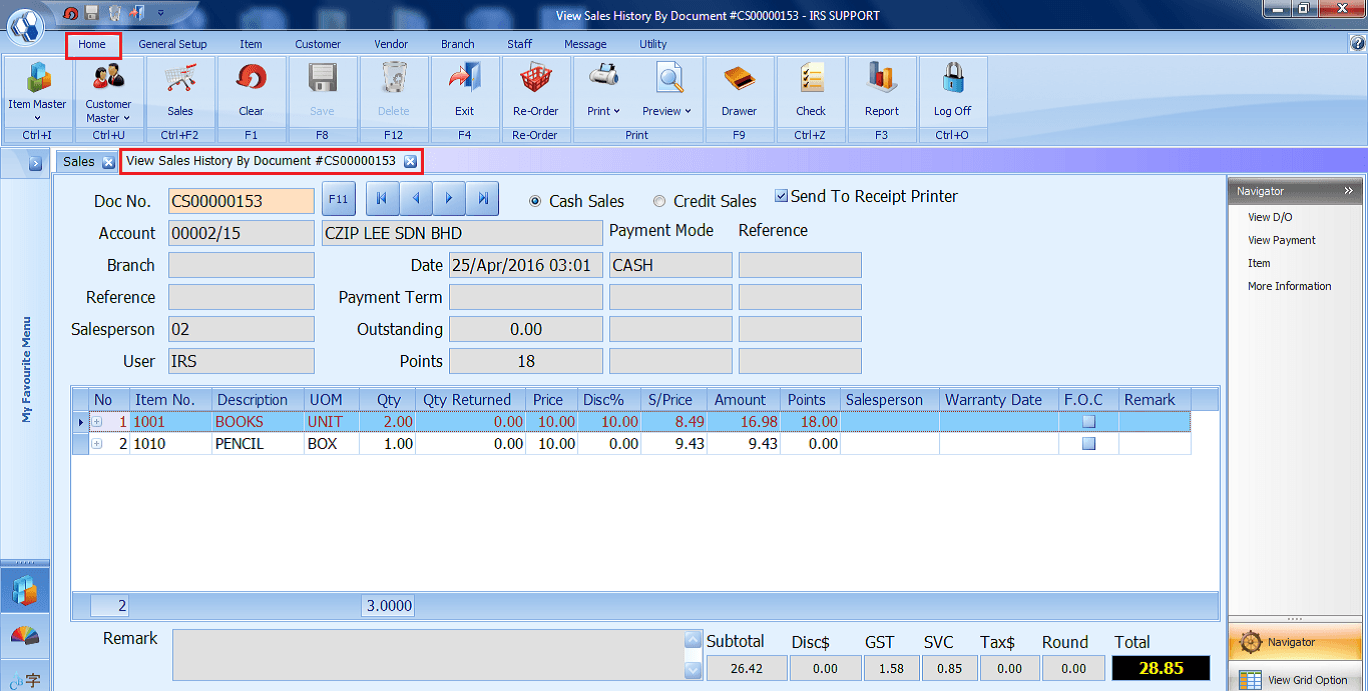
- Click to View Sales History through
Home – Print
- Click Print send the report to the printer.

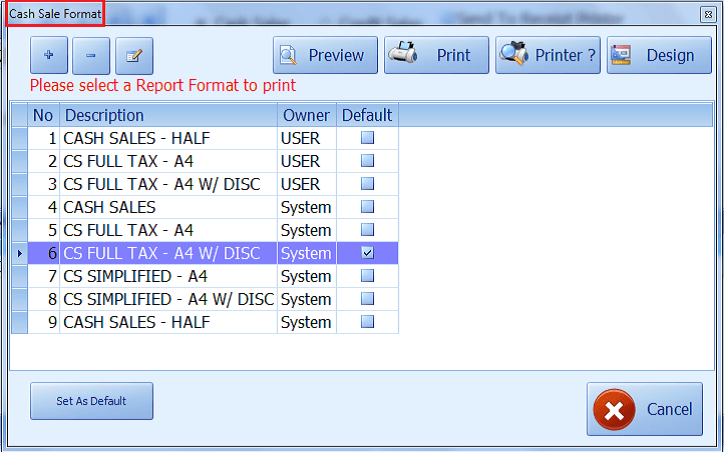
Home – Preview
- Click Preview to view or select the report format to print.

Home – Clear
- Click to Clear the Information Entered on the selected screen.
Home – Save
- Click to Save the information entered on the selected screen.
Home – Delete
- Click to Delete the information entered on the selected screen.
Home – Exit
- Click to Exit from the selected screen.
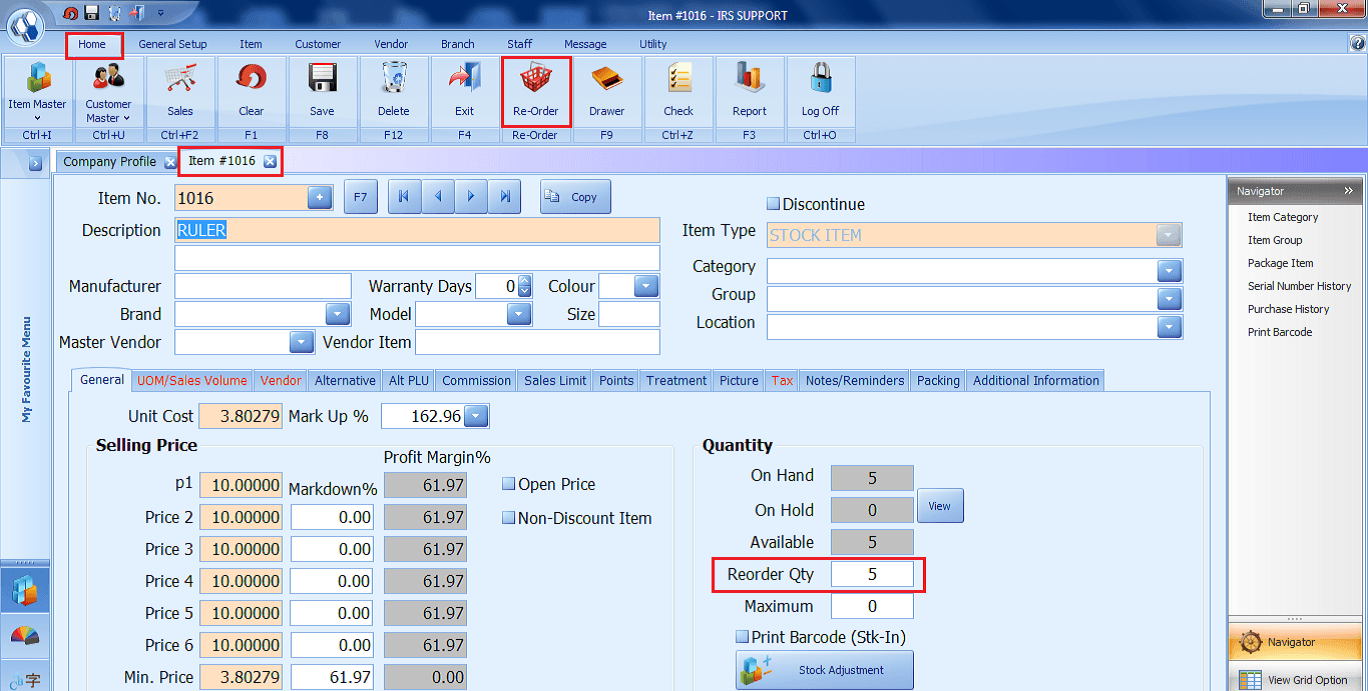
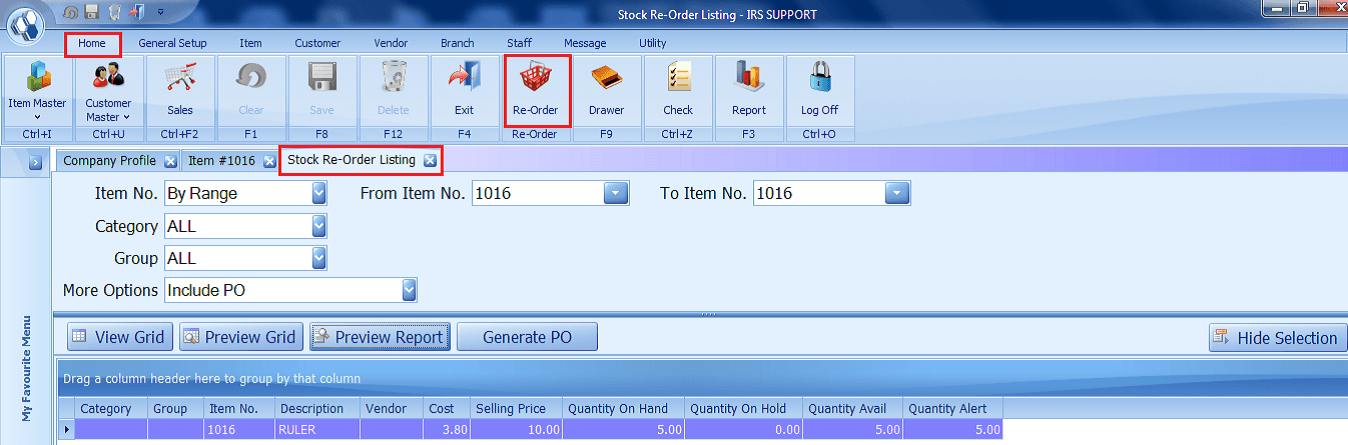
Home – Re-Order
- Click to generate Stock Re-Order Listing.
Home – Drawer
- Click on Open Cash Drawer.
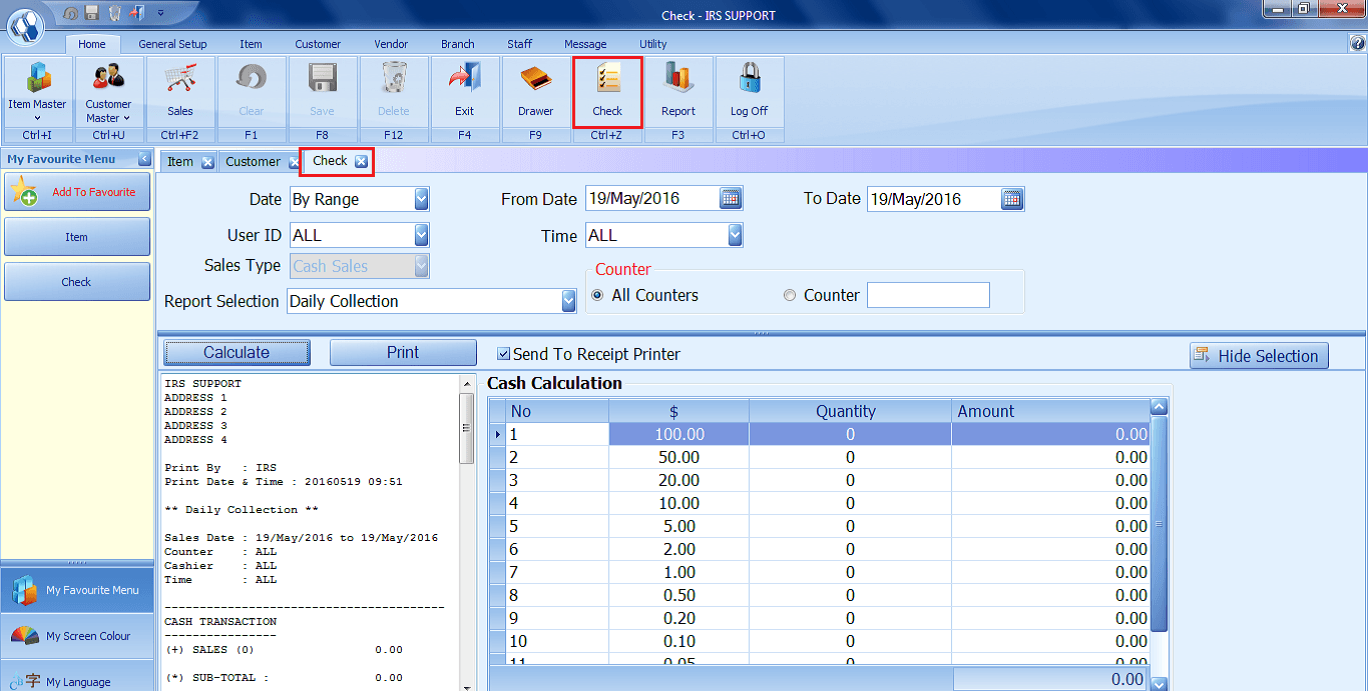
Home – Check
- Click to Check Daily Closing Stock.
- Cash Note Quantity and Amount is recorded in Cash Calculation section.
- Users will be able to calculate and generate Daily Collection, Daily Product Sales and Tax Summary Report.
- Note: This is only available for “Cash Sales” type.
Home – Report
- Click to generate IRS POS Reports.
- Reports are categorized by Item, Sales, Discount, Customer, Vendor, Analysis, Staff, Tax, and others.

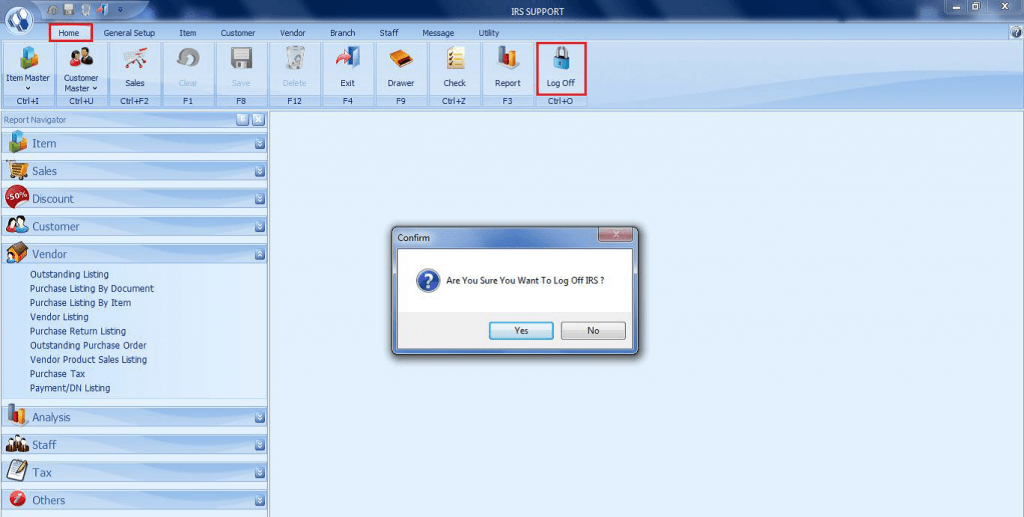
Home – Log Off
- Click “Yes” to log off from the system.
Share Link: https://www.irs-software.com/faqwd/irs-pos-introduction/
- 2. General SetupMore
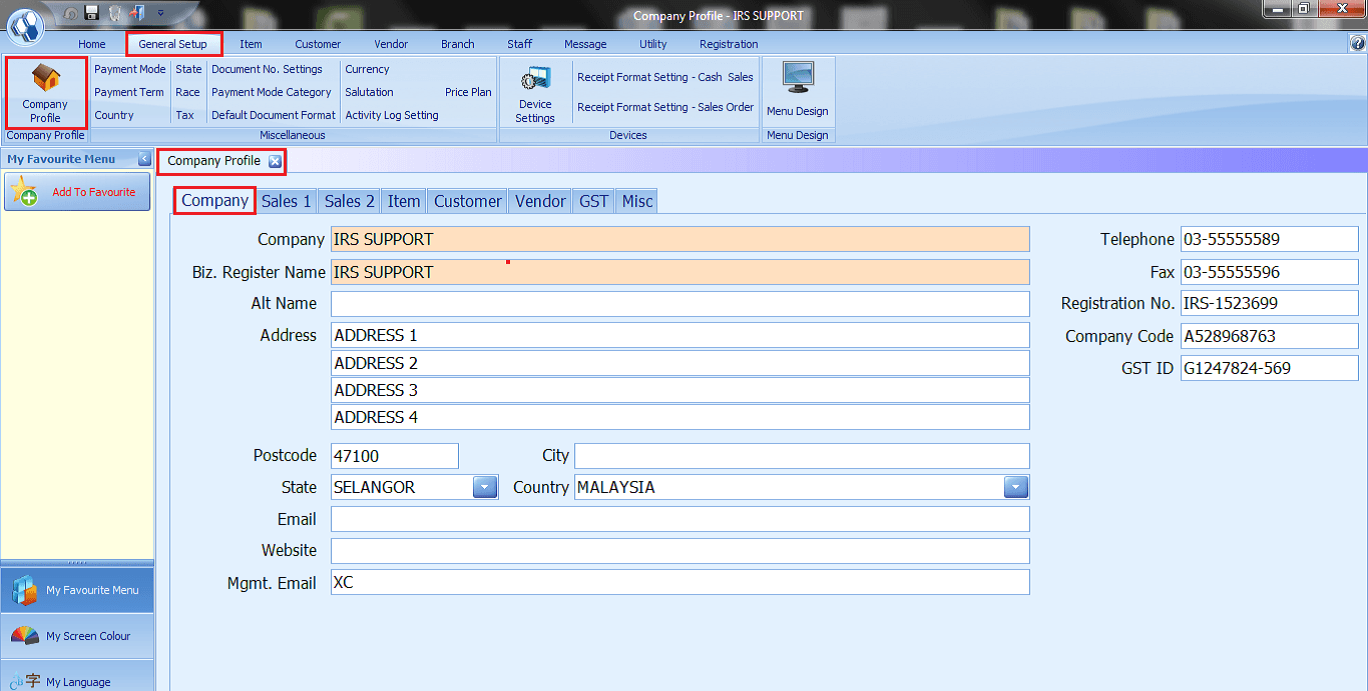
Company Profile - Company
- Fill in the Company name and Business Information.
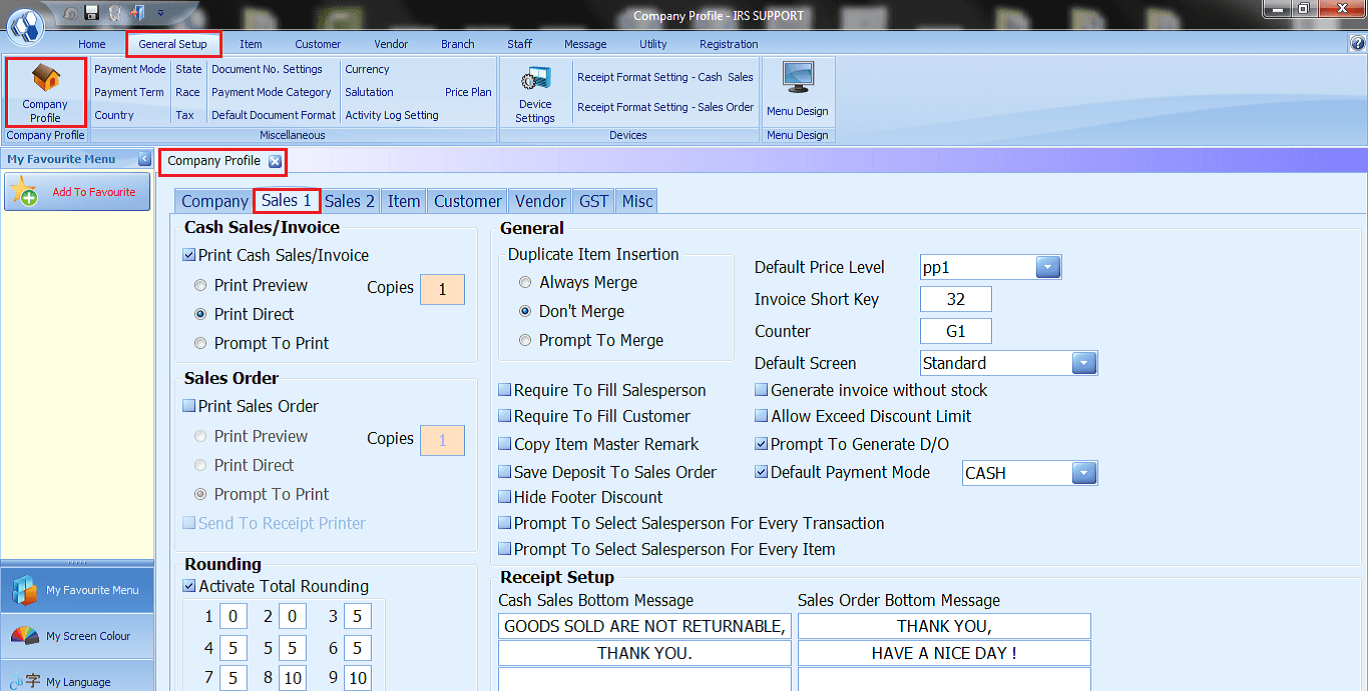
Company Profile – Sales 1
- Select user preference function for Sales screen.
- Tick or choice whichever you needed to act for your business use.
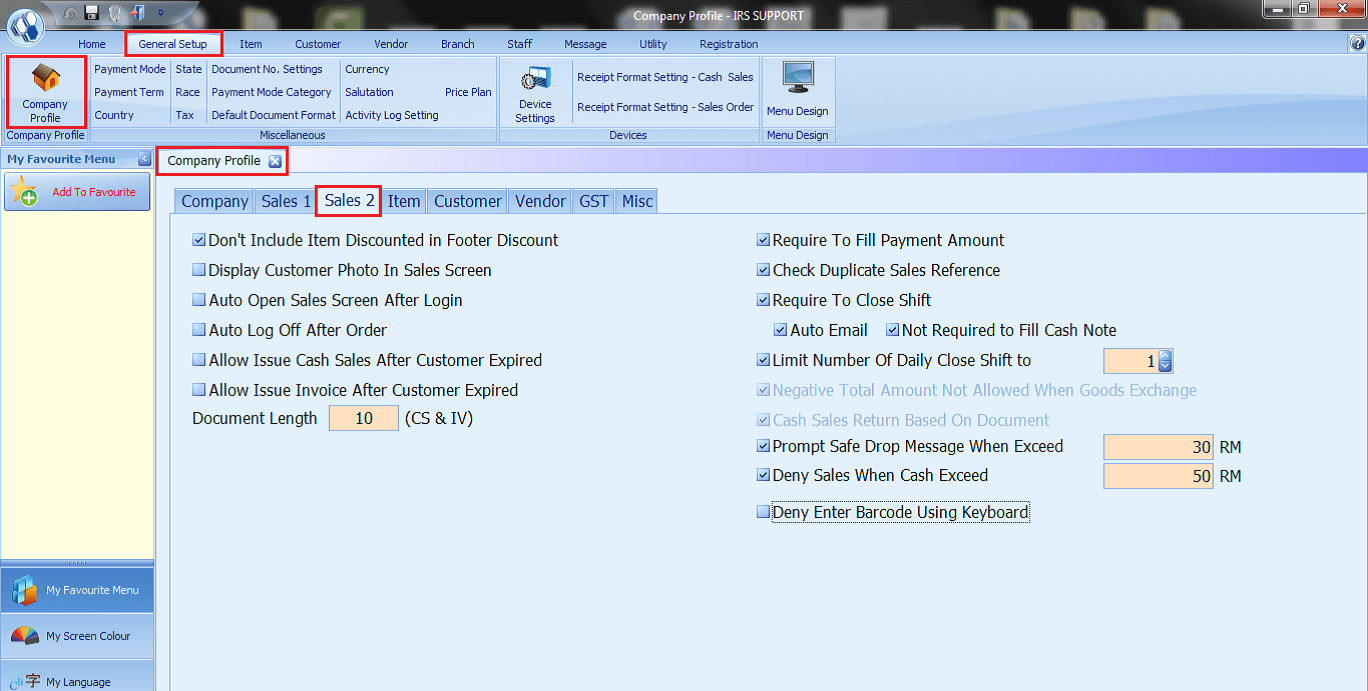
Company Profile – Sales 2
- Select user preference function for Sales screen.
- Tick or choice whichever you needed to act for your business use.
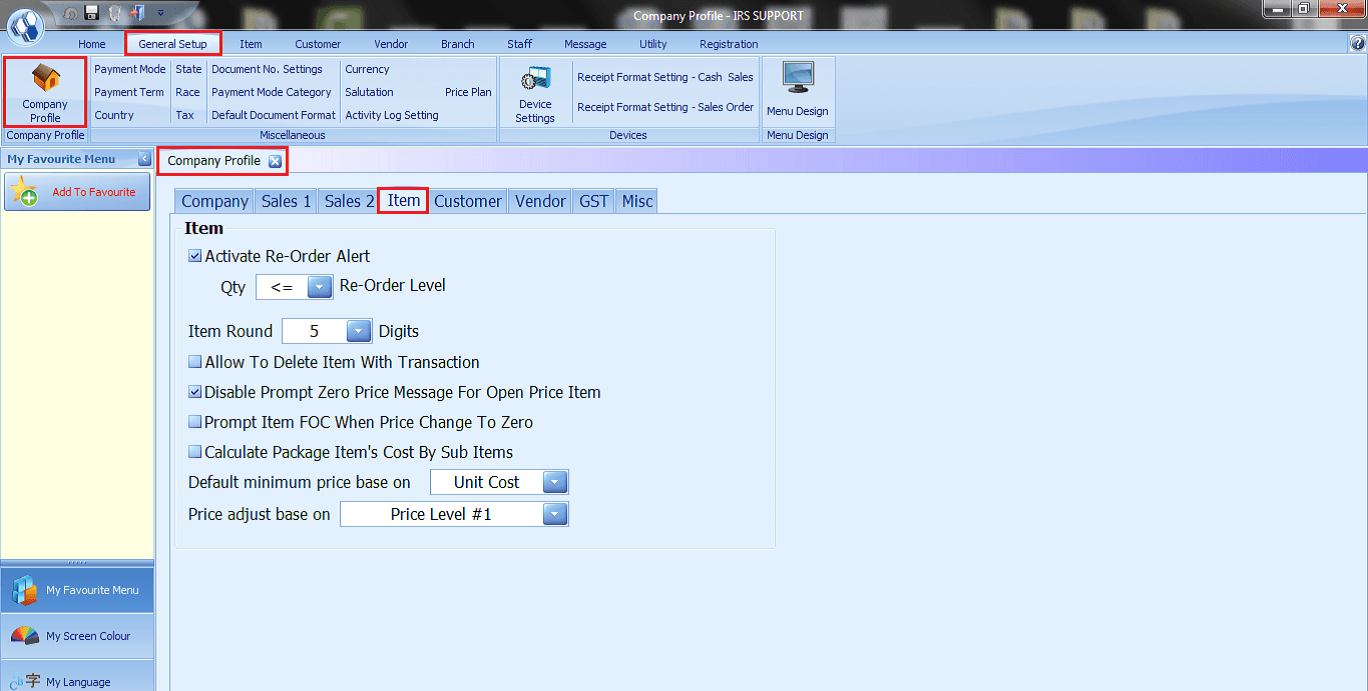
Company Profile – Item
- Select user preference function for Item.
- Tick or choice whichever you needed to act for your business use.
Company Profile – Item
- Select user preference function for Item.
- Tick or choice whichever you needed to act for your business use.
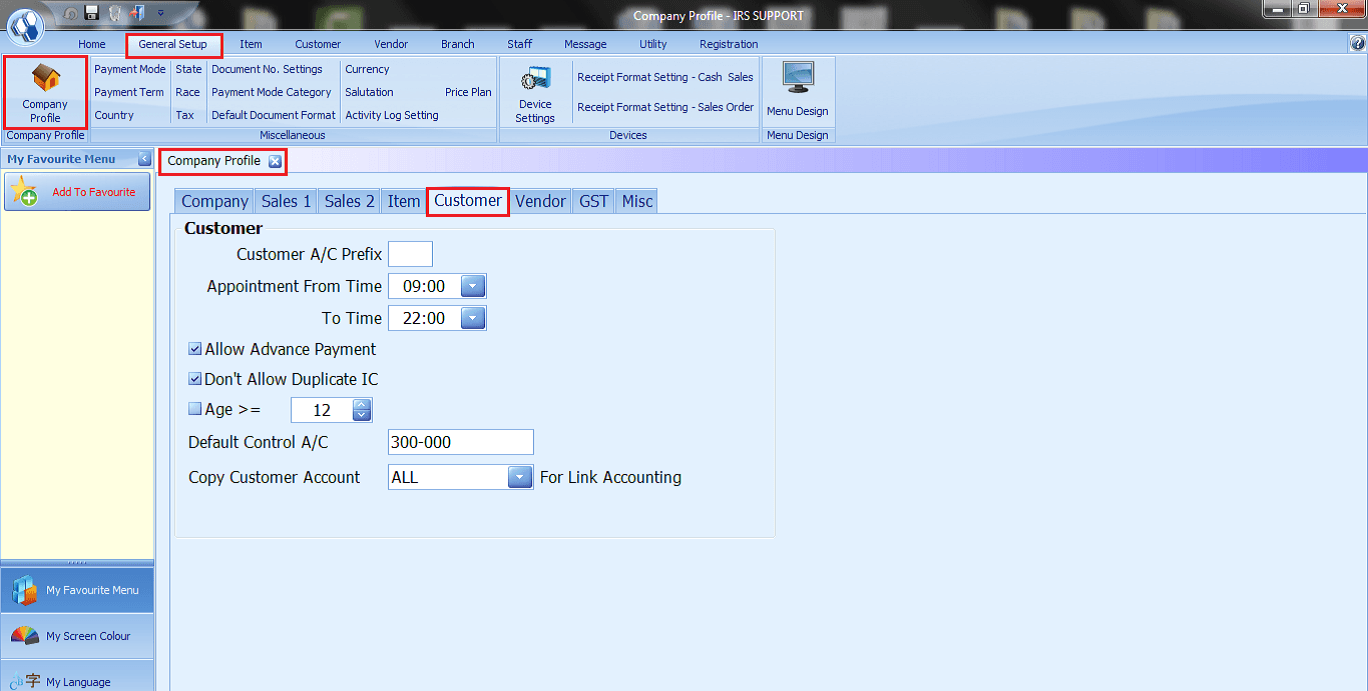
Company Profile – Customer
- Select user preference function for Customer.
- Tick or choice whichever you needed to act for your business use.
- Age > = you may tick and enter to Allow Age.

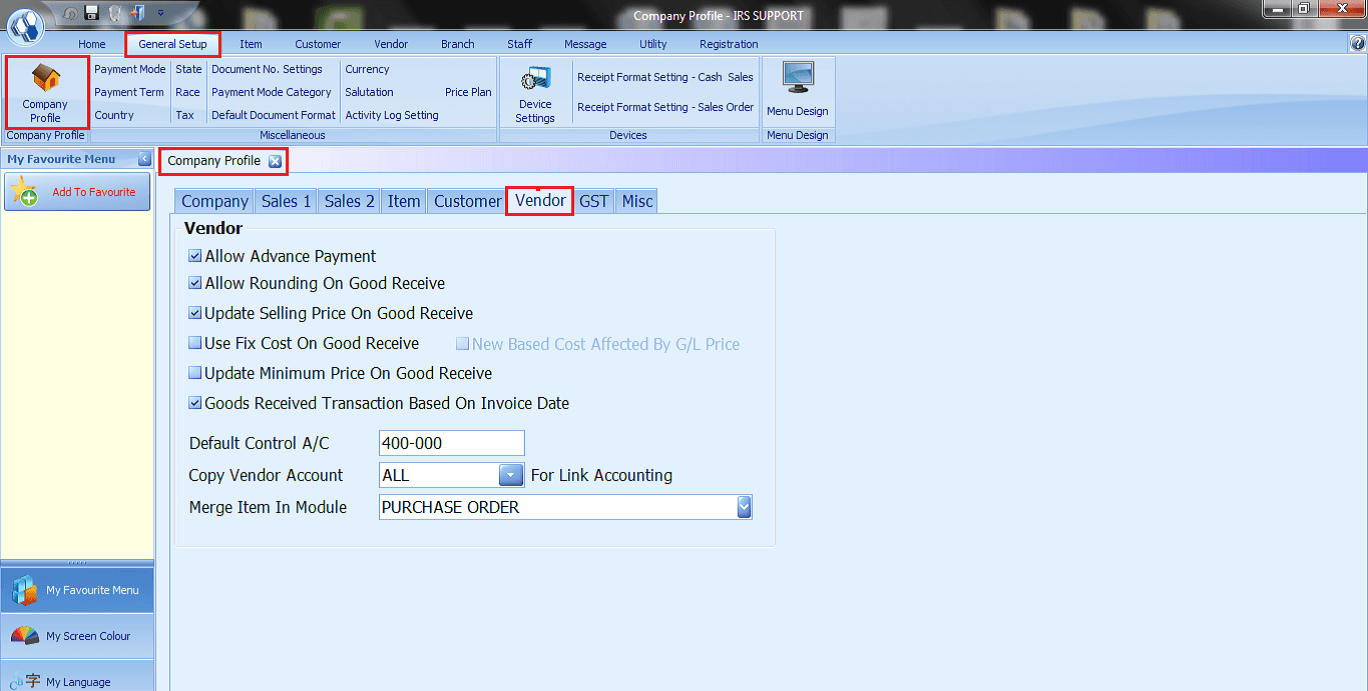
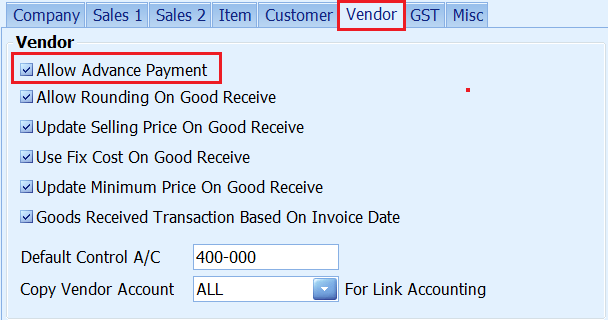
Company Profile – Vendor
- Select user preference function for Vendor.
- Tick or choice whichever you needed to act for your business use.
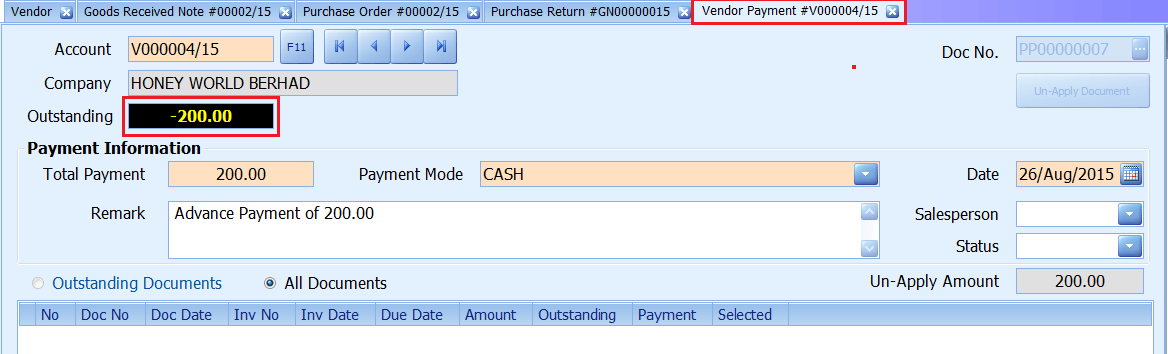
Company Profile – Vendor – Allow Advance Payment
Step 1
Step 2
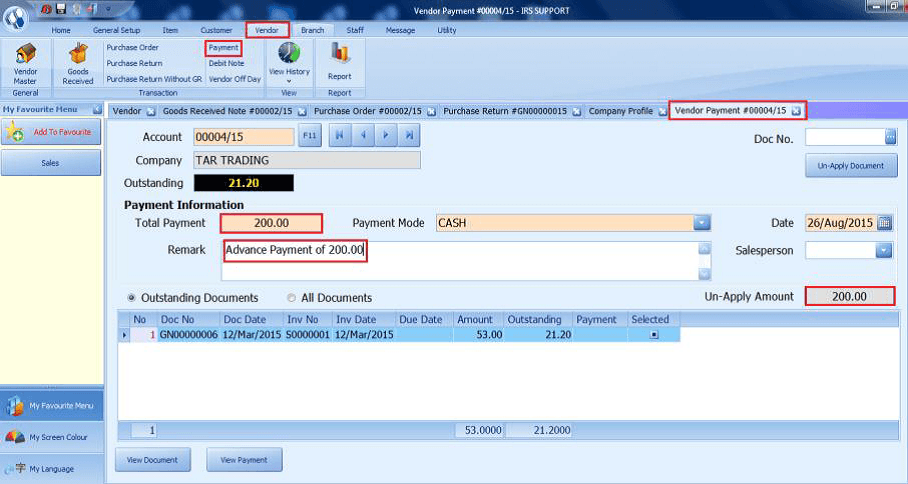
Step 3
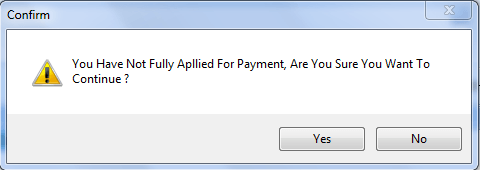
Step 4
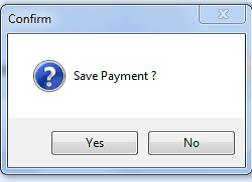
Step 5
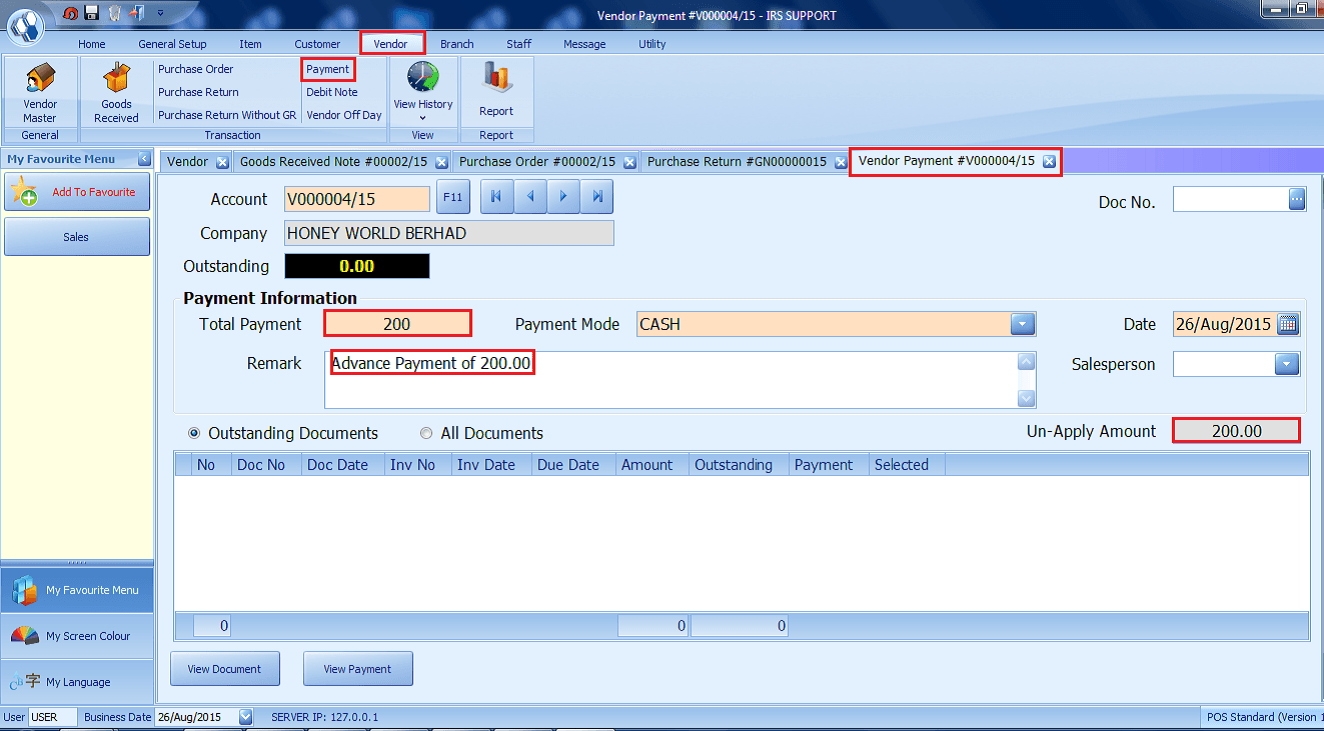
Step 6
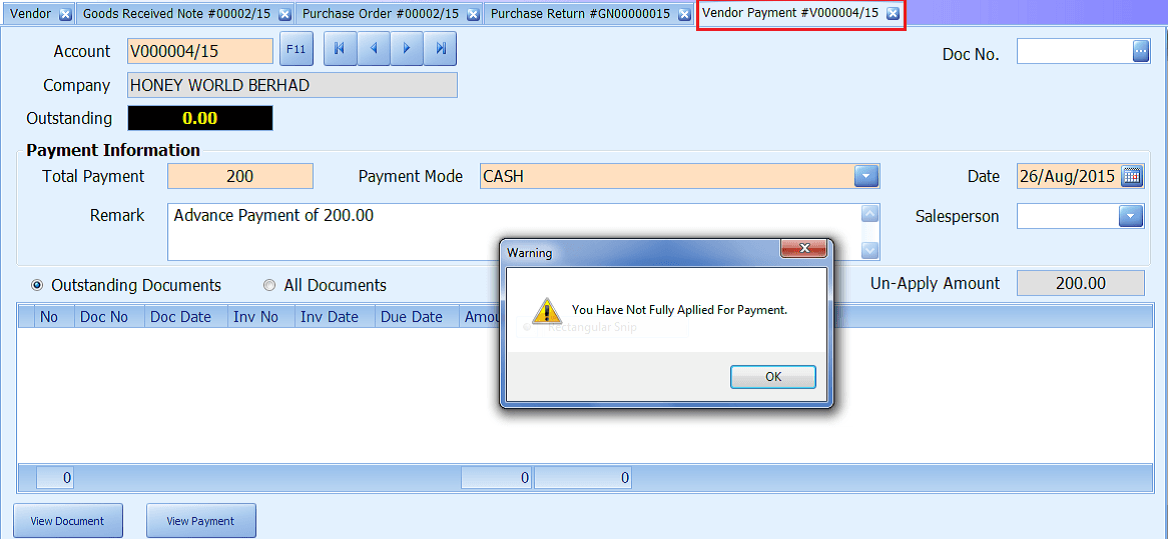
Step 7
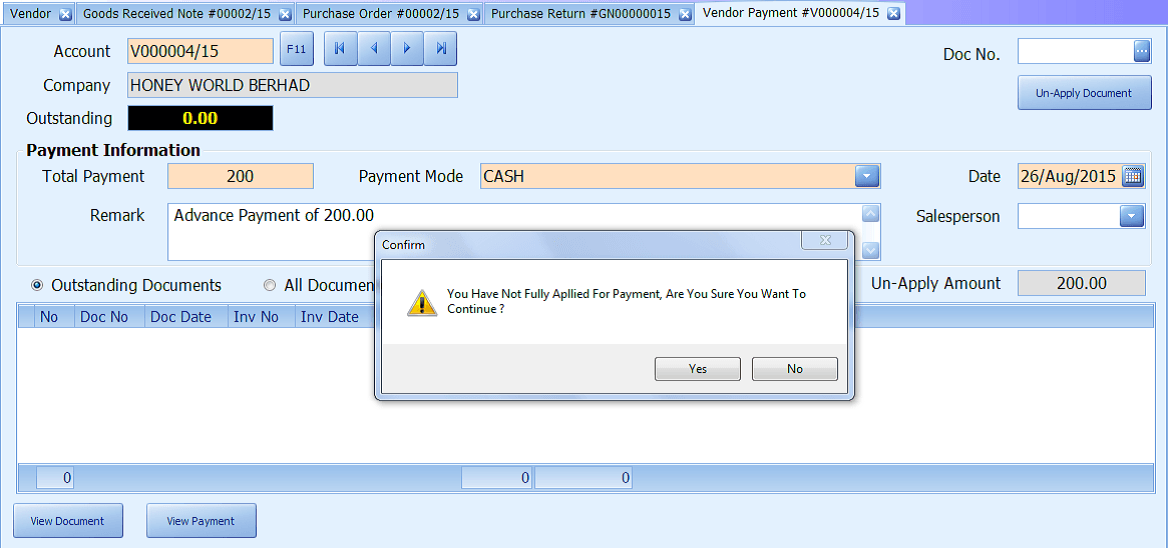
Step 8
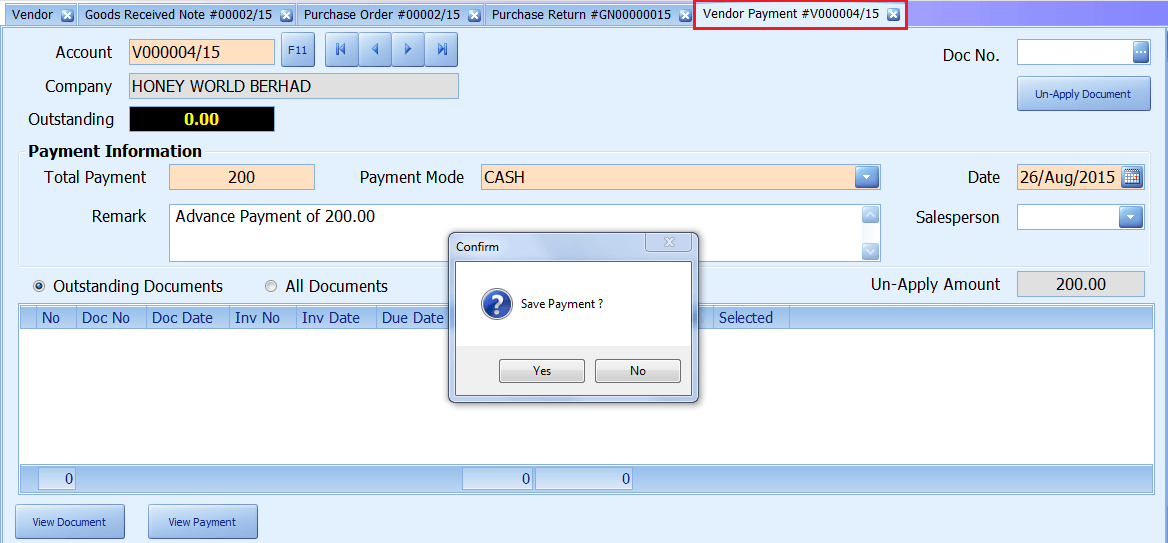
Step 9
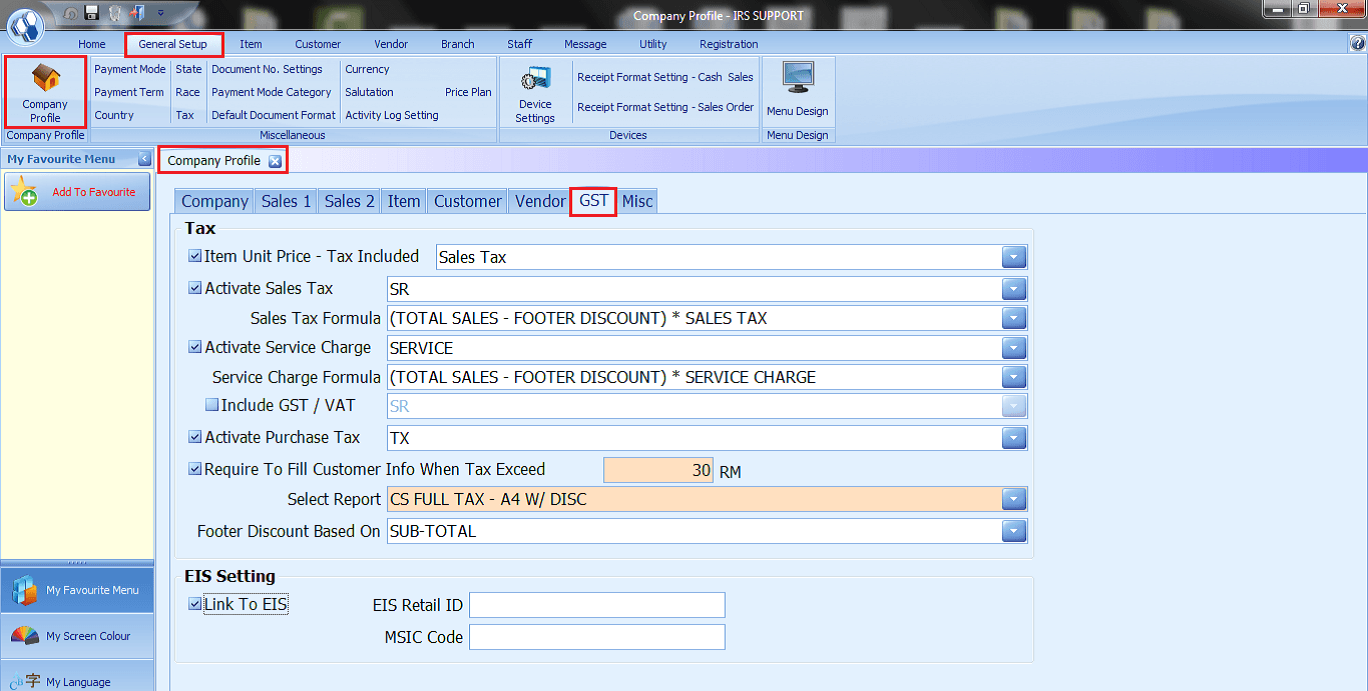
Company Profile – GST
- Fill-in all the related fields about GST.
- Tick or choice whichever you needed to act for your business use.
Company Profile – MISC
- Fill-in all the related fields in order to activate the features.
- Tick or choice whichever you needed to act for your business use.

Share Link: https://www.irs-software.com/faqwd/general-setup/
- 3. UtilityMore
Utility – Recalculate Closing Stock
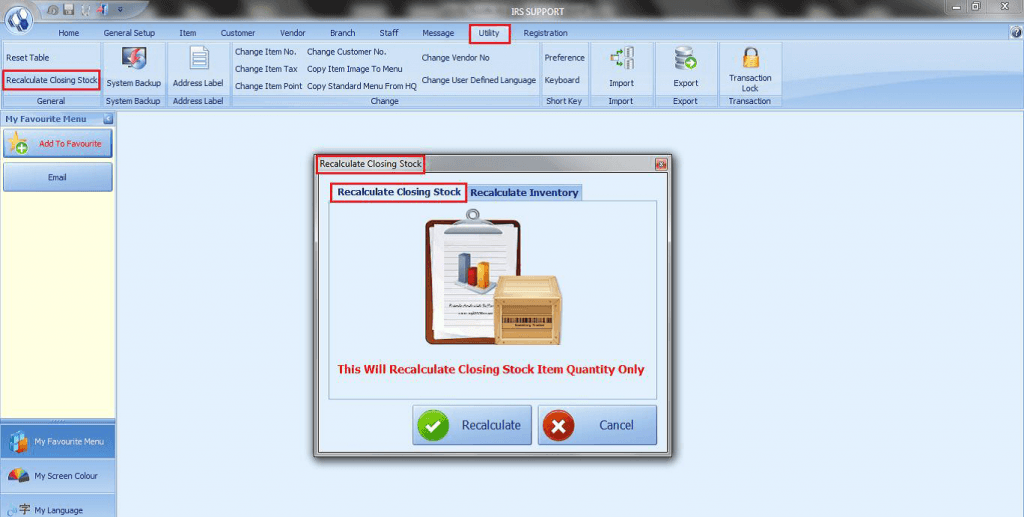
Recalculate Closing Stock
- This will recalculate closing stock item quantity only.
Recalculate
- Click Recalculate to recalculate closing stock item quantity.
Cancel
- Click Cancel to cancel the process.
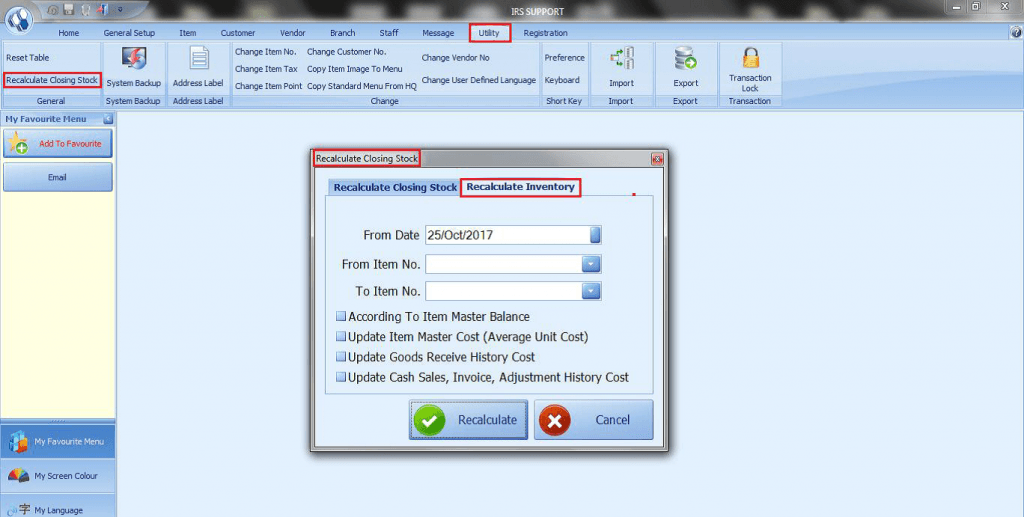
Recalculate Item Average Unit Cost
From Date
- Select the From Date from the drop-down calendar.
From Item No.
- Select the From Item No.
To Item No.
- Select the To Item No.
Users have the choices to select the below options when recalculating the Item Average Unit Cost
- According to Item Master Balance.
- Update Item Master Cost.
- Update Goods Receive History Cost.
- Update Cash Sales & Invoice History Cost.
Recalculate
- Click Recalculate to recalculate the inventory.
Cancel
- Click Cancel to undo the process.
Utility – System Backup
- This option allows the user to backup complete set of database & system file.
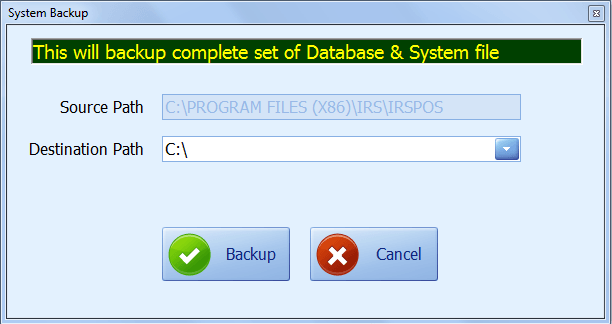
Source Path
- The source path specifies the directories the IRS source files are located.
Destination Path
- The destination path is where the backup file will be copied to.
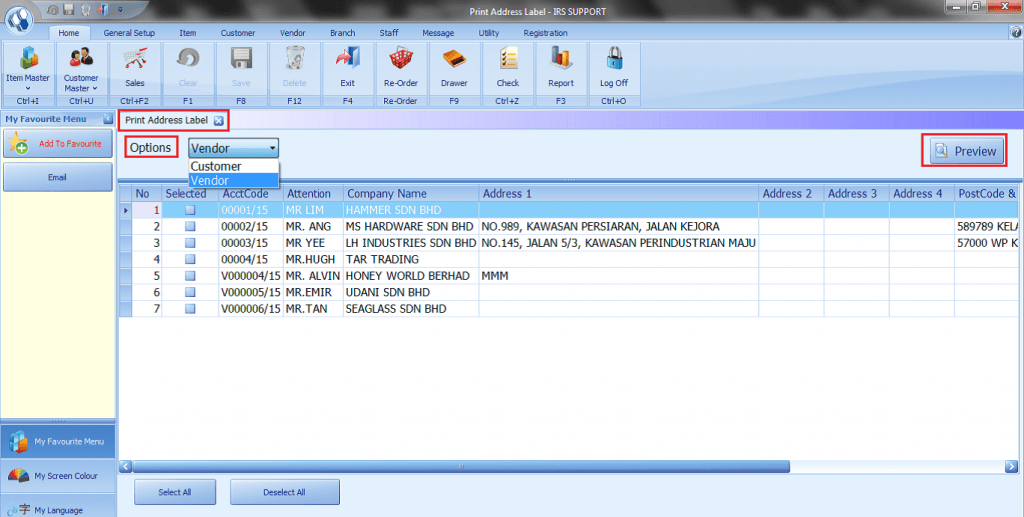
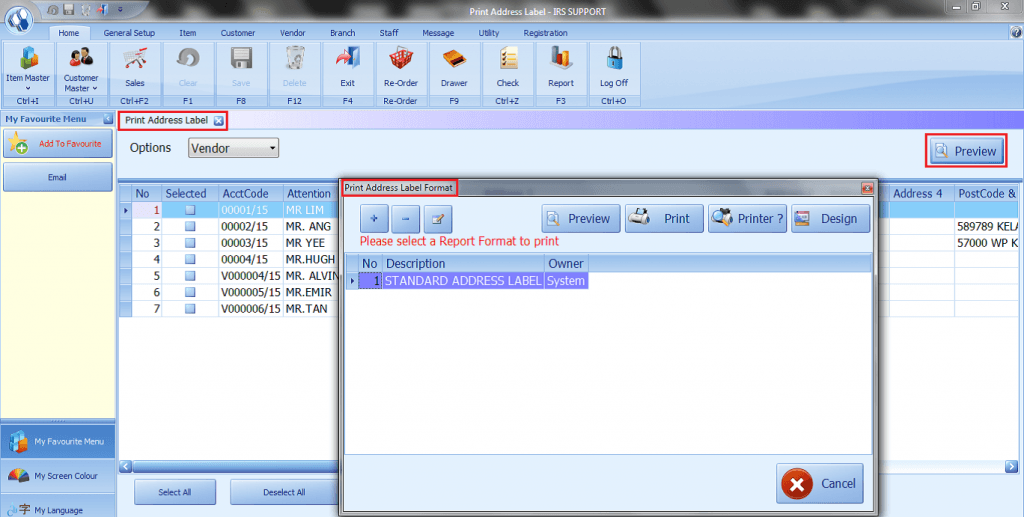
Utility – Print Address Label
- This option allows the user to print customer & vendor address label.
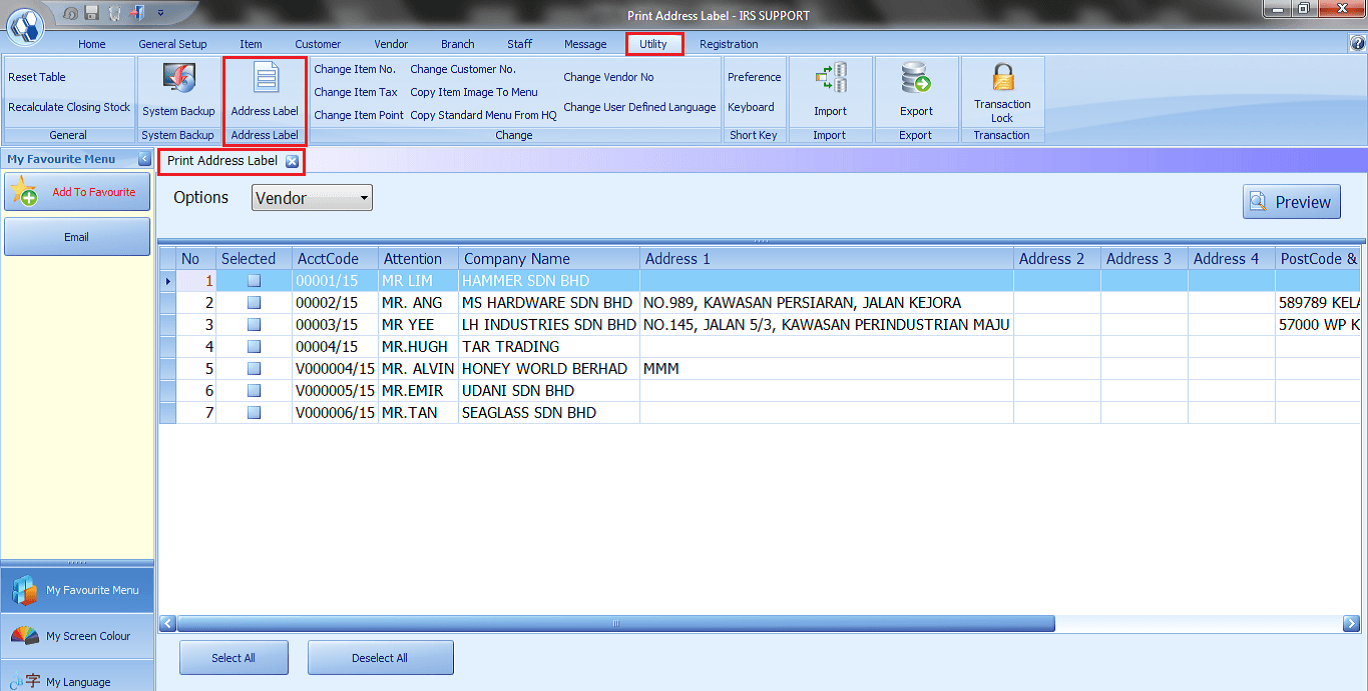
Select All
- Allows the user to select all Account Code.
Deselect All
- Allows the user to deselect all Account Code.
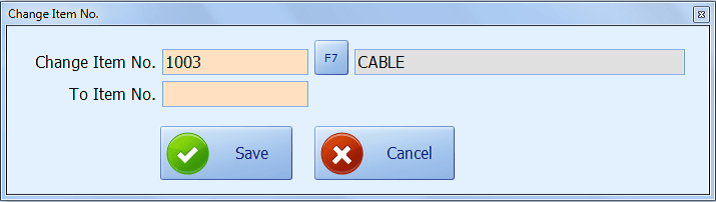
Utility – Change Item No
- This option allows the user to Change Item No.
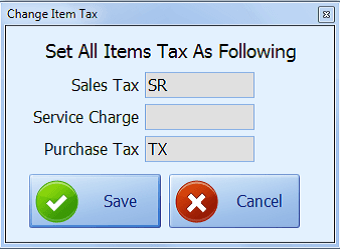
Utility – Change item Tax
- This option allows the user to change Item Tax to a new income tax.
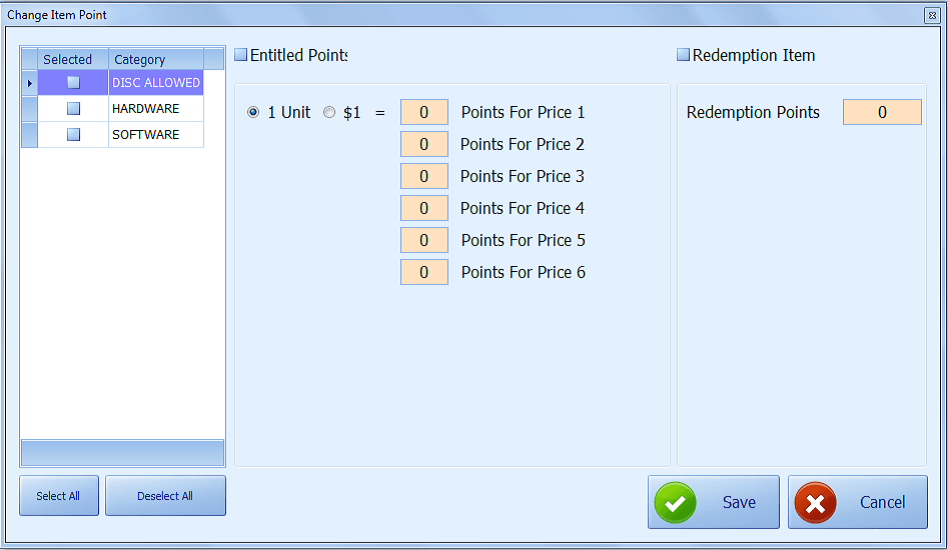
Utility – Change Item Point
- This option allows the user to Change Item Point.
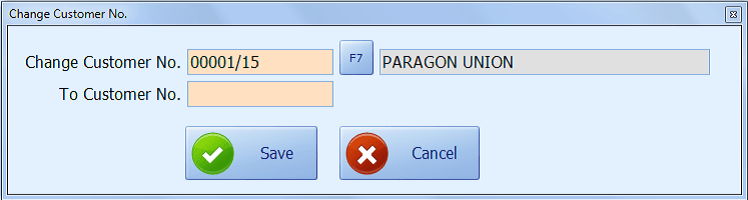
Utility – Change Customer No
- This option allows the user to change Customer No to a new customer no.
Utility – Change Vendor No
- Allow changing Vendor No to a new vendor no.

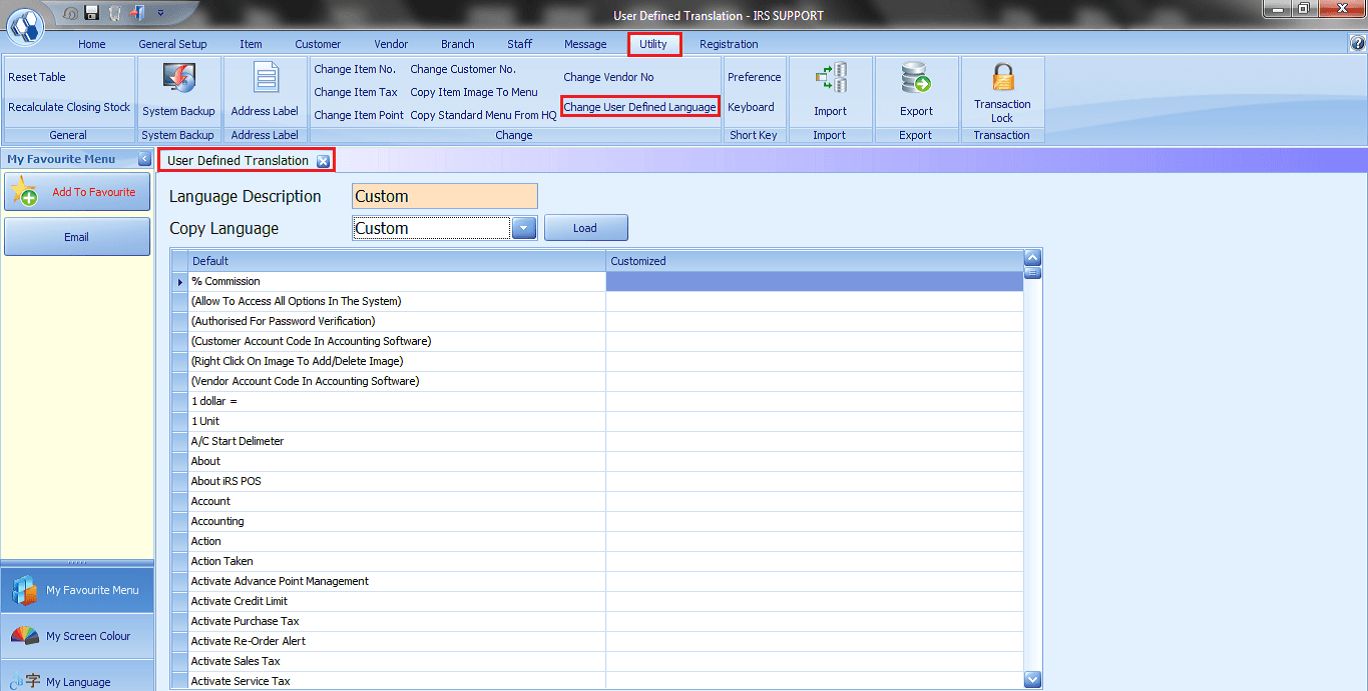
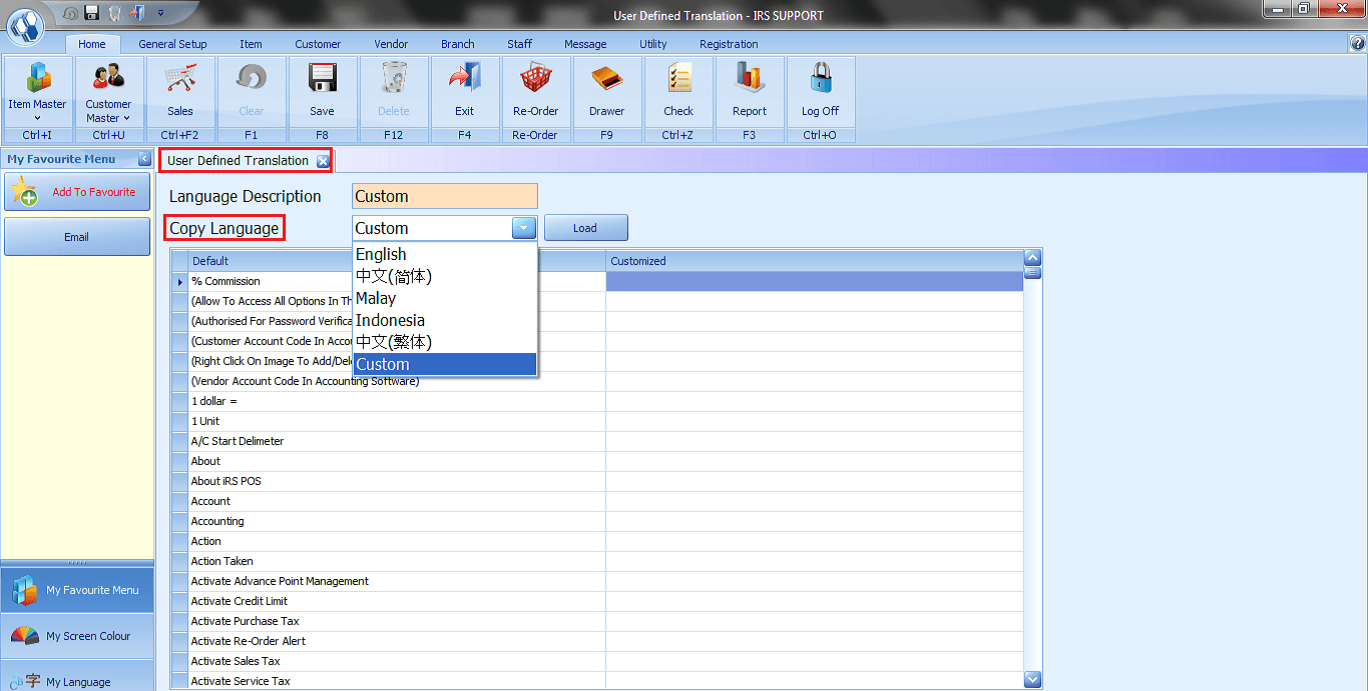
Utility – Change User Defined Language
- Allow to Change User Defined Language to a new language.
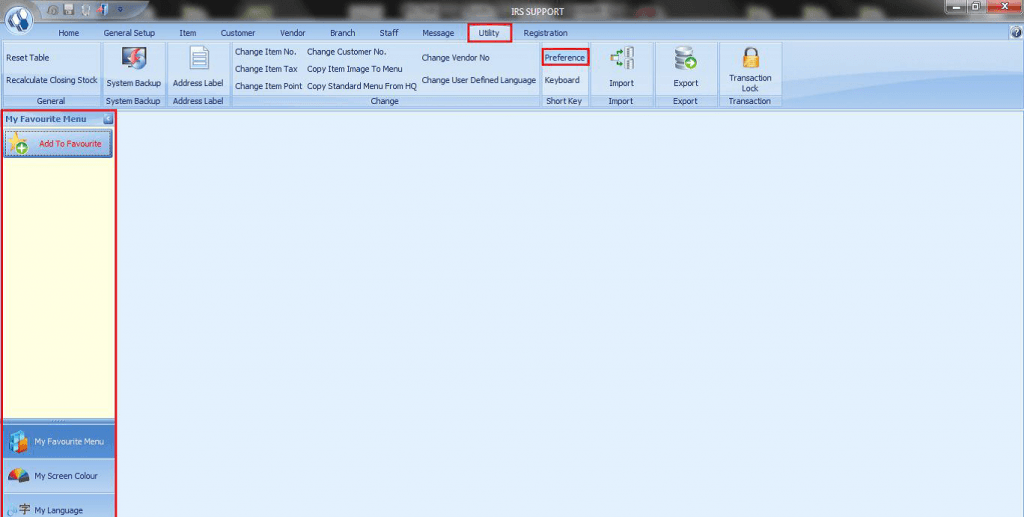
Utility – Preference
- The Preference feature allows the user to hide or show the menus at the left side grid of the Main Screen.
Utility – Keyboard
- This is a shortcut key to open the virtual keyboard.
- This feature only works on Windows 32 bit.
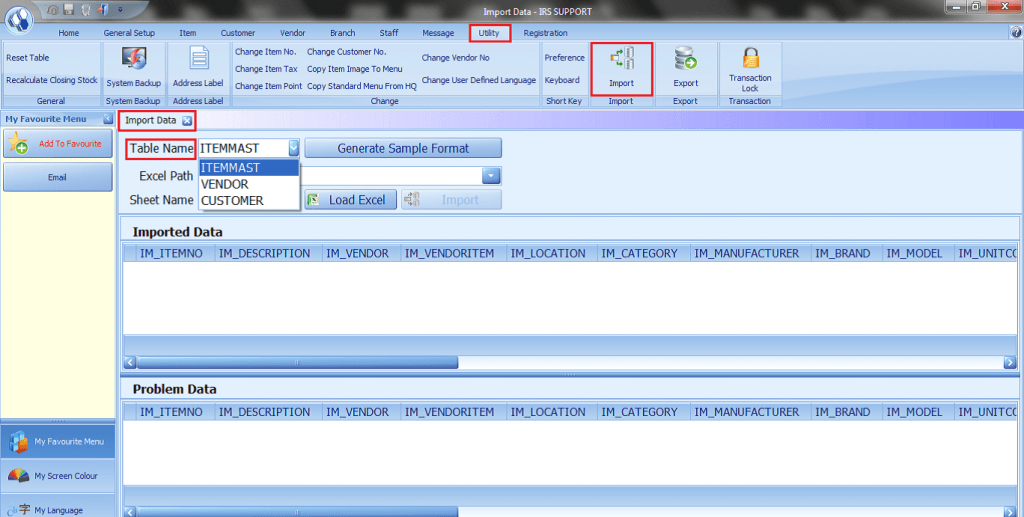
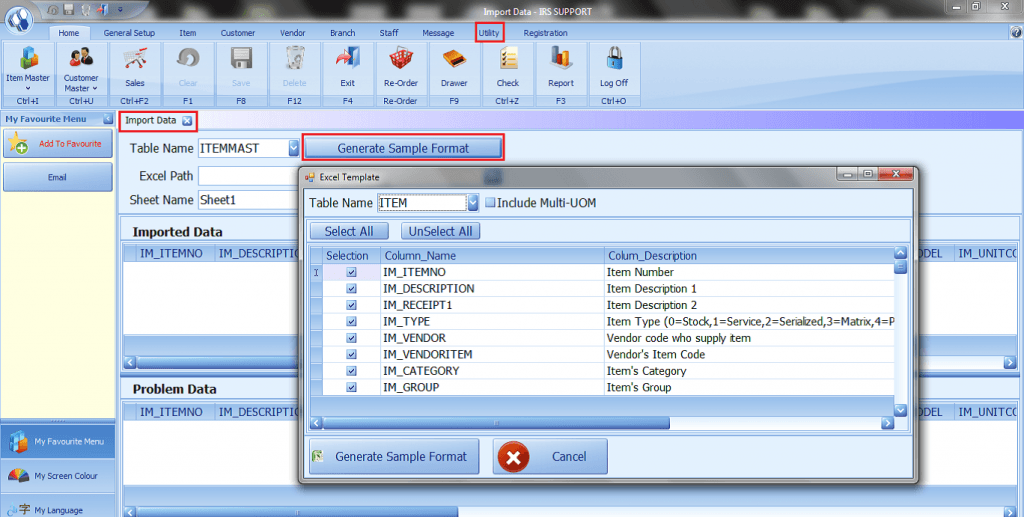
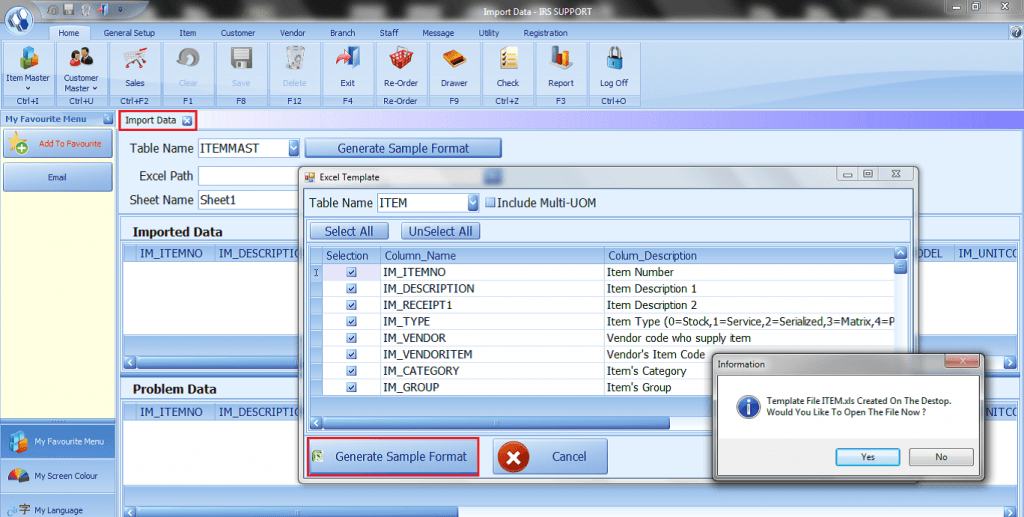
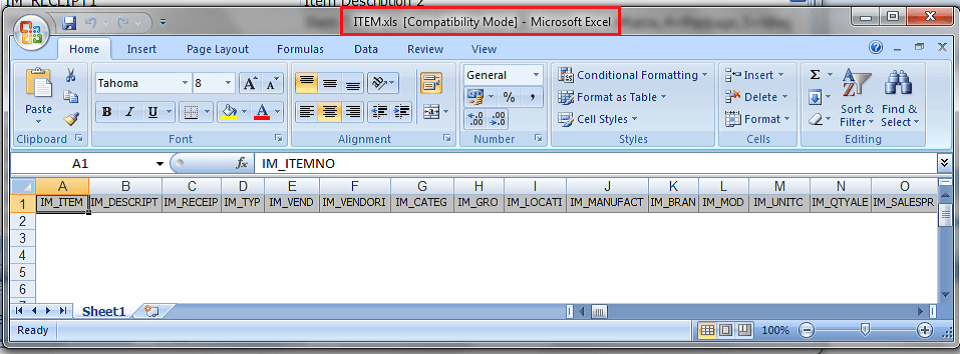
Utility – Import
- Allow to Import Data from Excel.
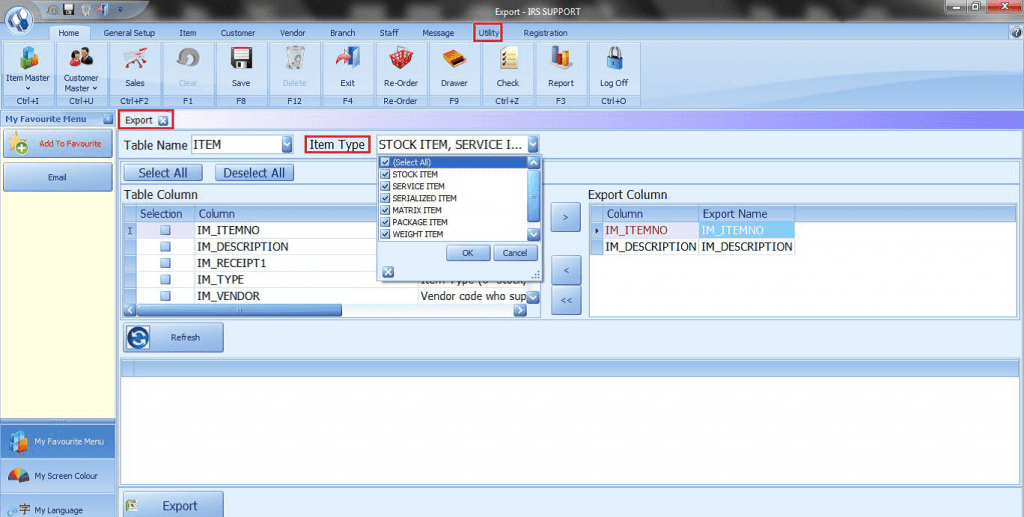
Utility – Export
- Allow to Export Data.


Utility – Transaction Lock
- Transaction lock forbids entering or editing transactions for the selected modules as of date is considered to take effect.
- This feature also blocks front end change or edit of the transaction to minimize the input error.
- This feature very useful for GST Filing.
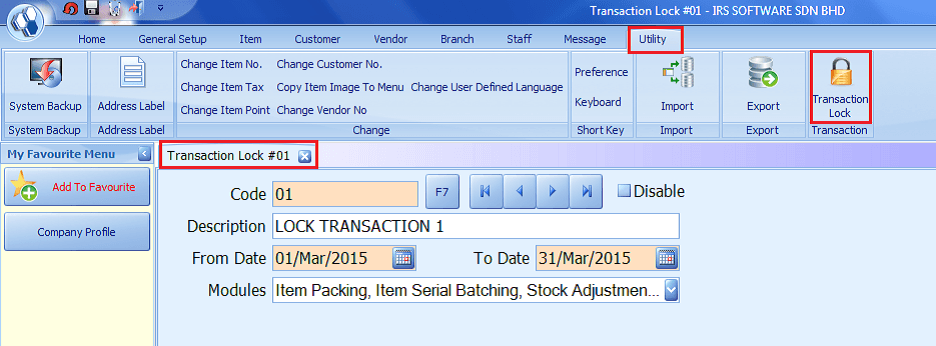
Instructions
- 1. Go to Utility > Transaction Lock.
- 2. Fill in Code (01).
- 3. Fill in Description (GST Submission).
- 4. Set the transaction lock period, From Date – To Date.
- 5. Press Save.
Note: You're allowed to tick Disable to unlock transaction (not recommended), Recall the previous code for GST submission to edit the transaction lock period instead of creates a new data.
Share Link: https://www.irs-software.com/faqwd/utility/
- 4. Staff CategoryMore
Staff – Category
- This section allows the user to categorize the staff in different of position level.
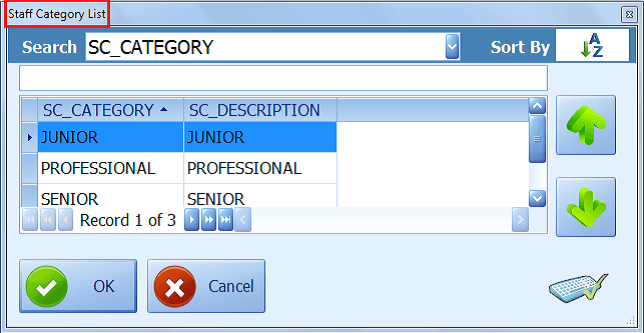
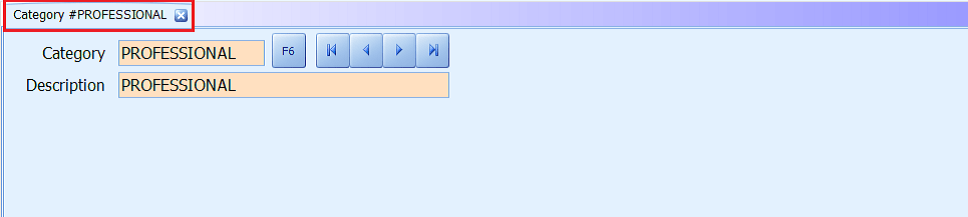
Share Link: https://www.irs-software.com/faqwd/staff-category/
- 5. Staff FeaturesMore
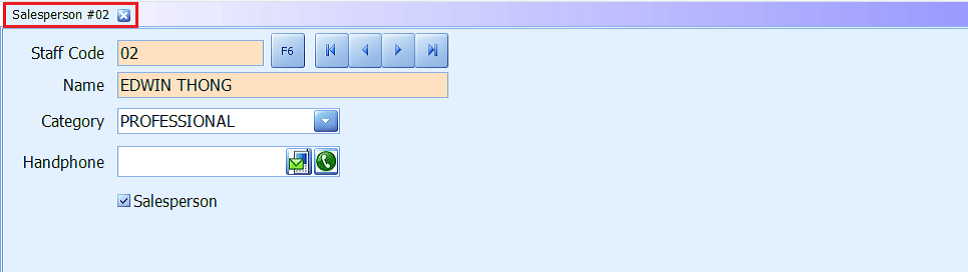
Staff - Sales Person
- This section allows the user to record Salespeople and Staff information.
- The user will need to tick the Salesperson checkbox if the person is a salesperson, otherwise, the person is considered as a staff.
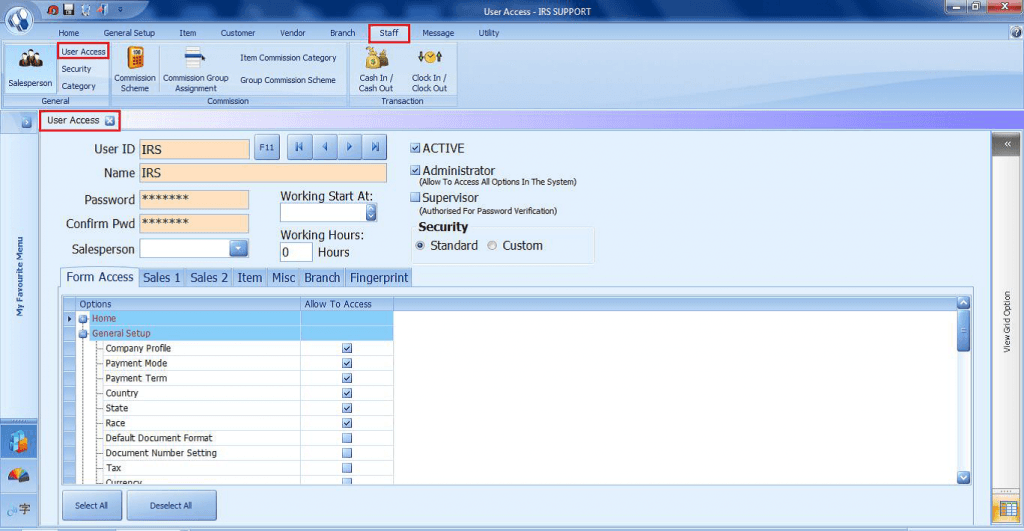
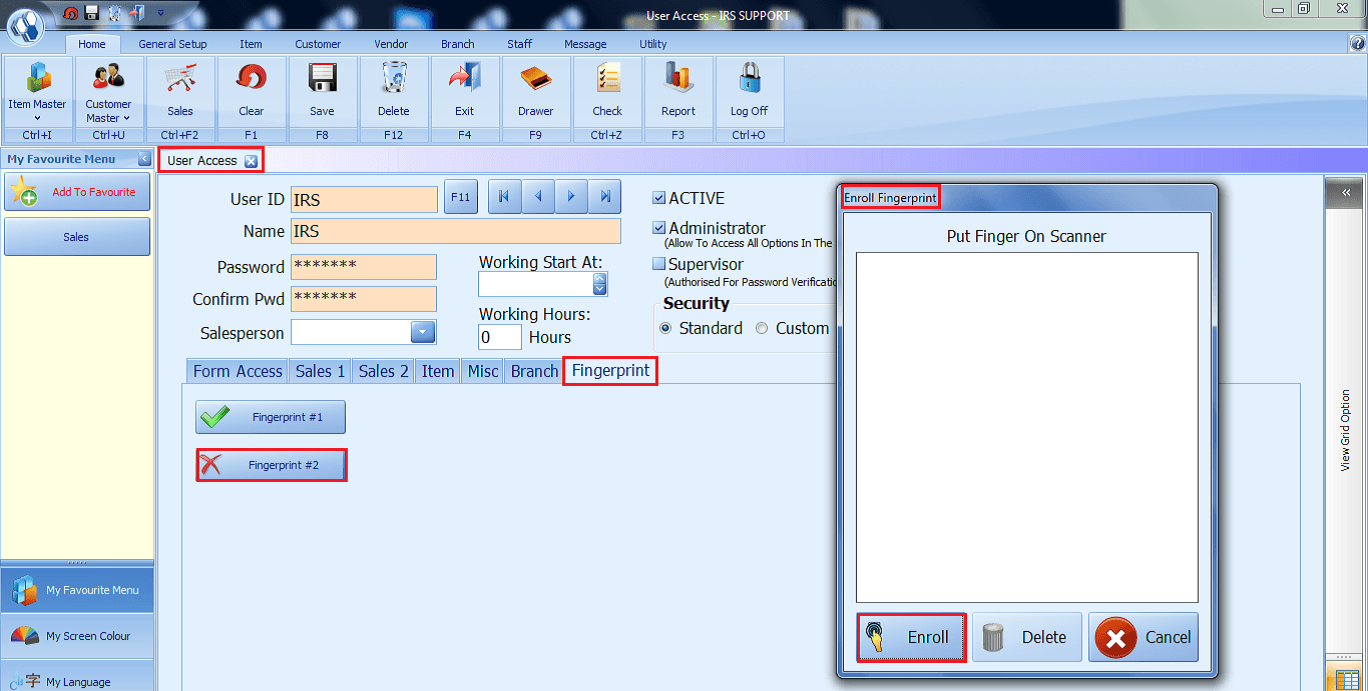
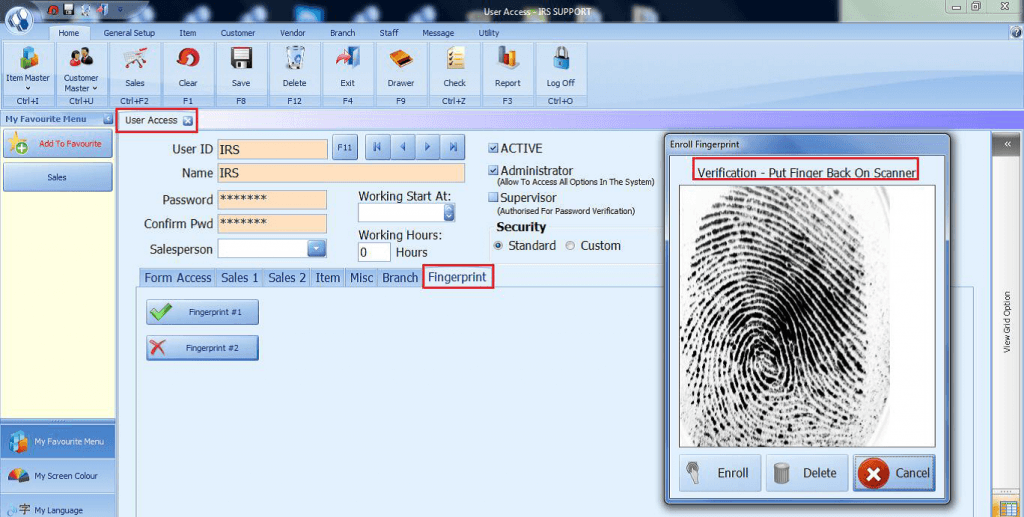
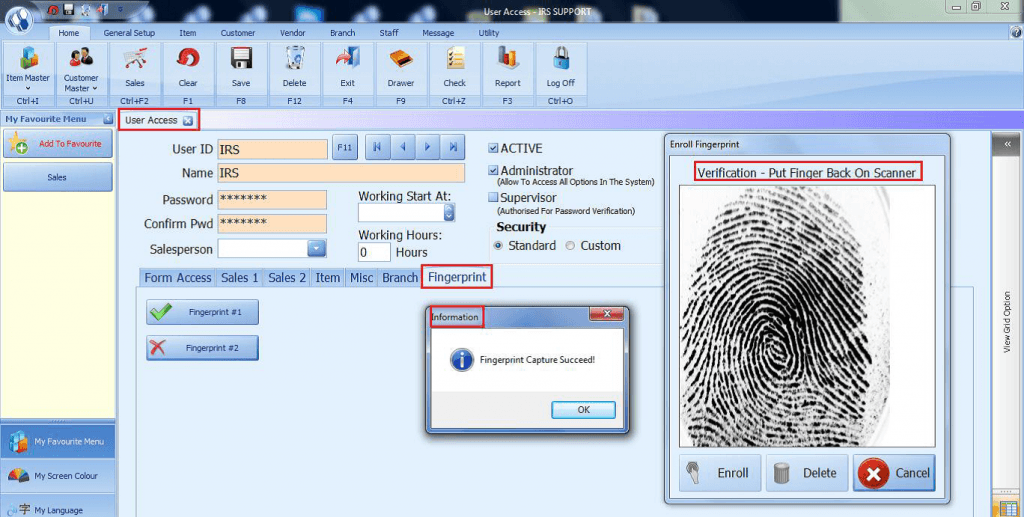
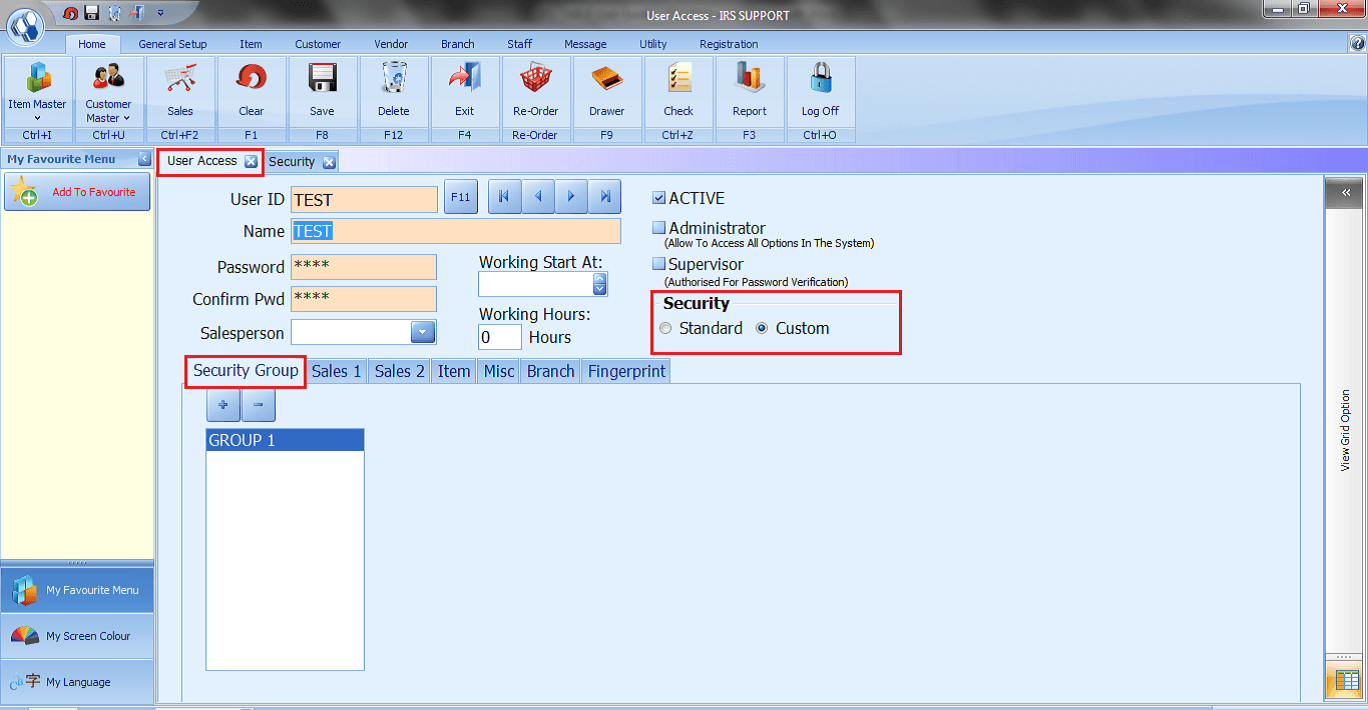
Staff – User Access
- This User Access feature allows the user to maintain and control user settings, access level and permission for each function of the application.
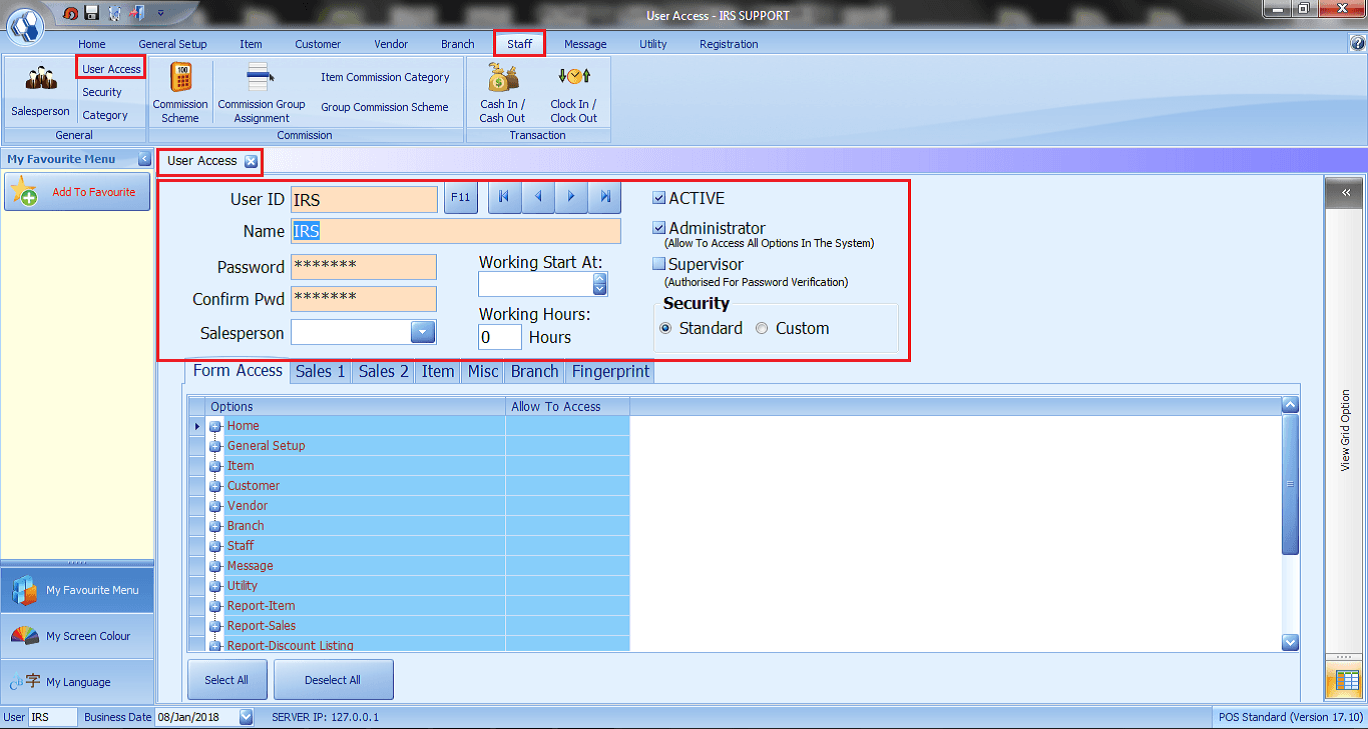
- Staff > User Access > Form Access
- This section allows Administrator to set the permission for the particular user to access each function on the application.
- This feature allows determining which users can perform certain tasks within the application.
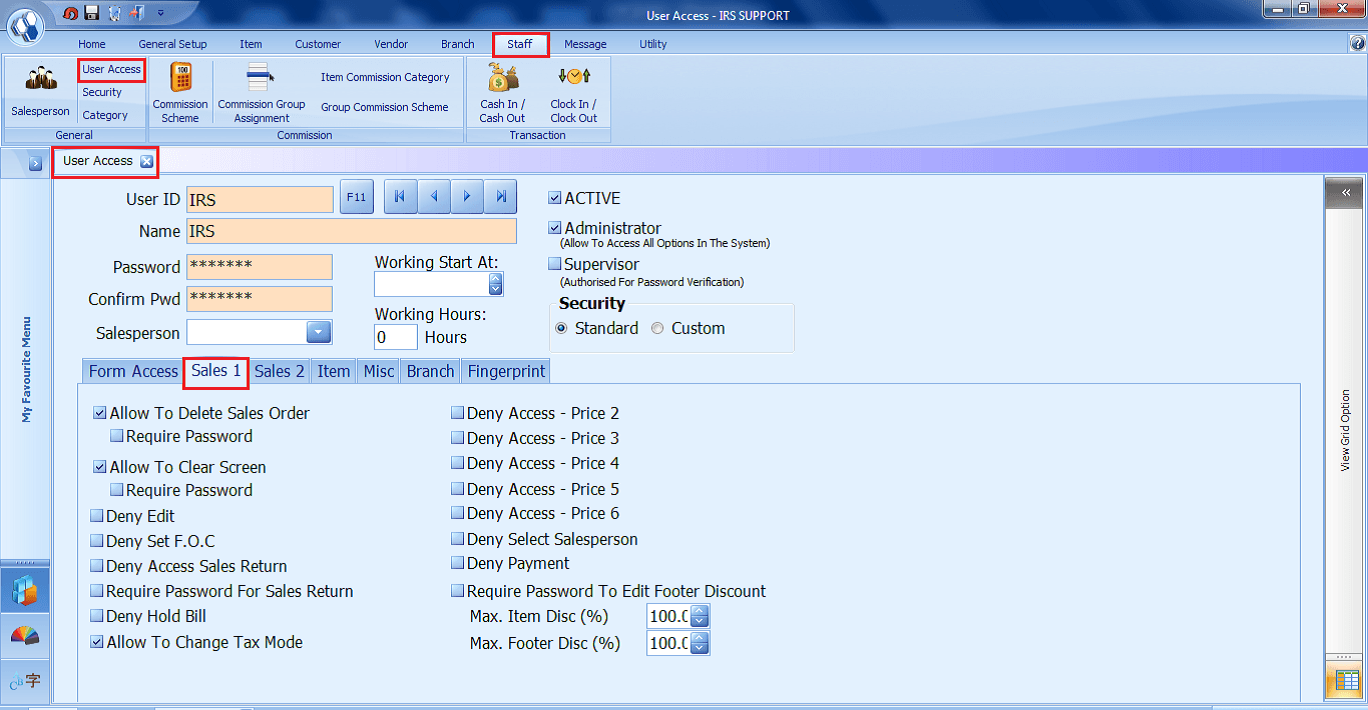
- Staff > User Access > Sales 1
- This page controls current user access rights by assigning edit or delete rights or no access rights for the defined functions of the sales.
- Pick whichever you want to active the features for your staffs.
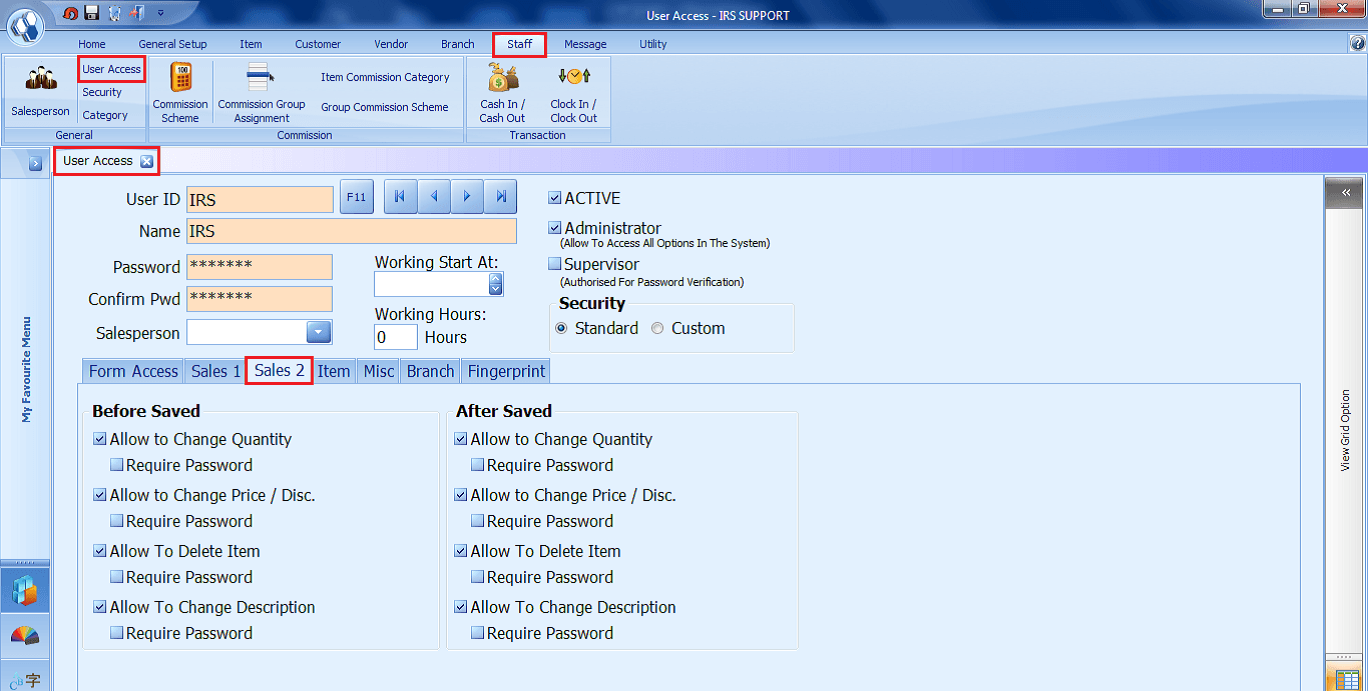
- Staff > User Access > Sales 2
- This section gives permission to users to perform certain tasks within the sales function before and after saving the sales transactions.
- Performing of the tasks can be controlled by setting passwords if it is required.
- Tick if you allow the user to change the specific description, price, discount, quantity and more.
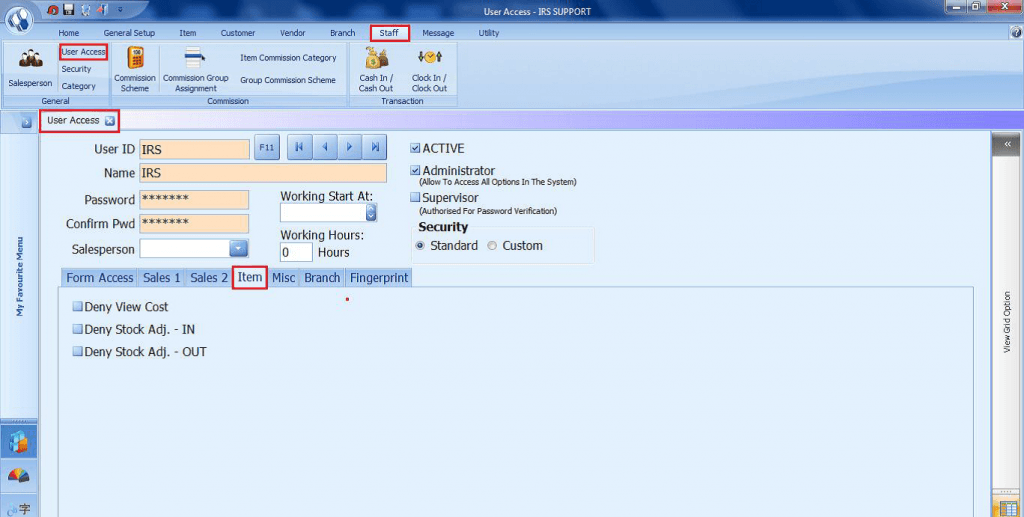
- Staff > User Access > Item
- This section sets the access level for the item function.
- Tick if you disallow user to view cost or perform the stock.
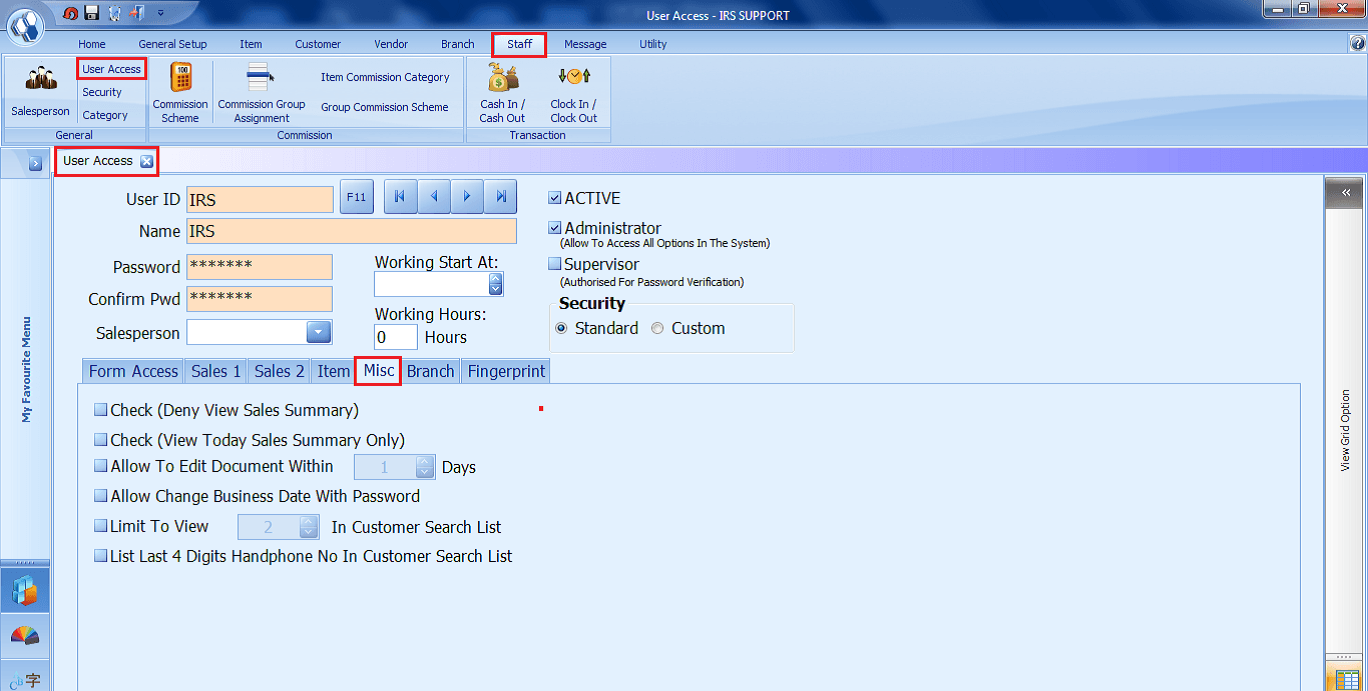
- Staff > User Access > Misc
- Tick whichever you allow the user to change, edit or view.
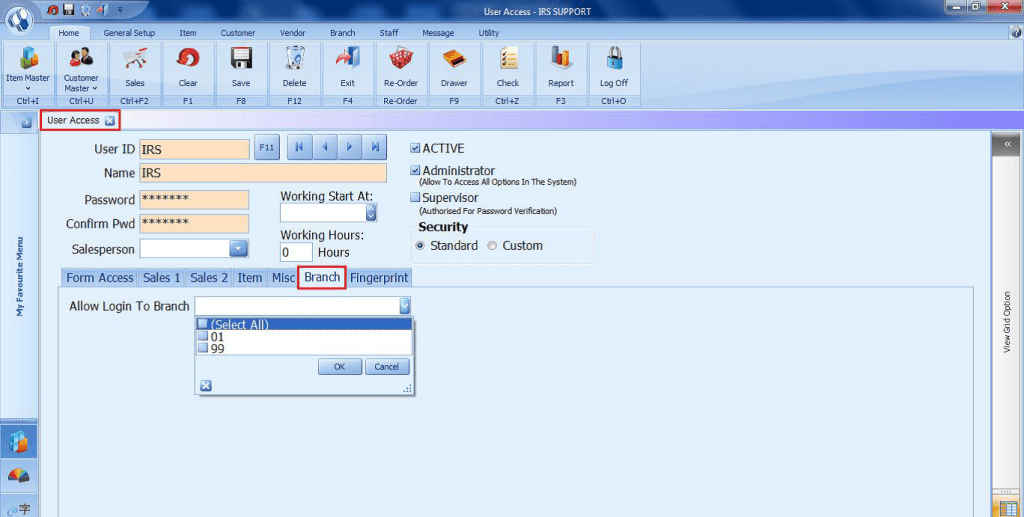
- Staff > User Access > Branch
- This section is to set if the user is allowed to log in to a particular branch.
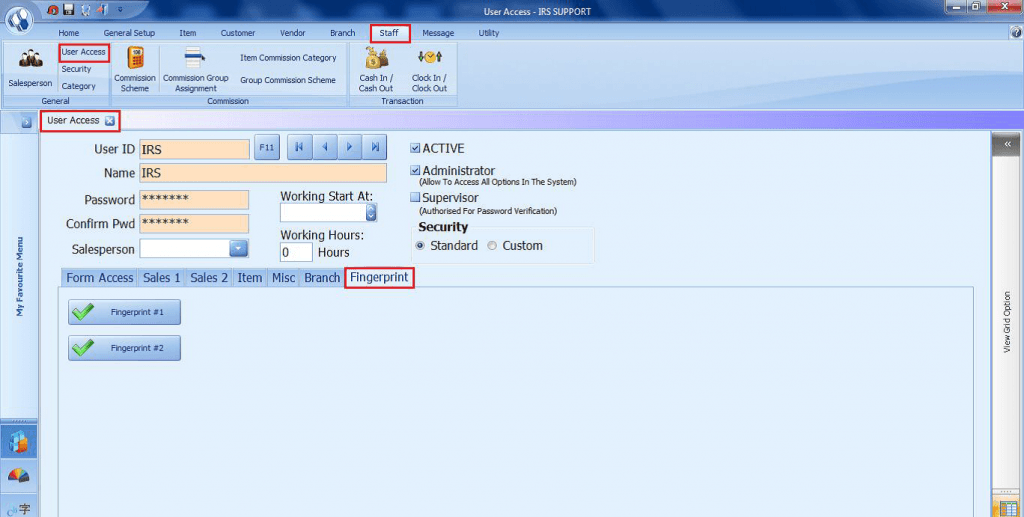
- Staff > User Access > Fingerprint
- This section allows the user to access the Fingerprint device.
Share Link: https://www.irs-software.com/faqwd/staff-features/
- 6. Commission SchemeMore
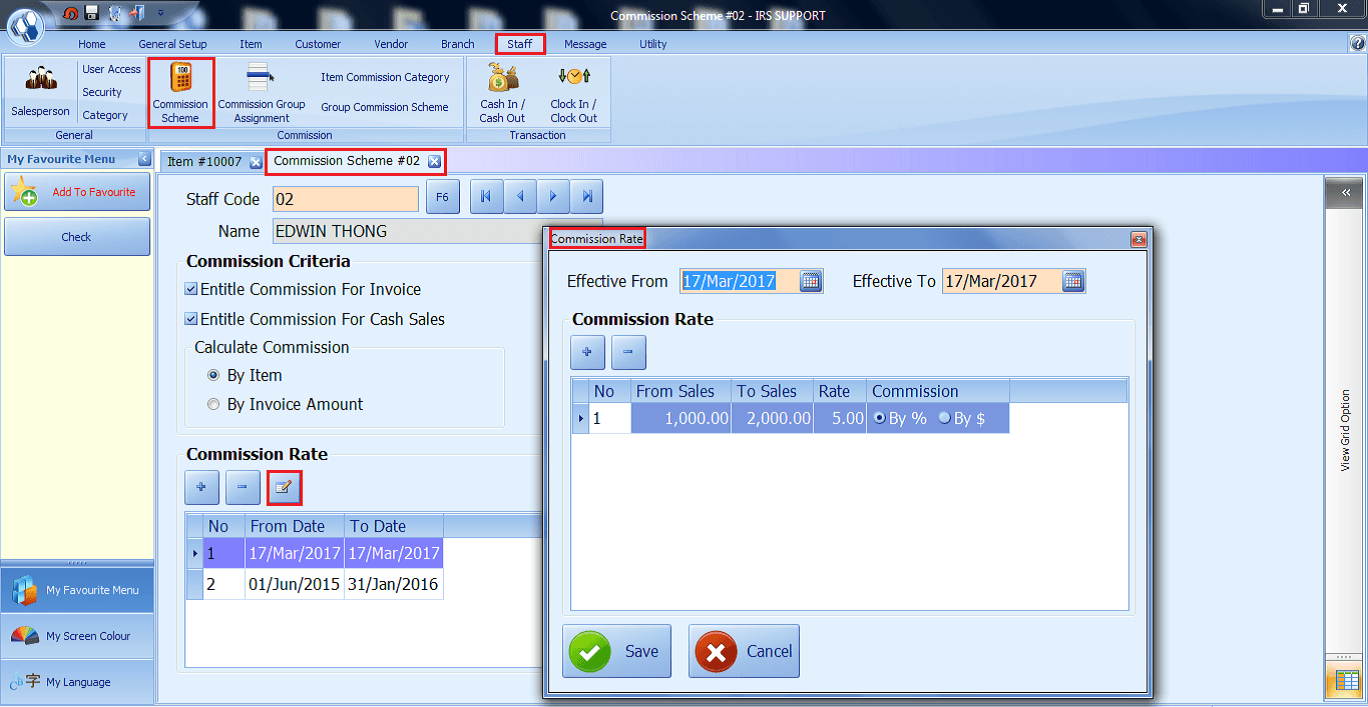
Staff - Commission Scheme
- 1. A commission is a fee that a business pays to a salesperson in exchange for his or her services in either facilitating, supervising, or completing a sale.
- 2. There are 3 types of Commission:-
- - Standard Scheme allows managing commission for salesperson and business employee. The commission is available for Cash Sales and Invoices. The commission is calculated based on either Item price or Invoice Amount with the rate being based either on Total Sales or Total Sales with Minimum Target.
- - Sharing (Fixed) Rate commission provides two options that are Percentage and Amount for the user to select and enter the value
- - FreeHand allows the user to key in the commission value manually. This is normally used for Treatment service.
- 3. Using commission scheme, you can specify the rates and criteria that the system uses to calculate commission amounts on different sales amount range within a selected date range. You can set up commission information to confirm the needs of an organization.
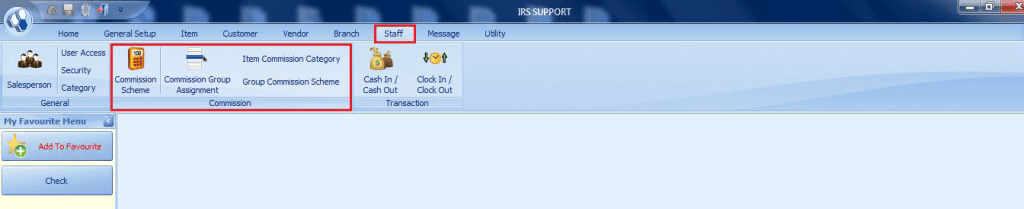
- 4. Commission Scheme screen is used to define commission rates to be assigned to a salesperson
- 5. The module gives the user the ability to calculate commission on the Invoice and Cash sales by Invoice Item or Invoice Amount.
- 6. Further, the user has the option to select the commission rate based on Total Sales or Total Sales – Min Target
- 7. Commission rates may vary by salesperson or sales amount within a selected date range.
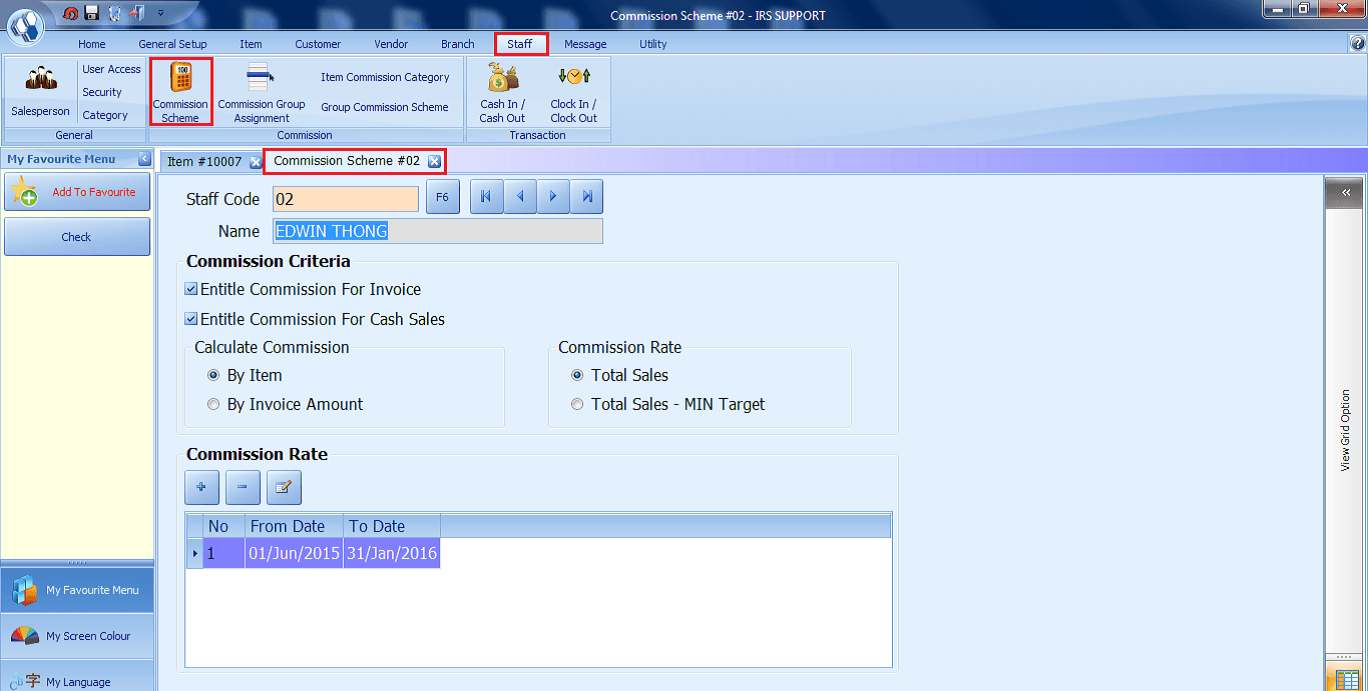
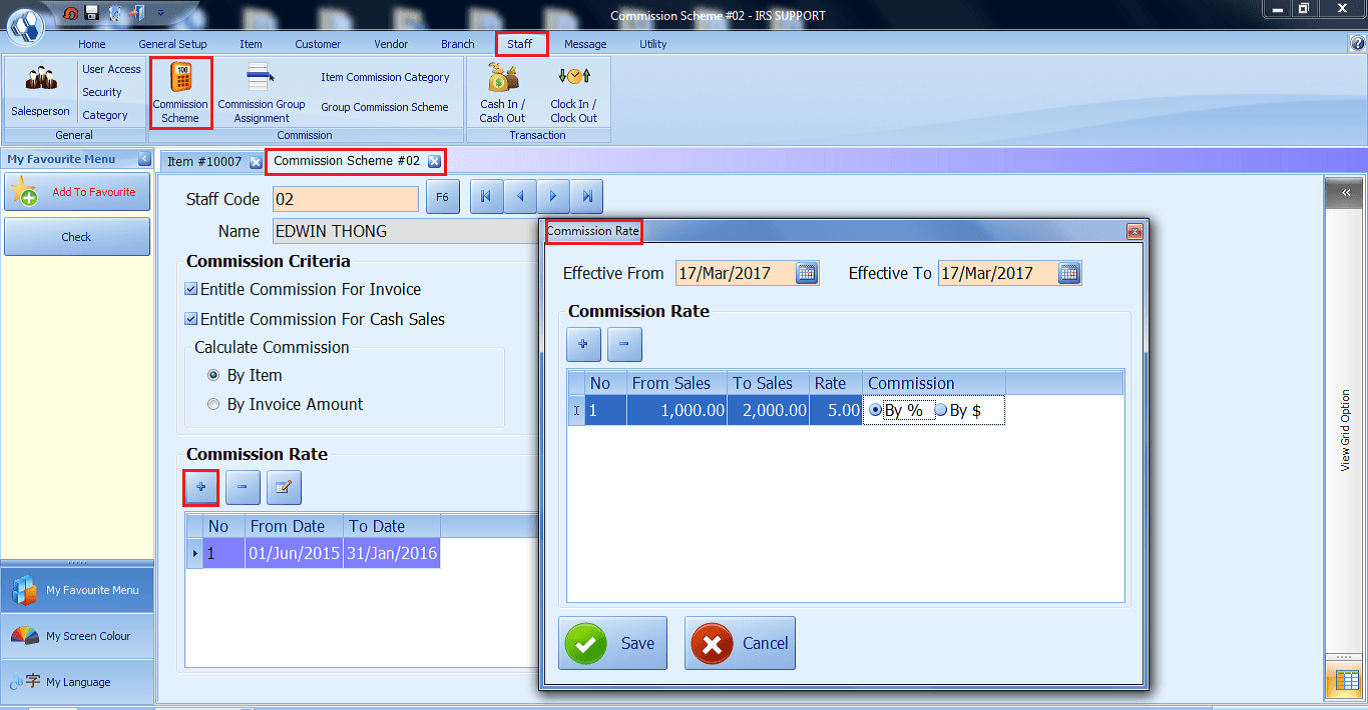
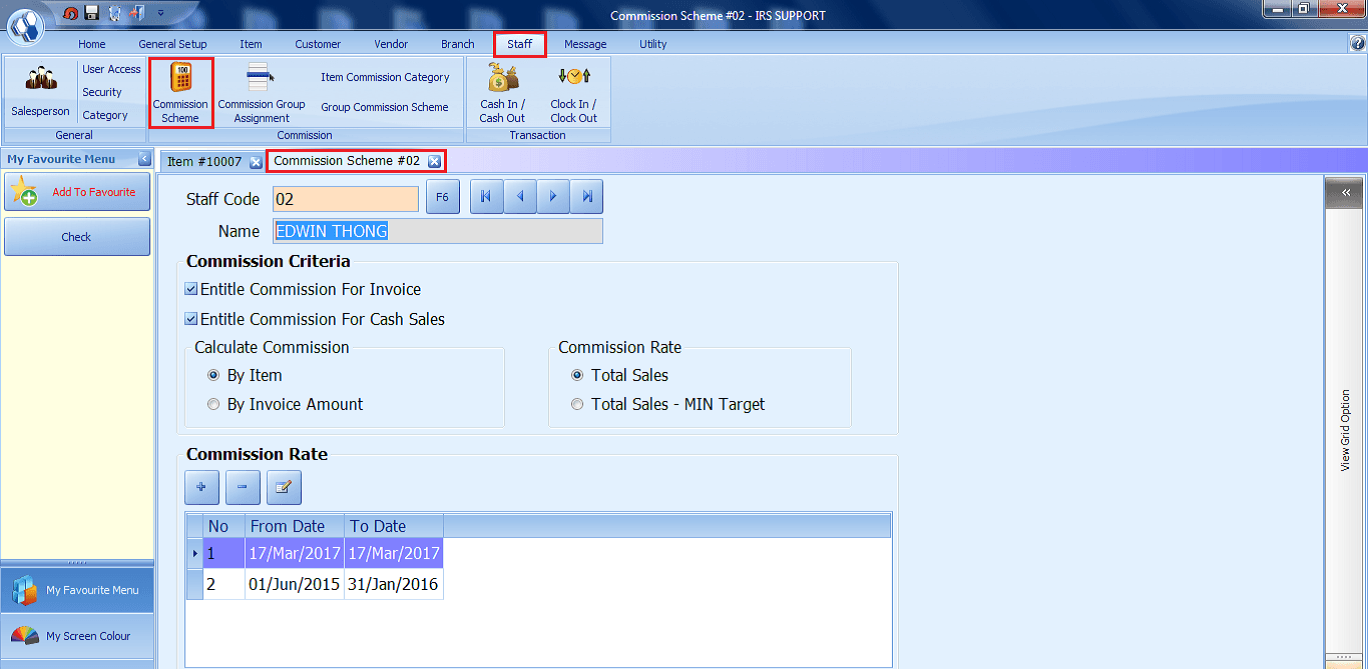
How to Add Commission Rate
- 1. Go to Staff > Commission Scheme > Commission Rate
- 2. Click on the “+” sign to add commission rate.
- 3. Commission Rate window pop up.
- 4. Enter the “Effective From and To Date” of the commission rates.
- 5. Click on the “+” sign to add commission rate
- 6. Enter the From Sales and To Sales, Rate and the corresponding Commission Rate percentage or amount.
- 7. Click on the Save button to update the data.
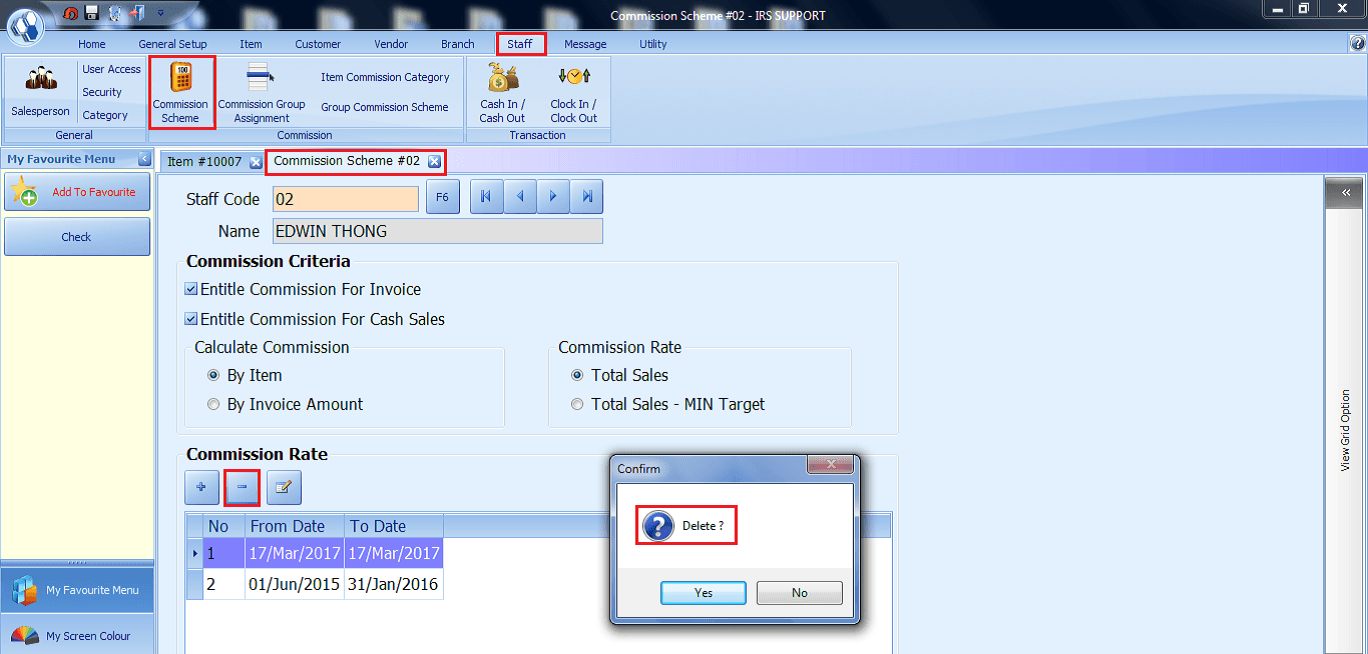
How to Delete Commission Rate
- 1. Go to Staff > Commission Scheme > Commission Rate.
- 2. Click on the “-“ sign to remove selected commission rate.
- 3. Confirm screen pop up to confirm the deletion.
- 4. Click Yes to confirm deletion or No to cancel the deletion.
How to Edit Commission Rate
- 1. Go to Staff > Commission Scheme > Commission Rate
- 2. Click on the “Edit” Sign to edit selected commission rate details.
- 3. Commission Rate window pop up.
- 4. Do the necessary changes.
- 5. Click Save to save the changes.
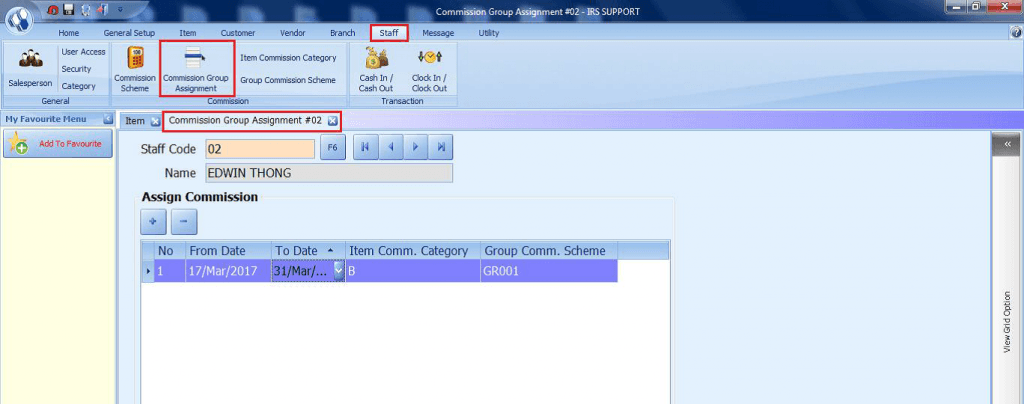
How to Assign Group Commission to a staff or salesperson - Commission Group Assignment
- 1. Go to Staff > Commission Group Assignment.
- 2. Select the salesperson.
- 3. Click on the “+” sign to add the Date Range, Item Commission Category and the Group Commission scheme field details.
- 4. Click Save on the Toolbar to update the information.
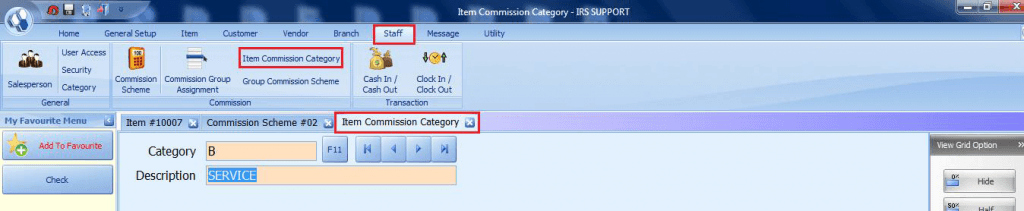
Item Commission Category
- This section allows the user to categorize the Item Commission, for example, service commission, sales commission and so on.
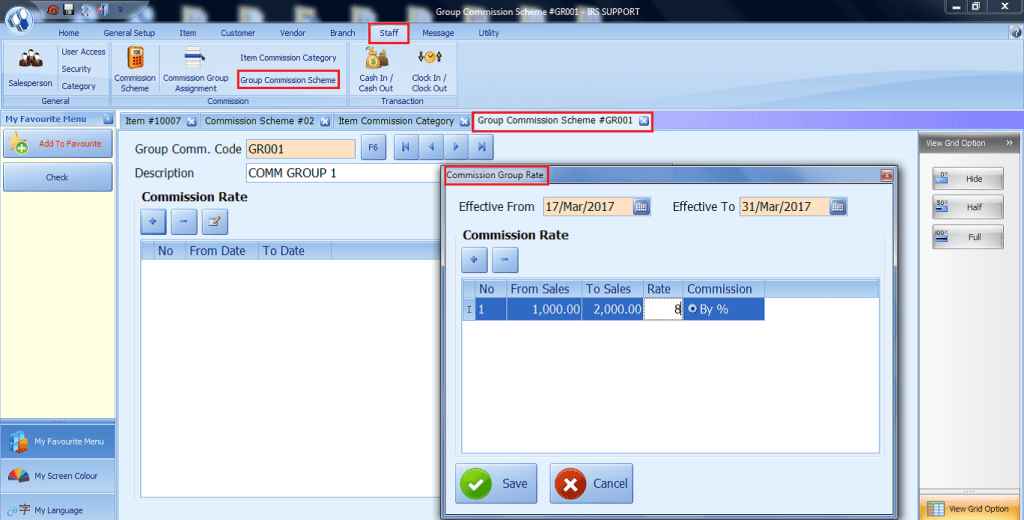
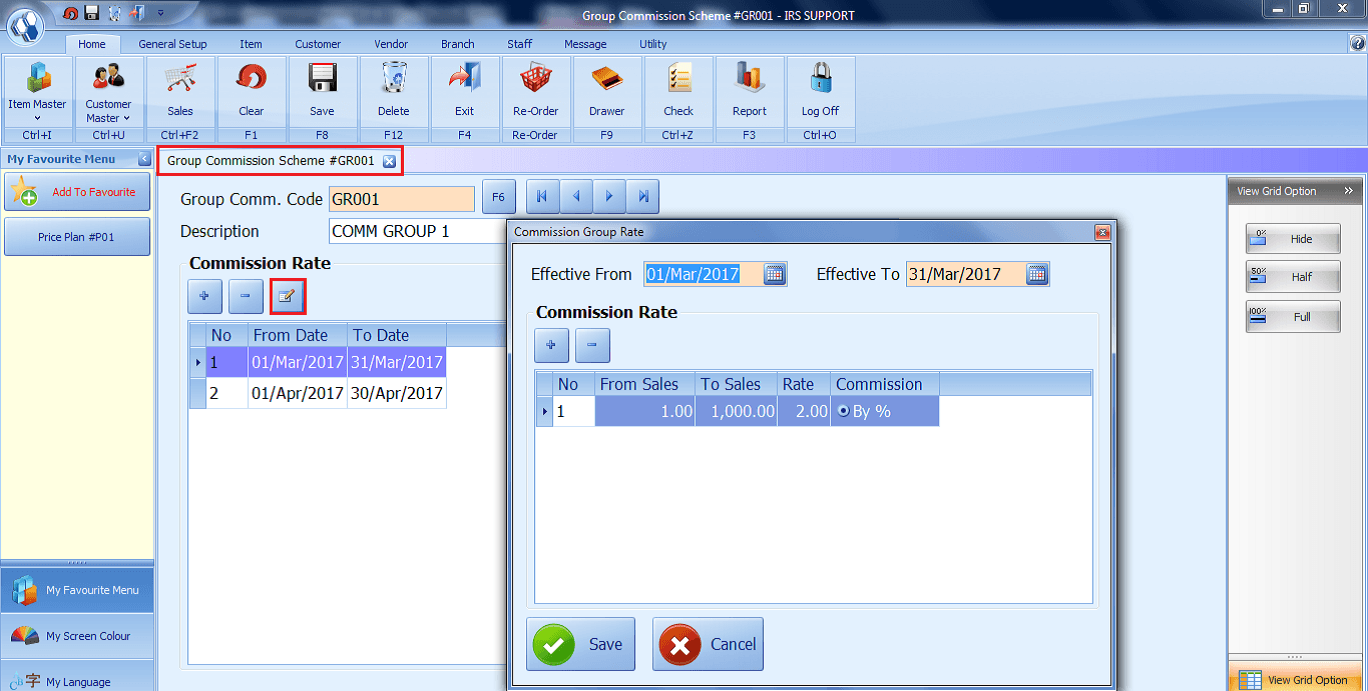
How to add Commission Rate for Group Commission Scheme - Group Commission Scheme
- 1. Go to Staff > Group Commission Scheme.
- 2. Add the Group Commission Code and the Description.
- 3. Click on the “+” sign to add group commission rate
- 4. Commission Rate window pop up.
- 5. Enter the “Effective From and to Date” of the group commission rates.
- 6. Click on the “+” sign to add group commission rate
- 7. Enter the From Sales and To Sales, Rate and the Commission Rate either by percentage or amount.
- 8. Click on the Save button to update the data.

How to Delete Commission Rate for Group Commission Scheme
- 1. Go to Staff > Group Commission Scheme.
- 2. Click on the “-“ sign to remove selected commission rate for the particular group.
- 3. Confirm screen pop up to confirm the deletion.
- 4. Click Yes to confirm deletion or No to cancel the deletion.

How to Edit Commission Rate
- 1. Go to Staff > Group Commission Scheme.
- 2. Click on the “Edit” sign to edit selected commission rate details.
- 3. Commission Rate window pop up.
- 4. Do the necessary changes.
- 5. Click Save to save the changes.
Share Link: https://www.irs-software.com/faqwd/commission-scheme/
- 7. Payment SetupMore
General Setup - Payment Mode
- Payment Mode is the way one pays for a transaction.
- A customer can choose a Payment Mode based on the business preferred payment methods.
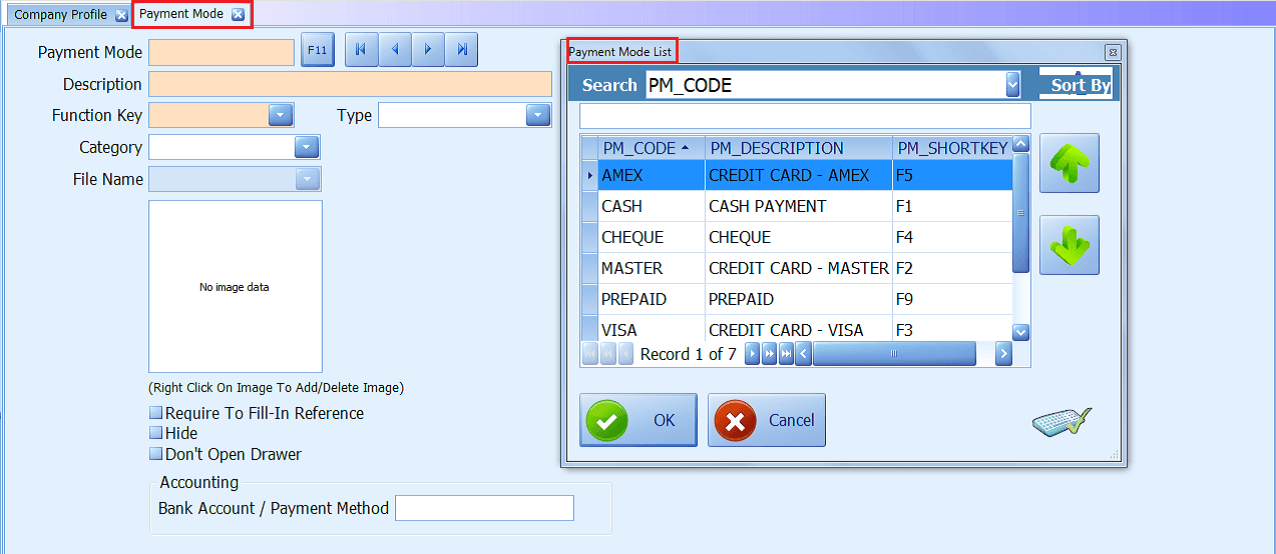
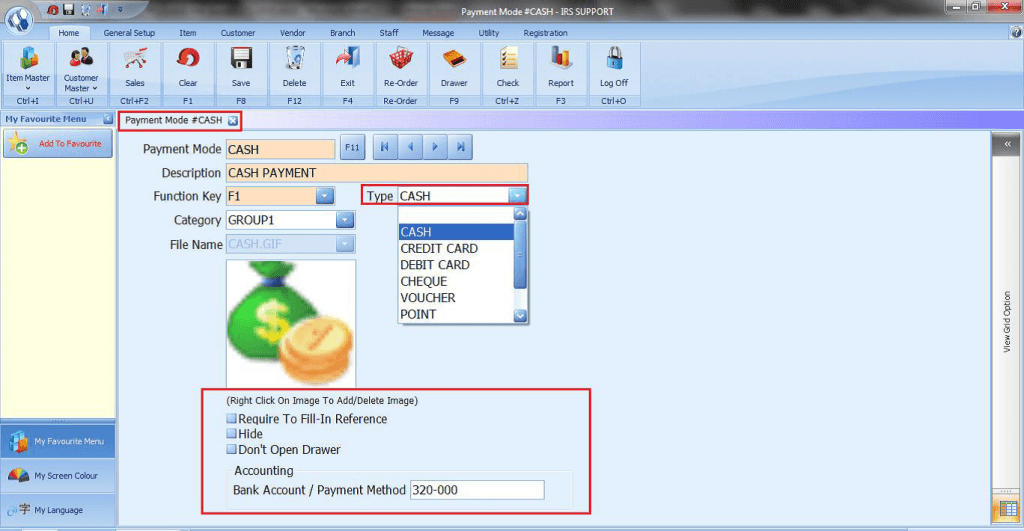
Note: Require to Fill in Reference – Tick if the payment mode requires Fill in Reference.
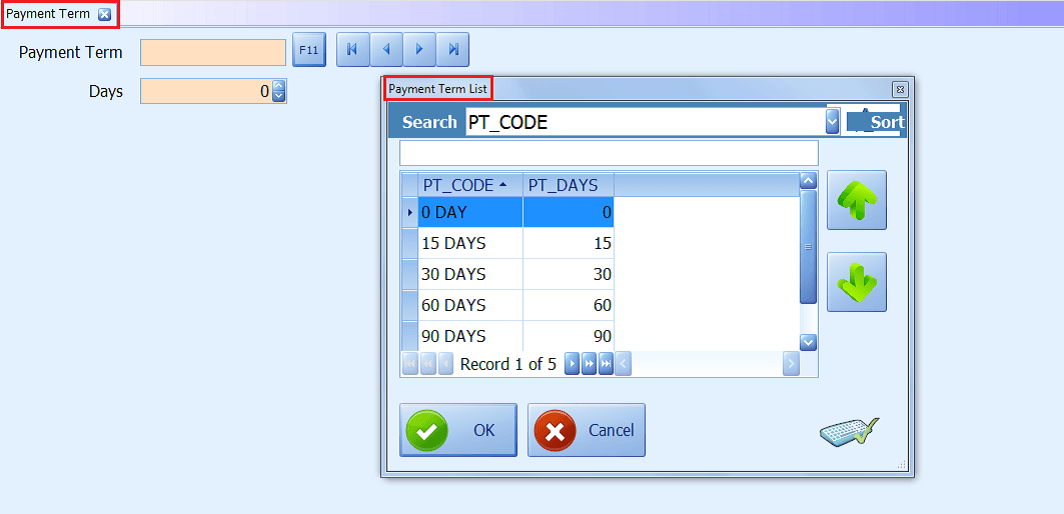
General Setup - Payment Term
- A Payment Term specifies the period allowed to pay off an amount due.
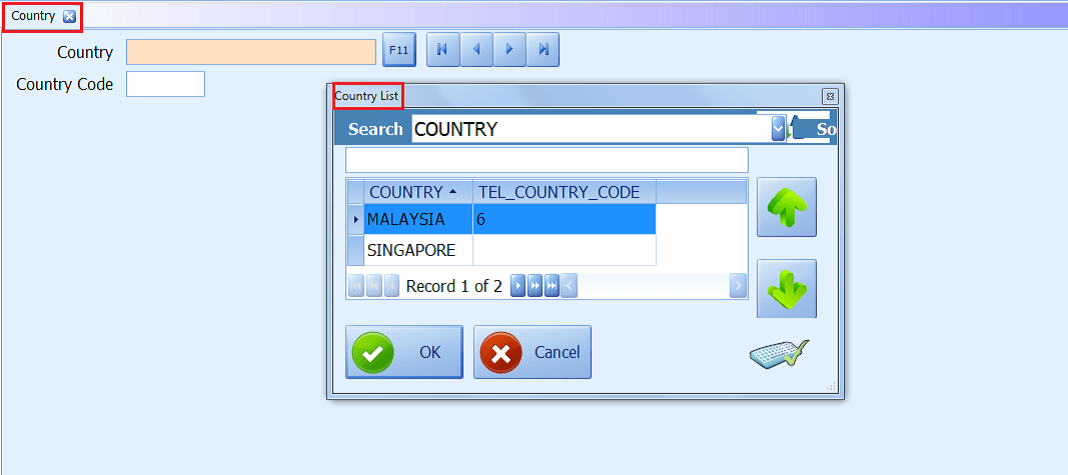
General Setup - Country
- The Country location of daily business activities.
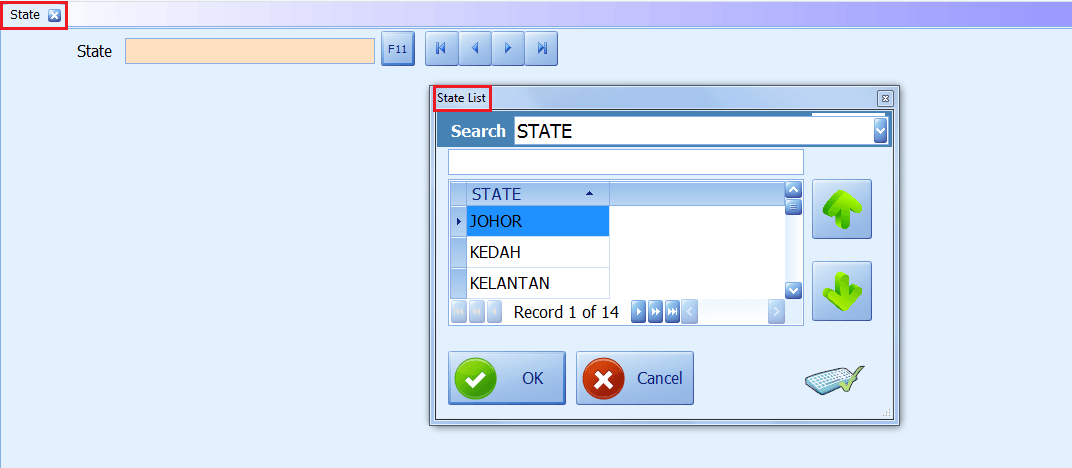
General Setup - State
- The State location of daily business activities.
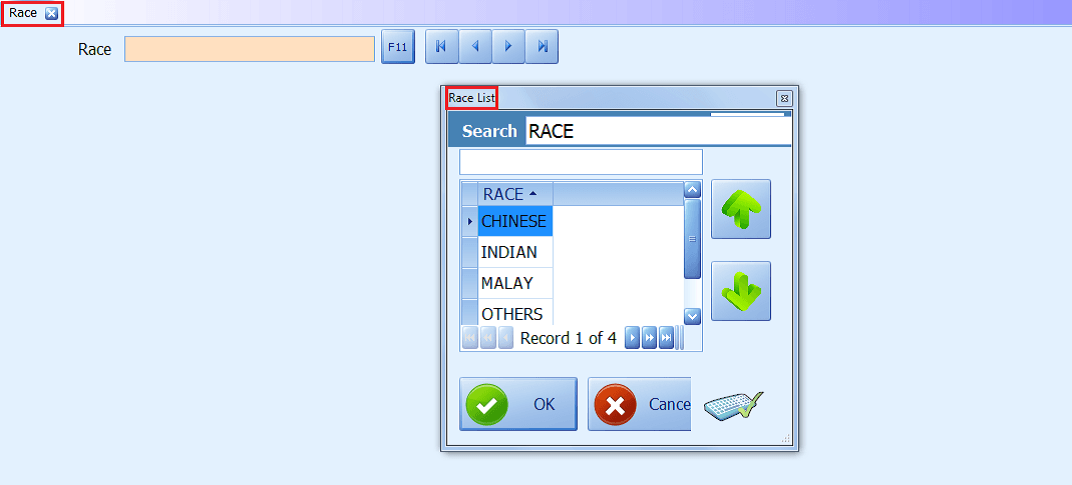
General Setup - Race
- User(s) are allowed to define Races, e.g., Chinese, Malay, Indian, or others as per business requirement.
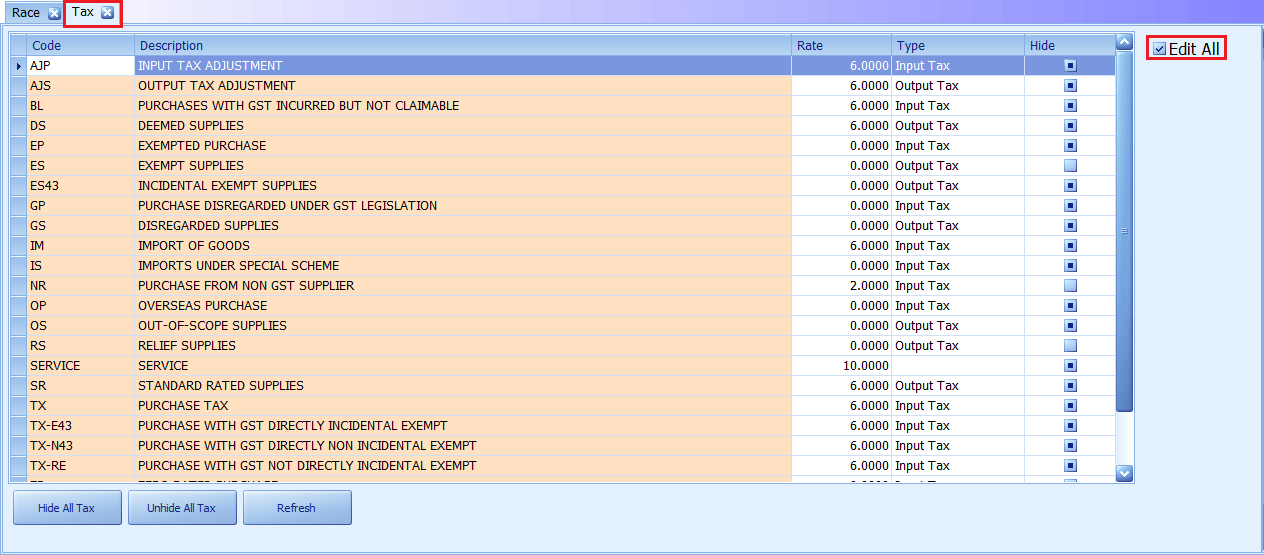
General Setup - Tax
- All taxes code can be founded on the tax list, all in default setting but it’s editable in the future if the tax rate is changes.

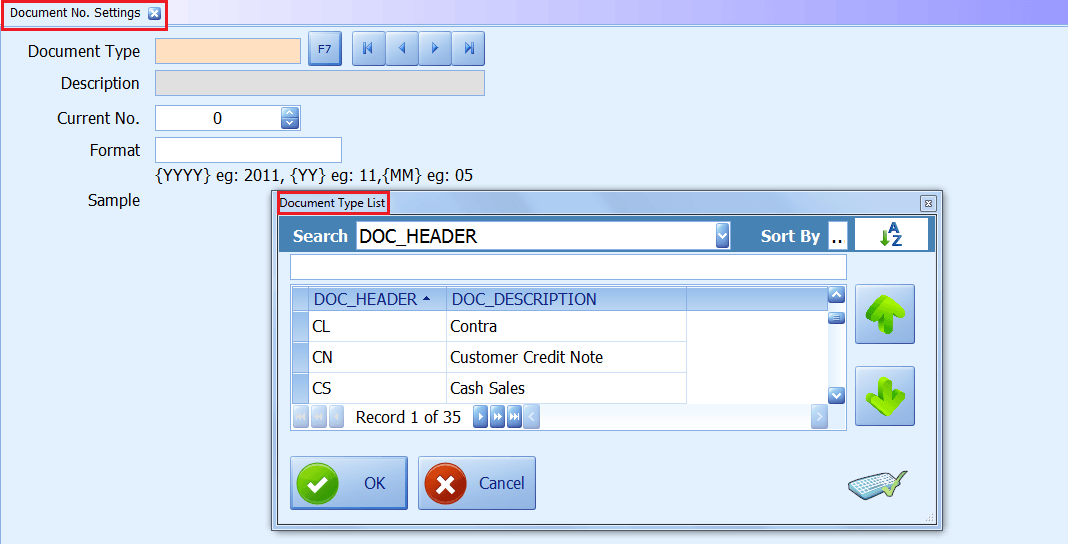
General Setup – Document No. Settings
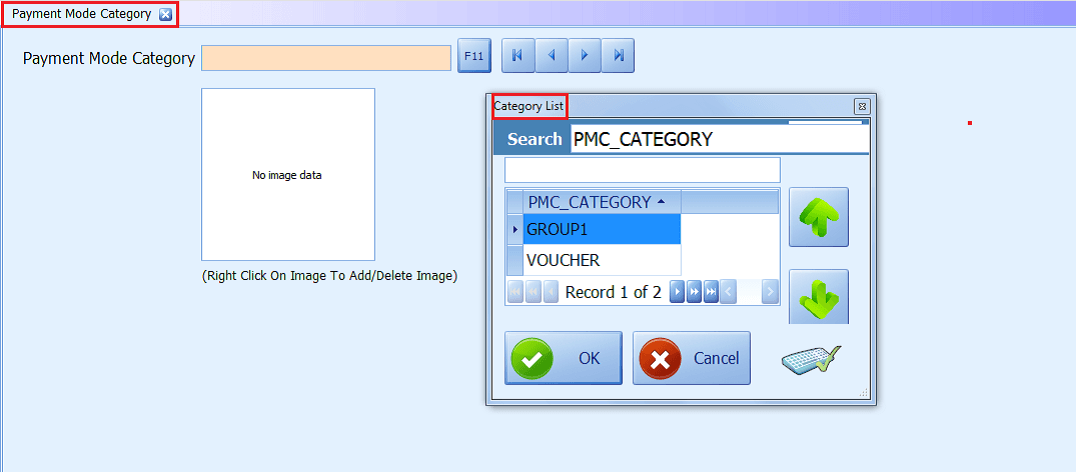
General Setup – Payment Mode Category
- Payment Mode Category is to segregate various payment methods into different categories. Typical payment methods used in a modern business context include cash, cheque, online banking, credit or debit cards etc.
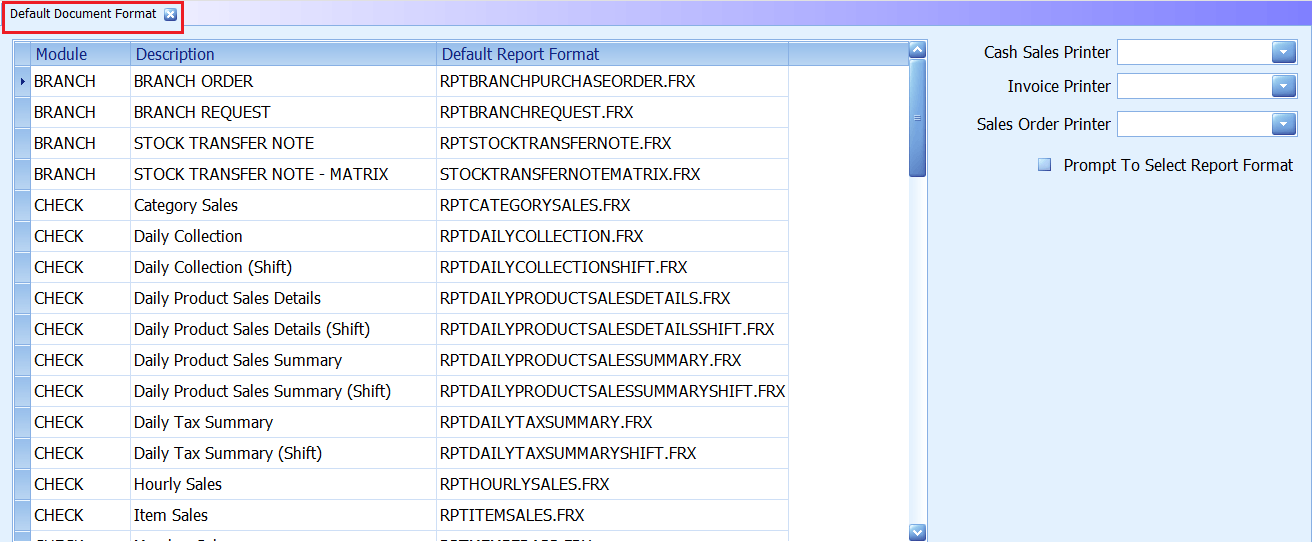
General Setup – Default Document Format
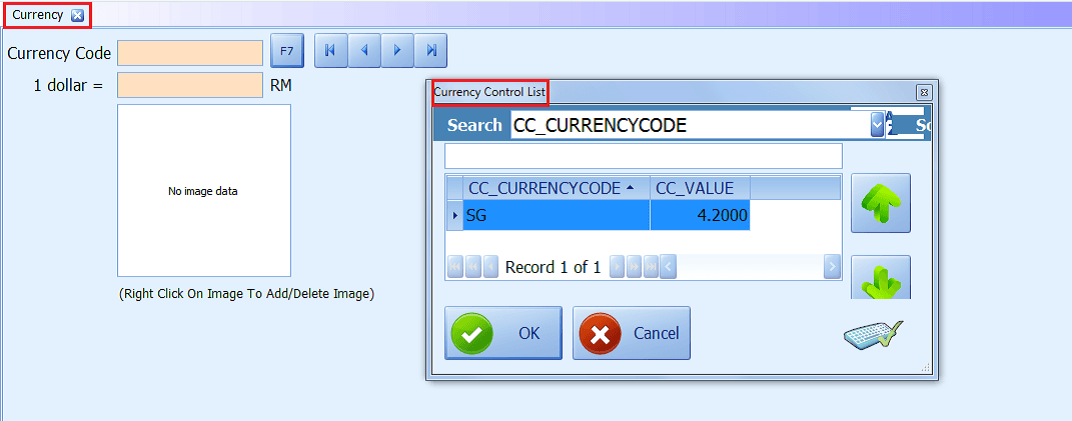
General Setup – Currency
- Currency is the monetary unit used when recording transactions within the financial books of a company or business.
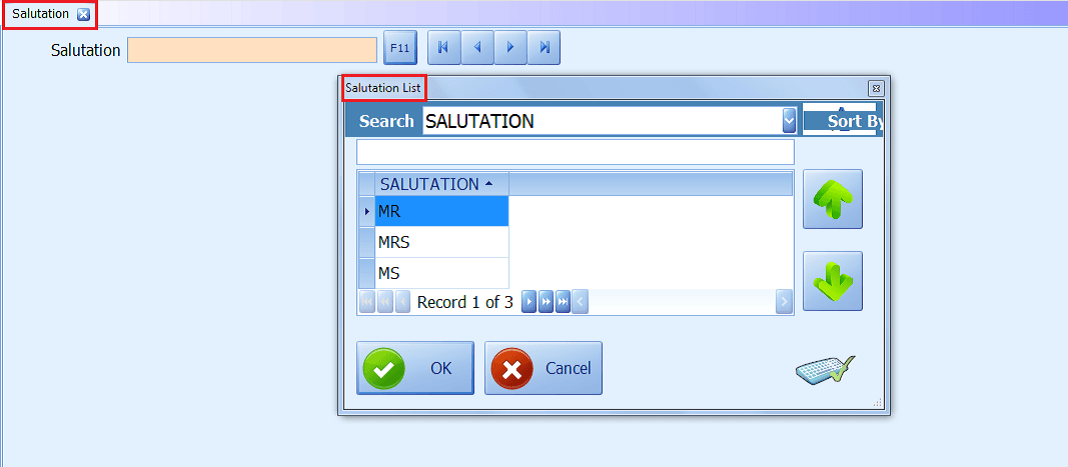
General Setup – Salutation
- A title of respect for a person.
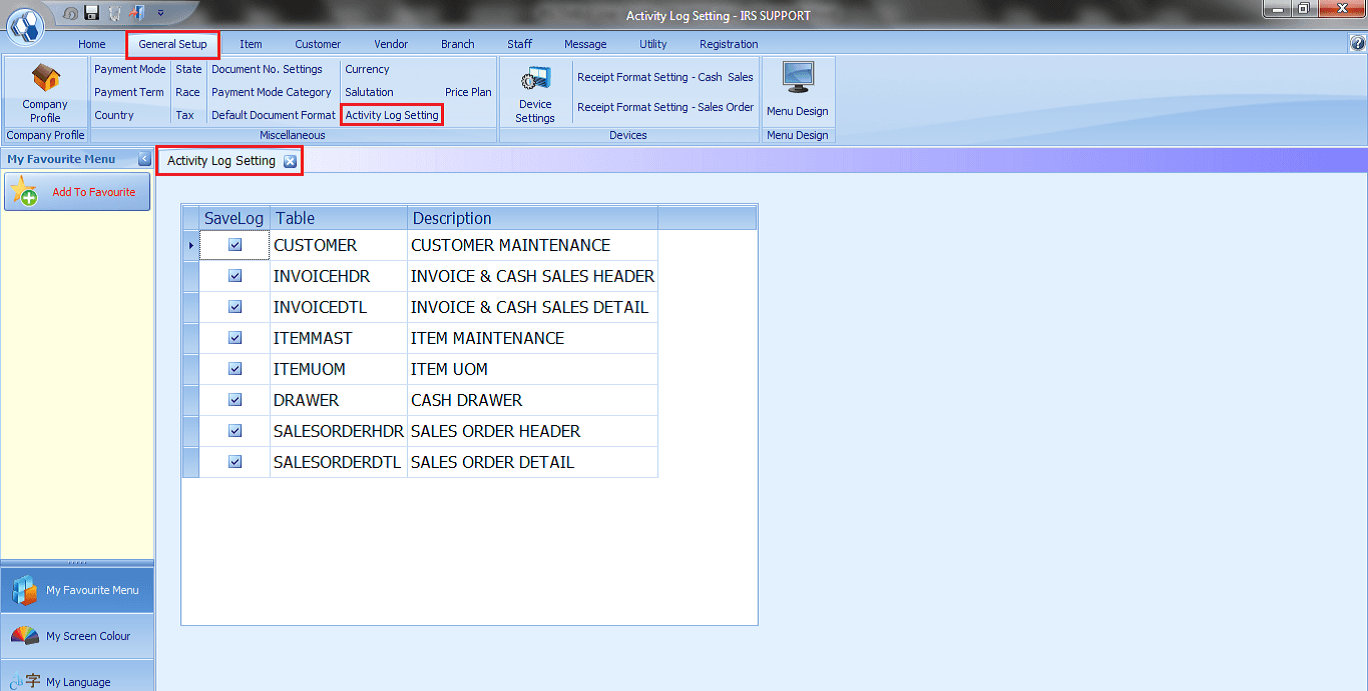
General Setup – Activity Log Setting
- The Activity Log records the events that occur to allow for tracking who and what initiated various actions and to allow for troubleshooting any errors or problems that occur.
General Setup – Price Plan
- Price Plan is used to preset price by amount and percentage, sales and purchase tax and service charge as of date is considered to take effect.
Instructions
- 1. Go to General Setup > Price Plan > Key in Code, Description, Effective Date.
- 2. Choose Update:-
- - All Price Level: This option will update all price level according to the value in the price plan
- - Based On Markdown: This option will update the price level 1, other price levels will be updated according to the revised price level 1.
- 3. Choose More Options:-
- - Activate Total Rounding: This option will round up/down the item price. (E.g.: 1.74 – 1.75)
- - Prompt Preview before Update: This option will prompt the preview list before update the price plan.
- - Round to Nearest Dollar: This option will round up/down the item price without cents. (E.g.: 29.10– 29, 29.50- 30)
- - Update Min. Price: This option will update the minimum price according to the value in price plan.
- 4. Press to add detail > Press the arrow to choose Filter Type.
- 5. Press F7 to search / Press Load All to list all information.
- 6. Click Save/press F8
Share Link: https://www.irs-software.com/faqwd/payment-setup/
- 8. Receipt Format SettingMore
Receipt Format Setting – Cash Sales
- This option allows user to choose a cash sales receipt format setting.
- To show option on receipt select/tick on the small box – Visible.
- To hide option on receipt de-select / un-tick the small box – Visible.

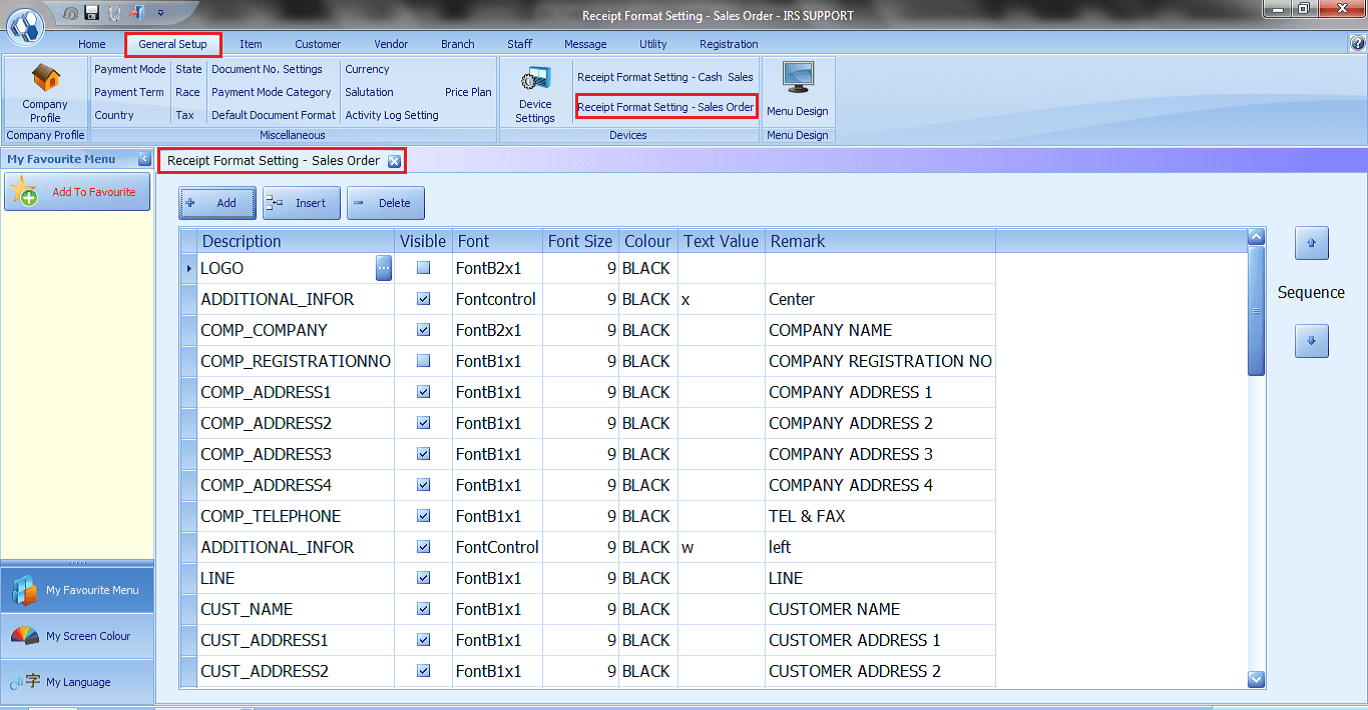
Receipt Format Setting – Sales Order
- This option allows user to choose sales order receipt format setting.
- To show option on receipt select/tick on the small box – Visible.
- To hide option on receipt de-select / un-tick the small box – Visible.
Share Link: https://www.irs-software.com/faqwd/receipt-format-setting/
- 9. Cash in and Cash OutMore
Cash in / Cash Out
- This section allows users to record the cash flow of the business.
- Cash In: Records the amount of money placed into a cash register as part of the cash flow.
- Cash Out: Records the amount of money taken from the cash register when the flow is removed.
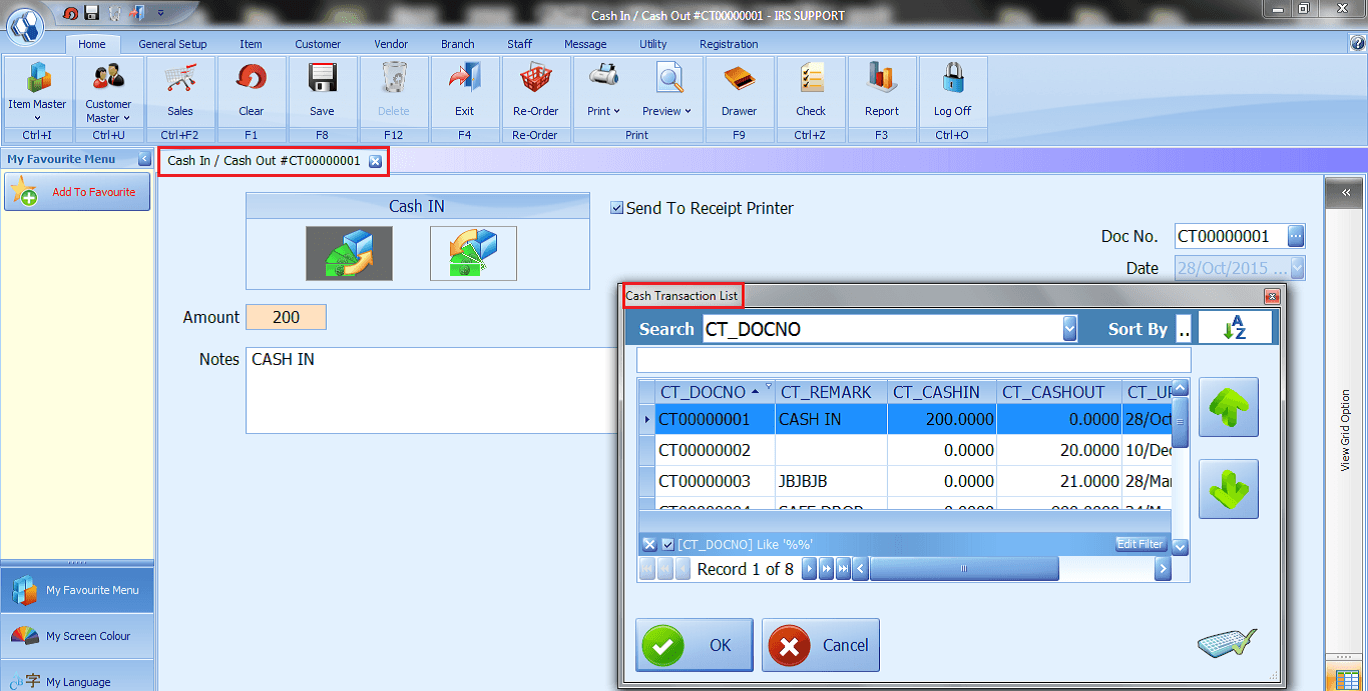
How to record Cash In / Cash Out
- 1. Select Cash in or Cash Out.
- 2. Fill in the amount.
- 3. Fill in the Note / Description.
- 4. Click Save to save the record.
Note: Cash Transaction List page lists all cash in and cash out records.
Share Link: https://www.irs-software.com/faqwd/cash-in-and-cash-out/
- 10. IRS Multi-Store SystemMore
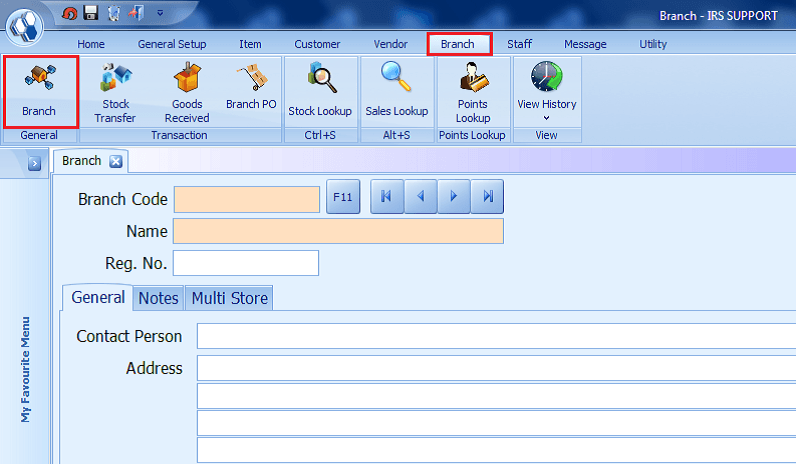
How to Create Branch
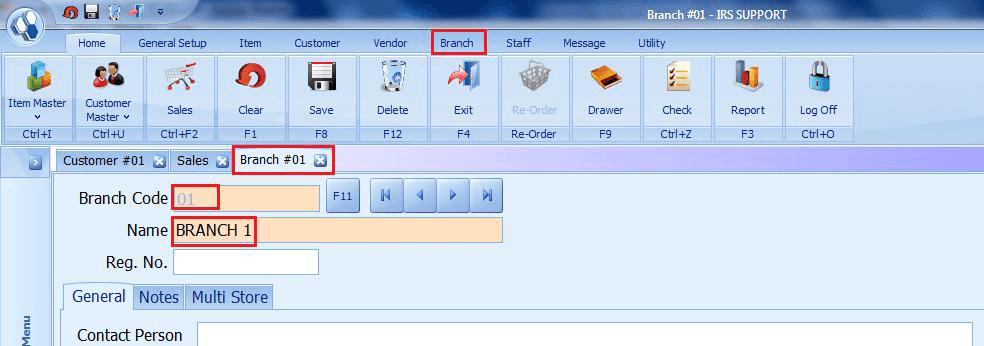
- 1. Go to Branch > Branch
- 2. Enter the Branch Code, Name and the details.
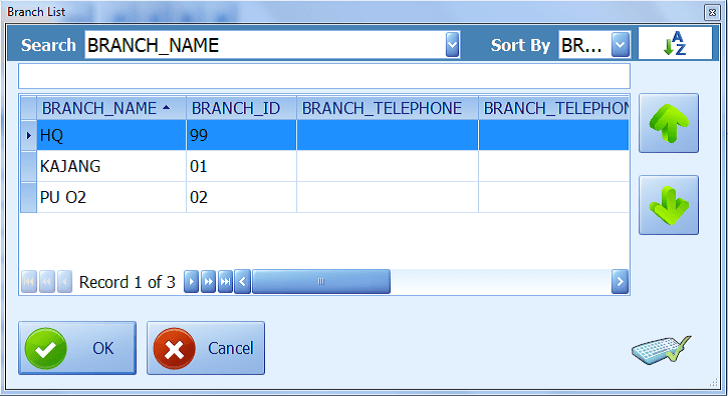
- 3. Below is the screen showing the Branch List
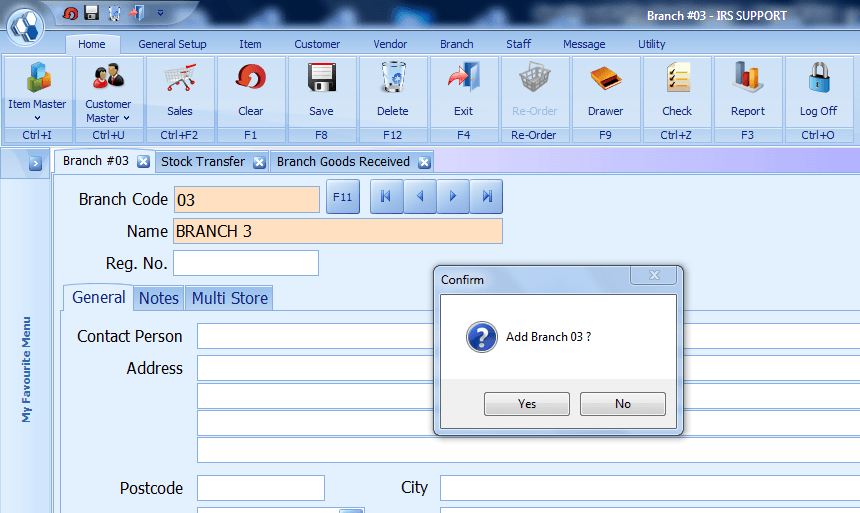
- 4. Confirmation screen to Add Branch
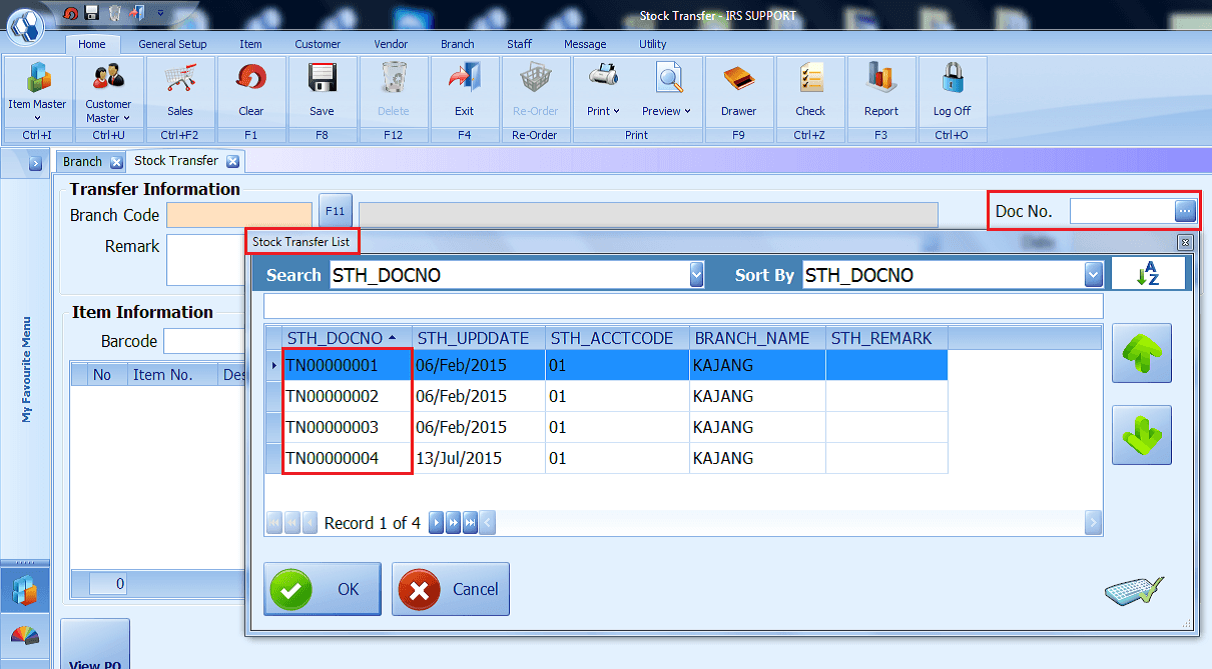
Branch – Stock Transfer
- Stock Transfer from HQ to Branch.
- Stock Transfer from Branch to HQ.
- Stock Transfer from Branch to Branch.
- 1. Go to Branch > Stock Transfer

- 2. Enter the Branch Code or press F11 to select the Branch to transfer the stock.
- 3. Select the item code by scan or press F7 to select the item to transfer.
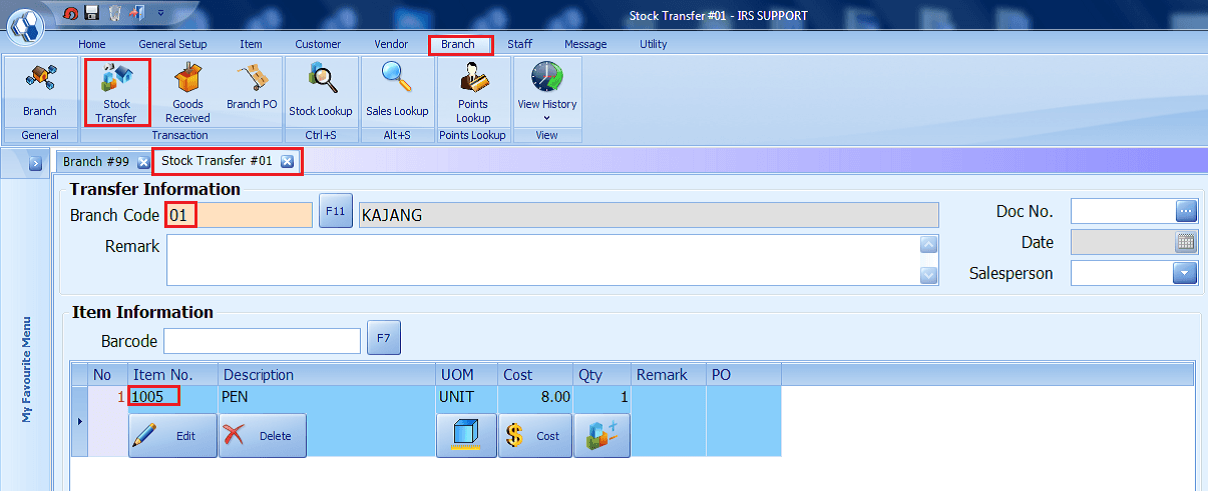
- 4. The below screen shows the Item List.
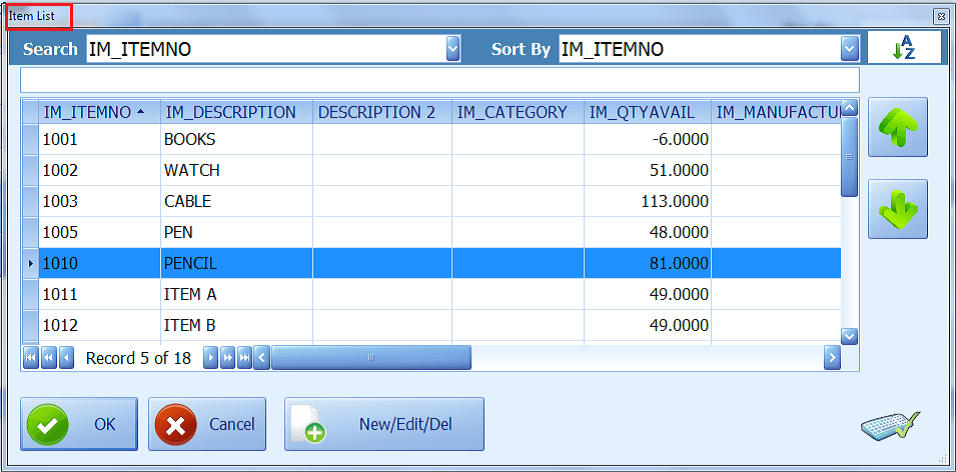
- 5. The user is allowed to edit the stock/item E.g: Stock Quantity.
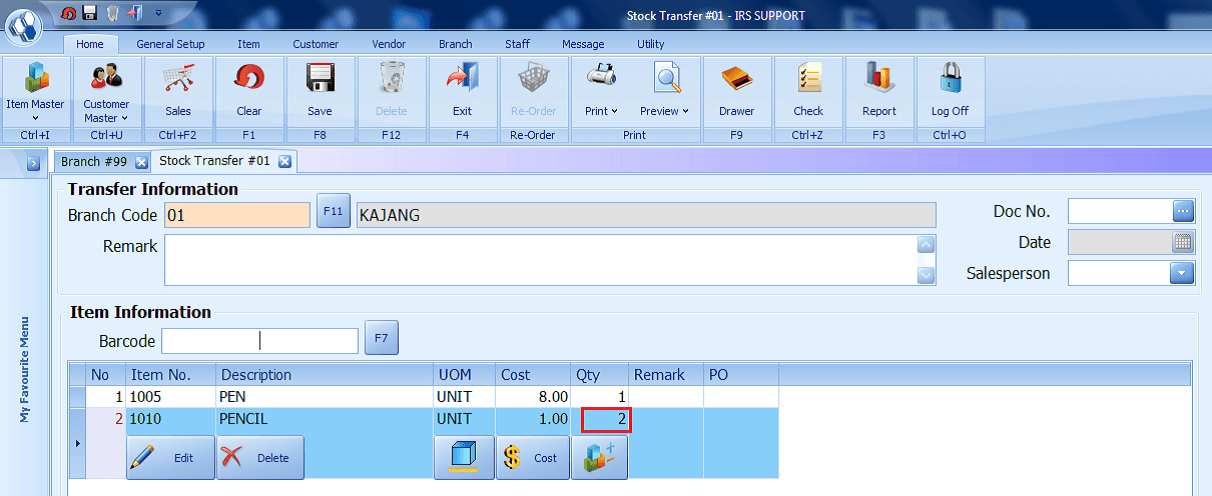
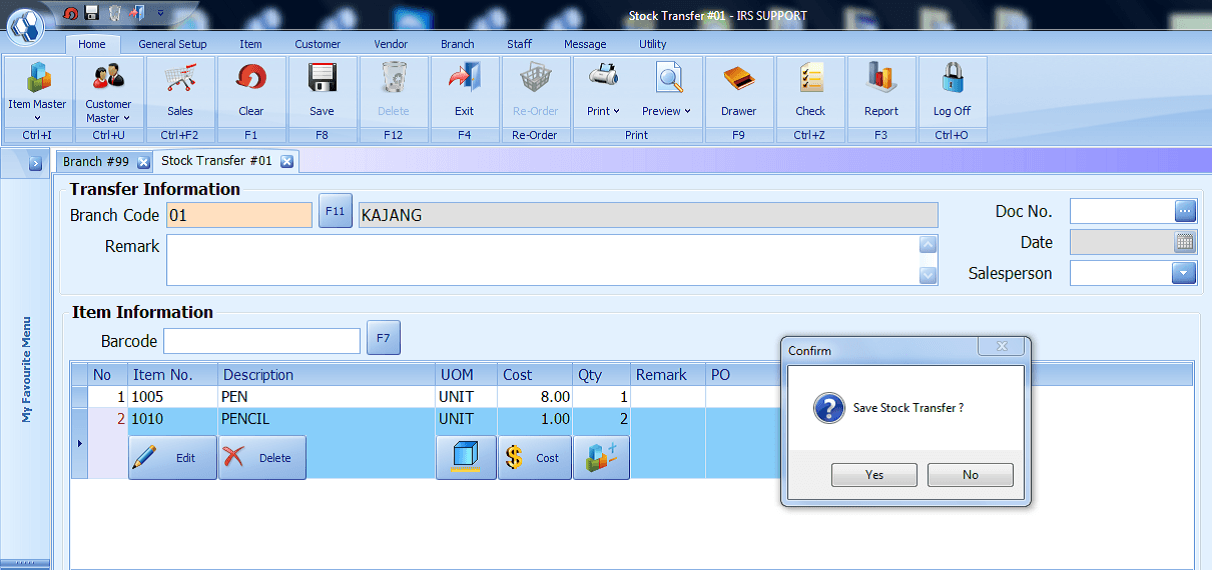
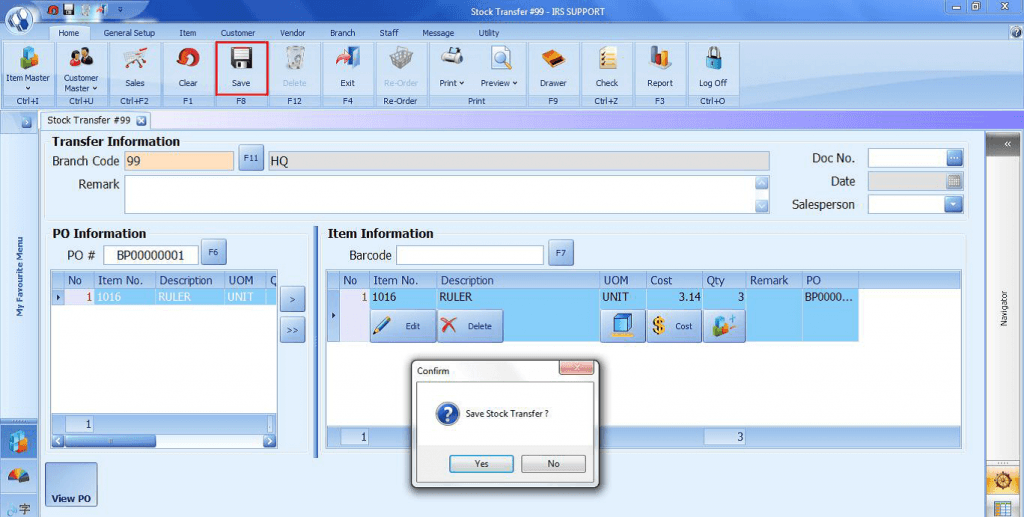
- 6. Click Save or press F8 to save the Stock Transfer.

- 7. Click “Yes” to confirm the Stock Transfer.
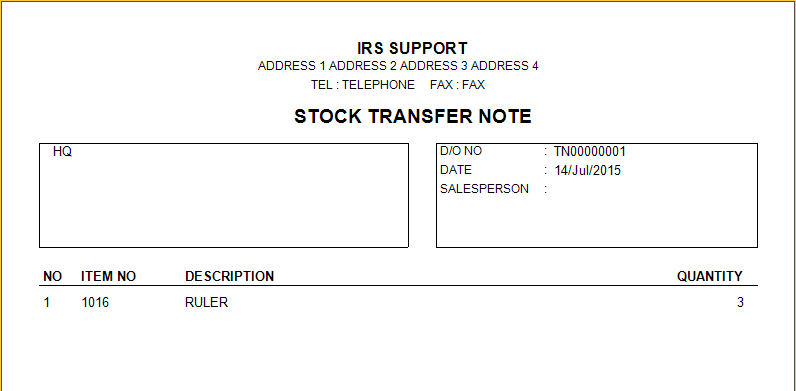
- 8. Stock Transfer Note Prompt
Note: 1. Double check on the item and quantity to be transferred as a stock transfer that has been confirmed and sent cannot be edited.
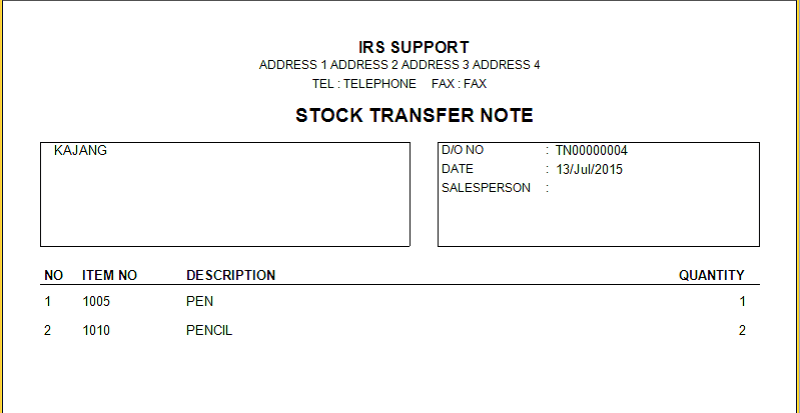
- 9. Go to Doc No. Drop-down list to view the Stock Transfer Note.
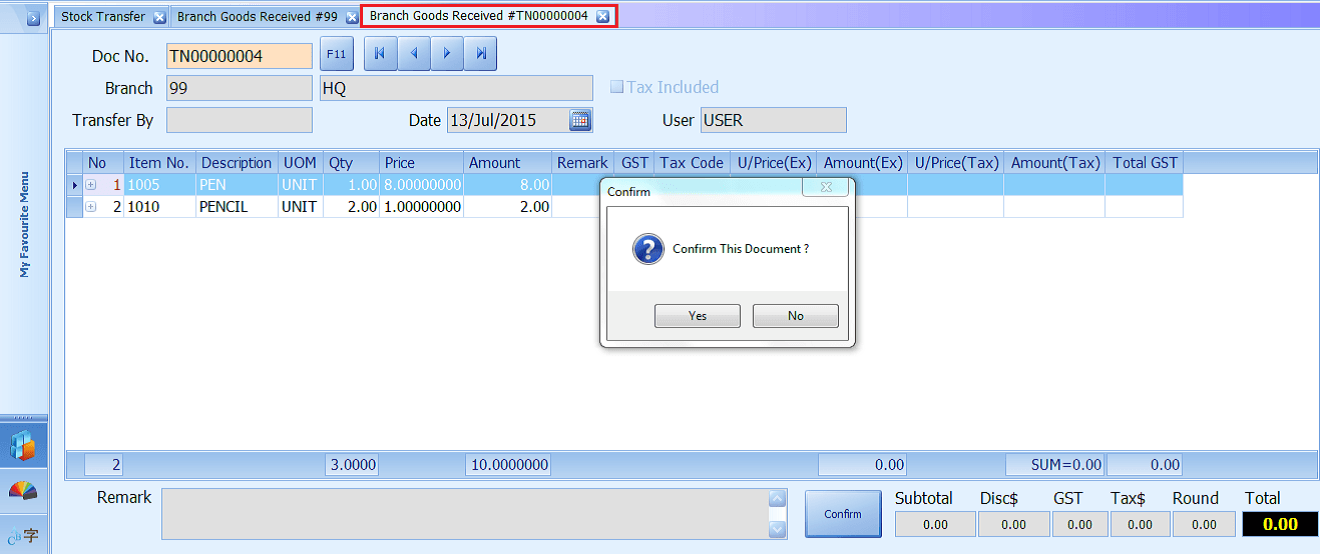
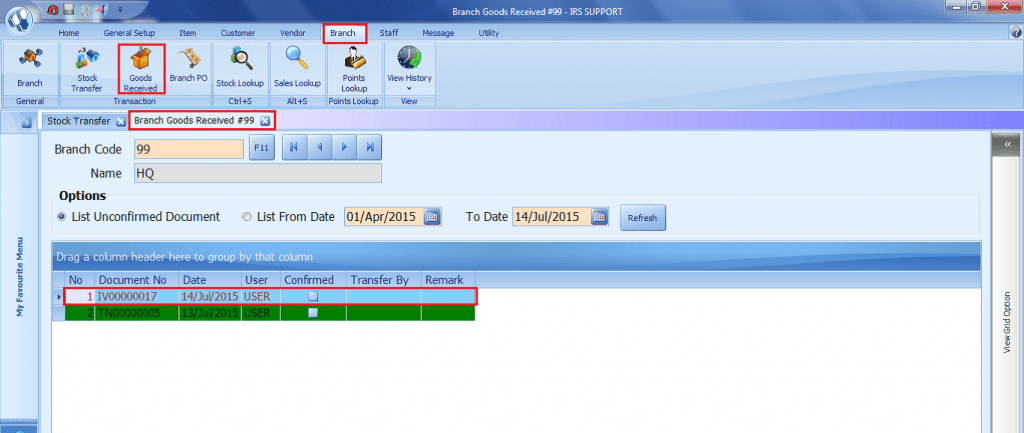
Branch – Goods Receive
- Branch receiving stock from HQ or other Branch (stock transfer from another branch).
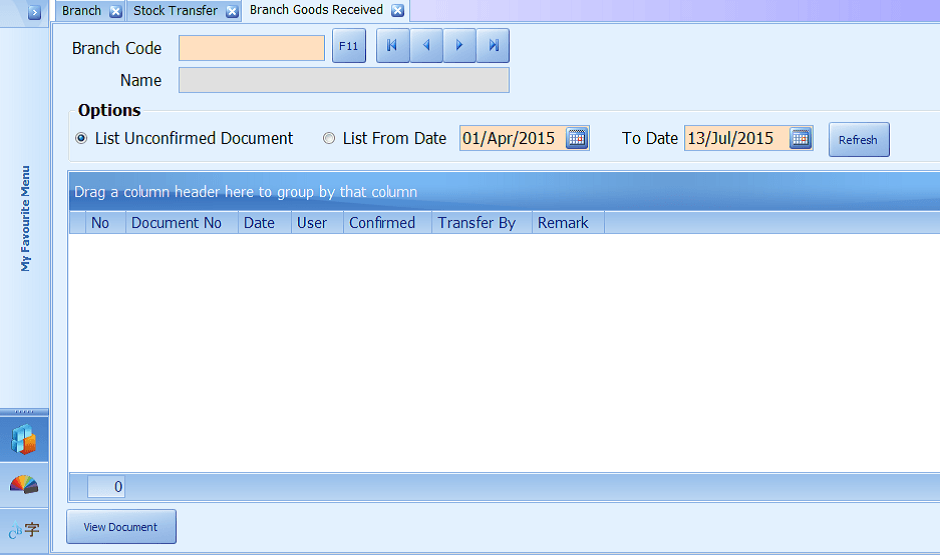
- 1. Go to Branch > Goods Receive
- 2. Enter the Branch Code or press F11 to select the branch.
- 3. The stock transfer note will be listed on the screen (if there is any).
- 4. There are 2 options for the user to choose:
- - List Unconfirmed Document – List the unconfirmed documents.
- - List From Date – To view confirmed documents based on the date range selected.
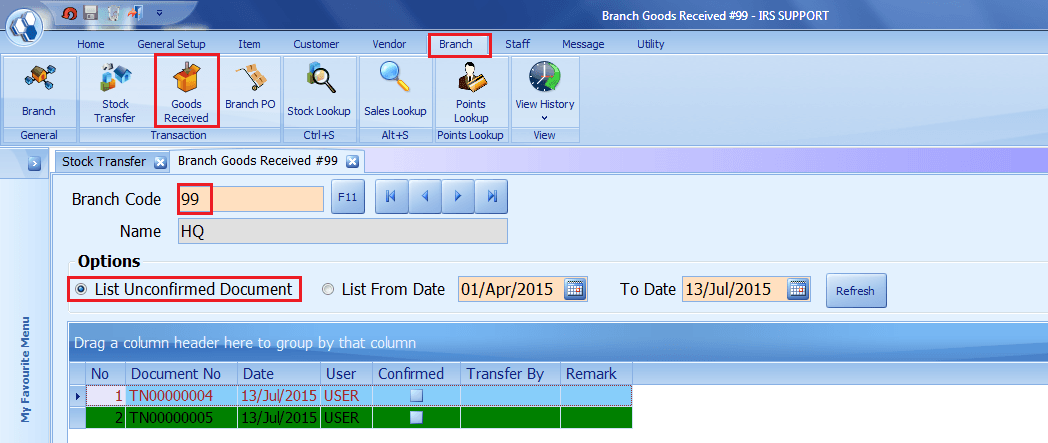
- 5. Click on the “View Document” to view the transfer detail.
- 6. The Stock Transfer Note opens a new screen with the “Confirm” command button.
- 7. Click on the confirm to confirm the document.
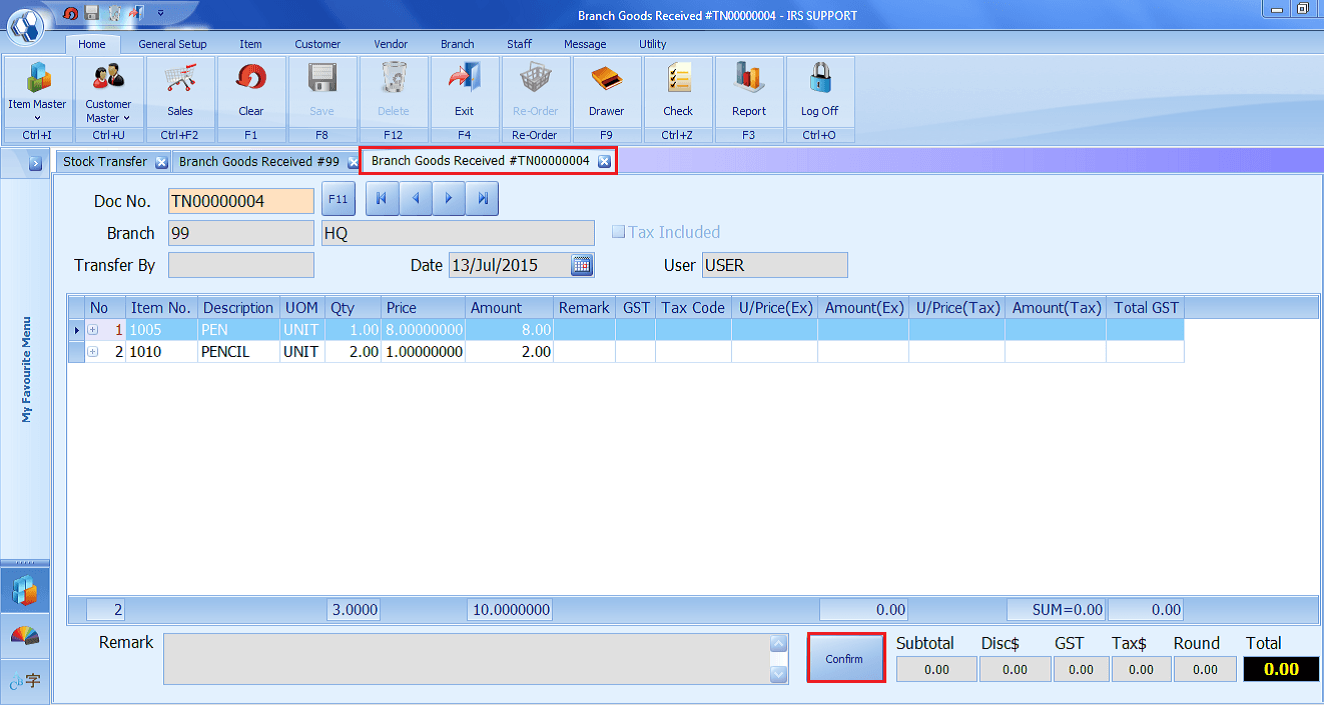
- 8. The confirmation screen prompt.
- 9. Click “Yes” to confirm.
- 10. Information screen prompt “Document Confirmed. Do you want to View Goods Received Note?
- 11. Click “Yes” to view Goods Received Note.
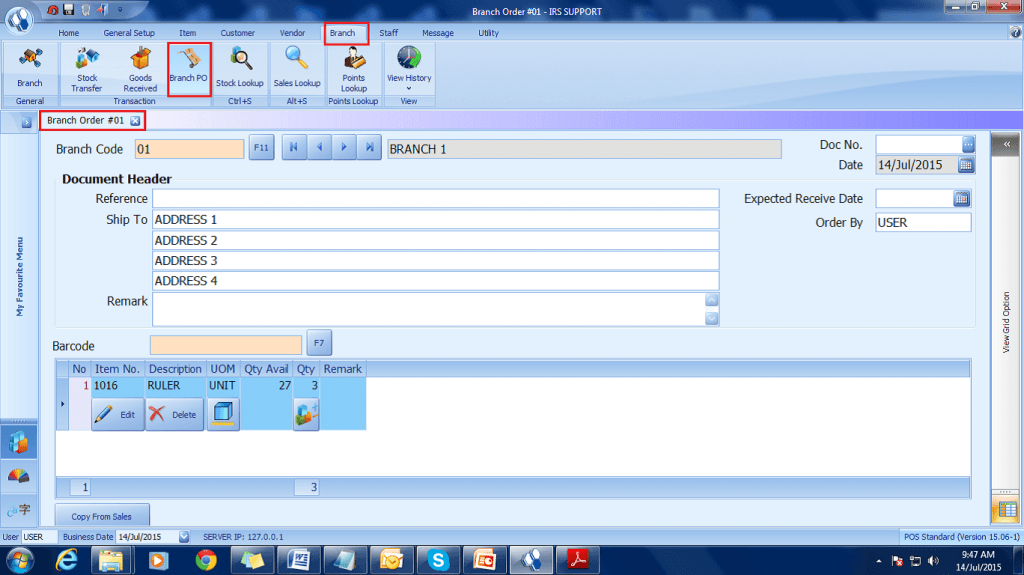
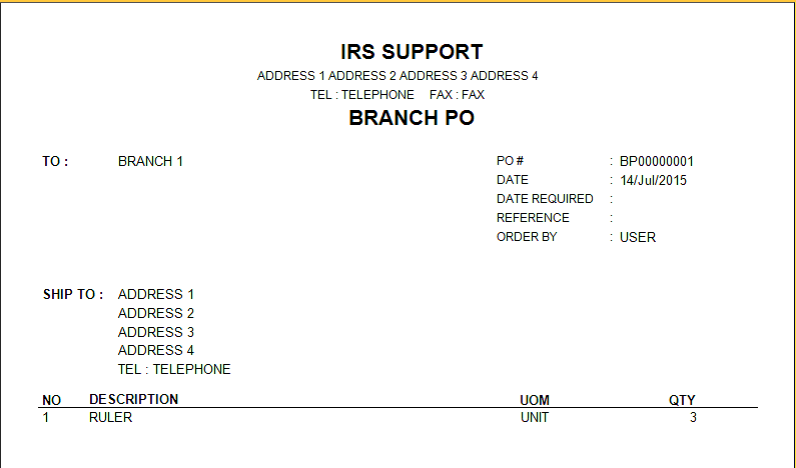
Branch – Purchase Order
- Purchase Order is issued when Branch places an order with the vendors:-
- 1. Go to Branch > Branch PO
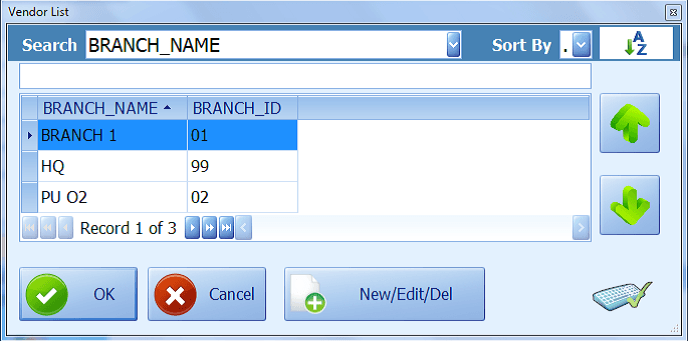
- 2. Enter the Branch Code or Press F11 to select a branch from the list.
- 3. Below is the Branch List.
- 4. Enter the Barcode number or press F7 view the item list.
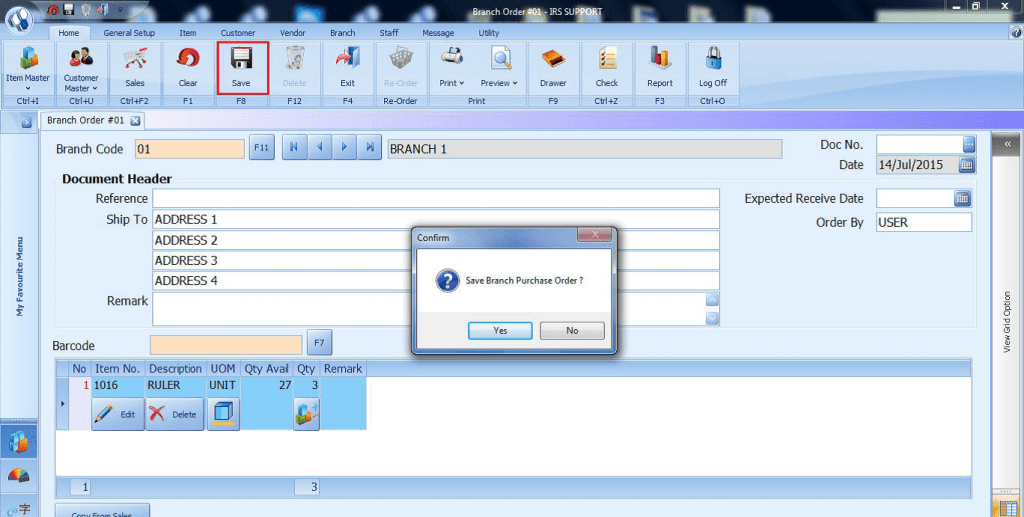
- 5. Click Save or press F8 to save the Purchase Order.
- 6. Click Yes on the Confirm screen to confirm with Purchase Order.
- 7. Branch Purchase Order document generated
Brach – Purchase Order (Receiver)
- - To View Branch Purchase Order at the branch receiving side:-
- 1. Enter the Branch Code.
- 2. Click "View PO"
- 3. Click View "PO"
- 4. Click PO# drop-down list.
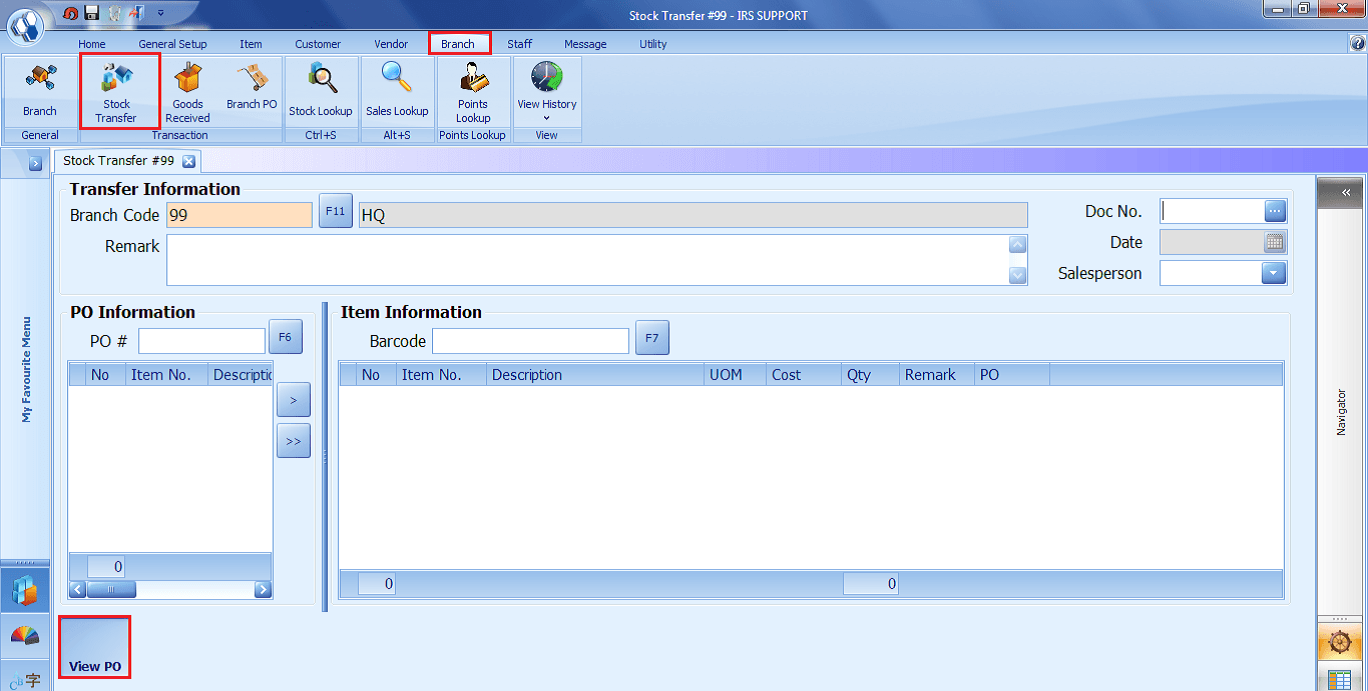
- 5. Screen showing Branch Purchase Order List for the user to select the PO.
- 6. Click “>” to add the item to the transfer list under the Item Information Section OR Click “>>” to add all item to the transfer list under the Item Information section.
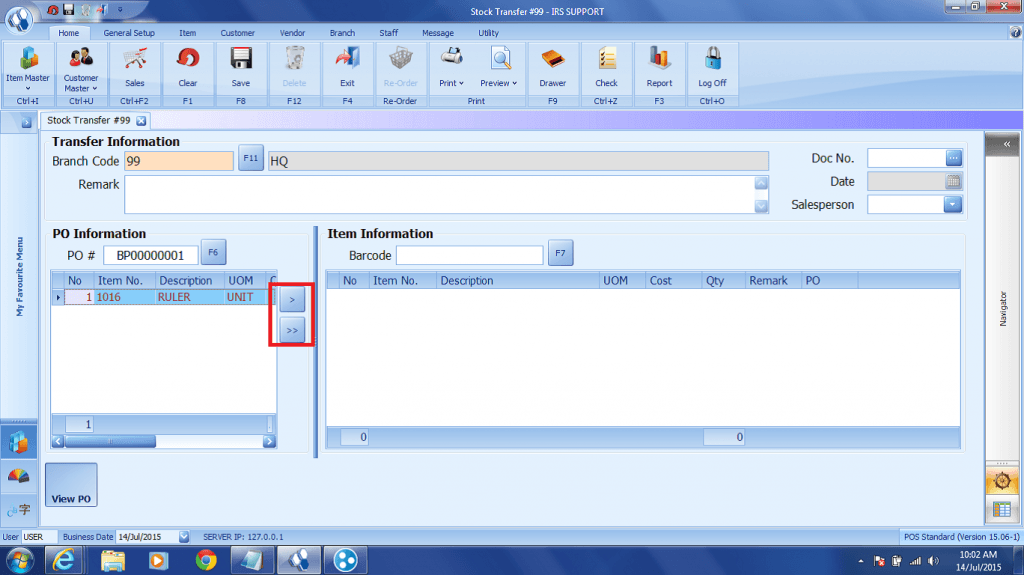
- 7. Click Save to save the Stock Transfer.
- 8. Click Yes to confirm the Stock Transfer.
- 9. Stock Transfer Note document generated.
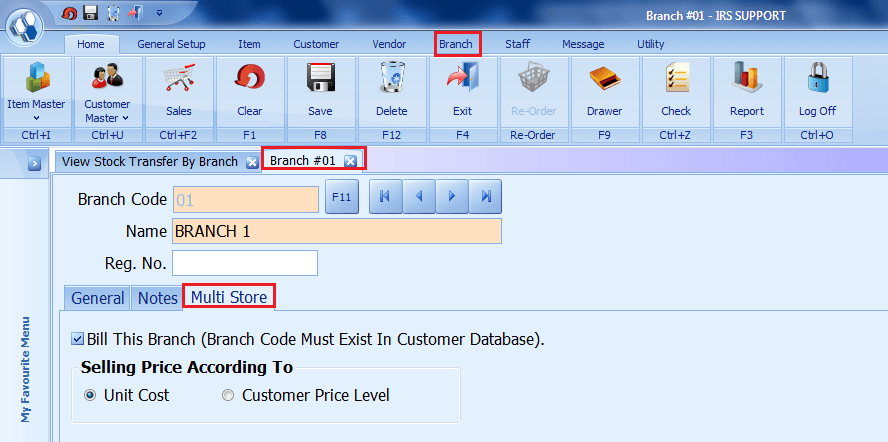
Brach – Branch – Multi-Store (Bill to Branch)
- - Issue Invoice to the other Branch / HQ.
- 1. Go to Branch > Branch > Multi-Store
- 2. Tick “Bill This Branch (Branch Code Must Exist in Customer Database)” checkbox.
- 3. Choose the Selling Price According to option.
- - Unit Cost
- - Customer Price Level
- 4. Create Customer Account for this branch.
- 5. The Customer Account Code should be the same as the Branch Code.
- 6. Issue an invoice to the Branch. (Customer Account)
Note: The Bill to Branch should be in credit sales.
- 7. Click Yes to generate the invoice.
- 8. Branch Receiving Invoice. (at the other branch)
- 9. Go to Branch > Goods Receive
- 10. Select the Branch Code.
- 11. The Invoice is listed.
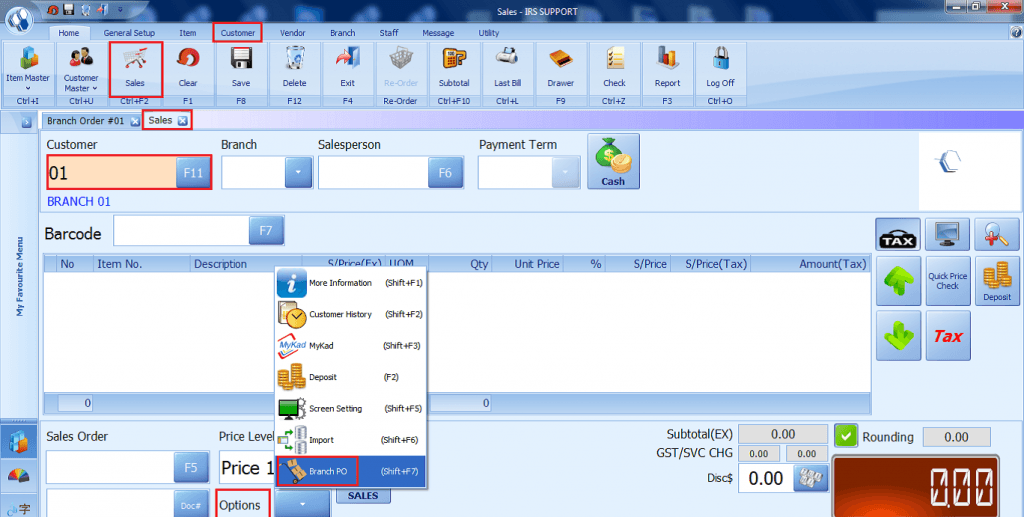
Customer – Sales (Bill to Branch – Branch Purchase Order)
- 1. Go to Customer > Sales
- 2. Enter Customer Account Code.
- 3. Click Options.
- 4. Select Branch Purchase Order.
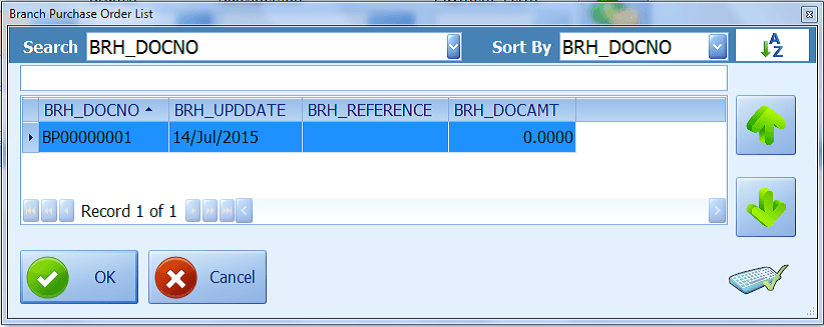
- 5. Branch Purchase Order List prompt.
- 6. Select Branch Purchase Order and click OK.
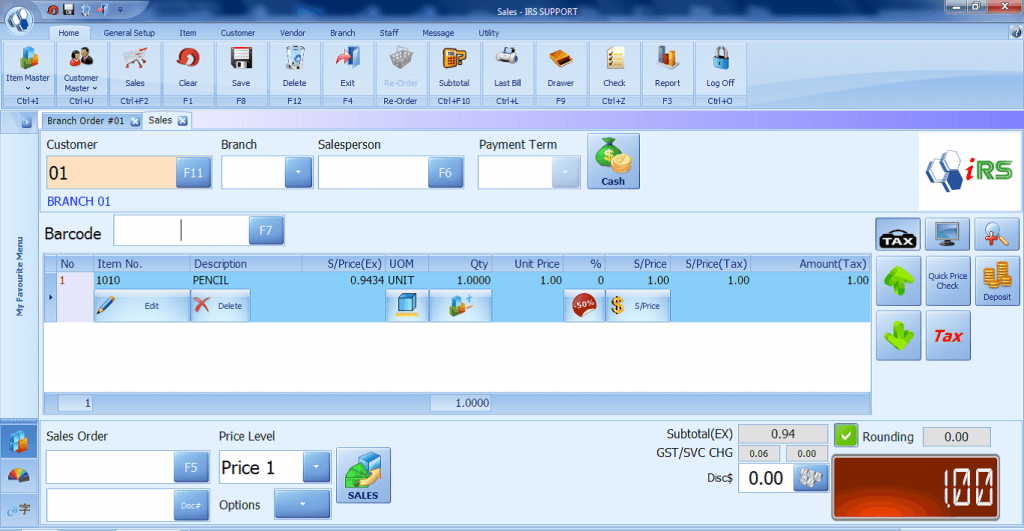
- 7. Branch Purchase Order information is listed in Sales Screen.
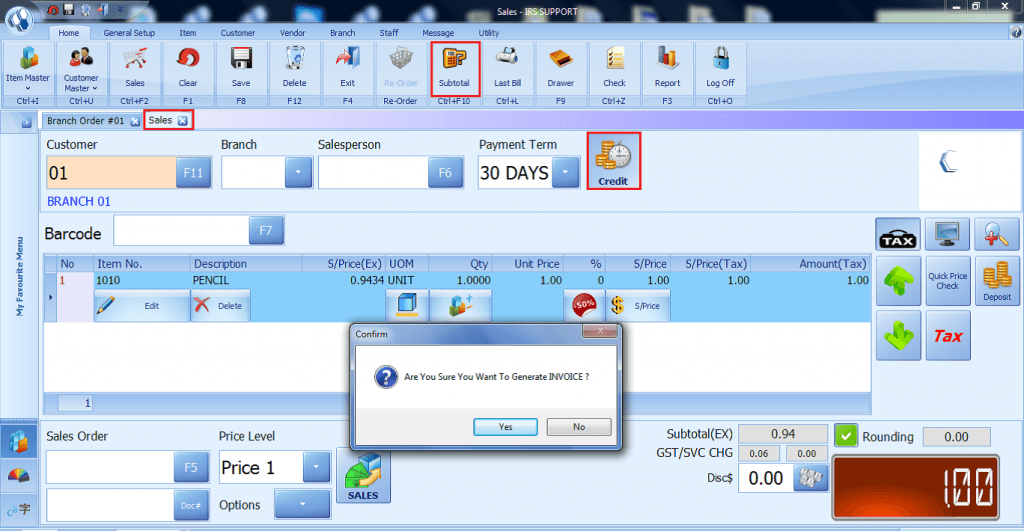
- 8. Ensure it is Credit Sales and Click on the Subtotal.
- 9. Click Yes to Confirm generate an invoice.
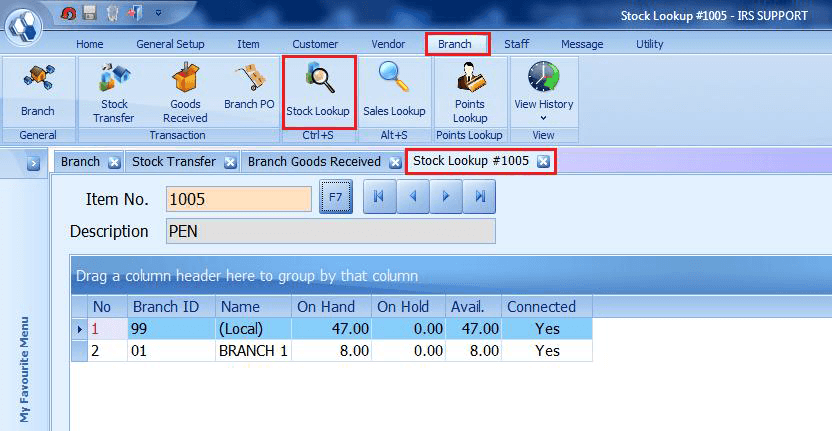
Branch – Stock Lookup (Branch Stock Lookup)
- 1. Go to Branch > Stock Lookup
- 2. Enter the item code.
- 3. Details will be shown as per on the screen.
Note: The items will not be listed in the branch is disconnected from the HQ.
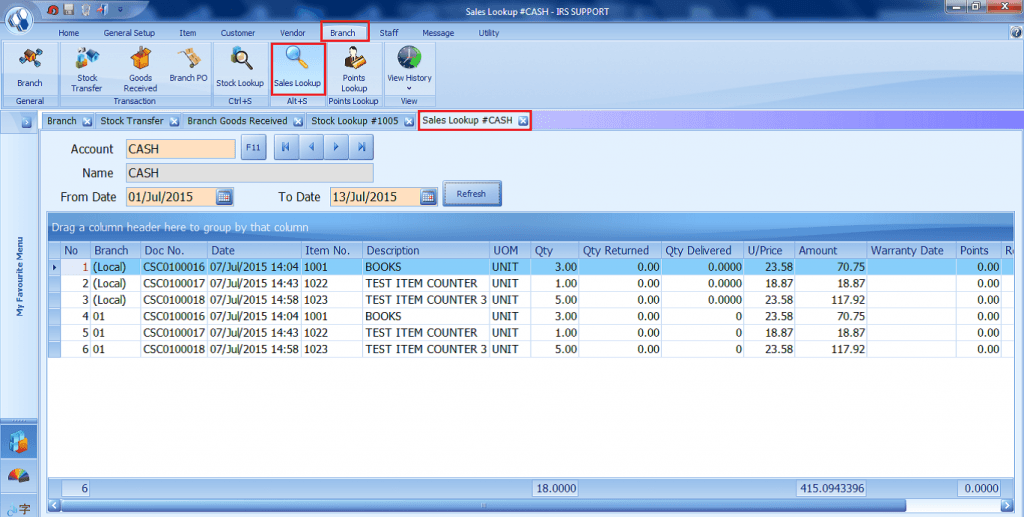
Branch – Sales Lookup (Branch Sales Lookup)
- - To view sales record for all branches based on the customer:-
- 1. Go to Branch > Sales Lookup
- 2. Select Customer / Account
- 3. Select the Date Range.
- 4. Click Refresh.
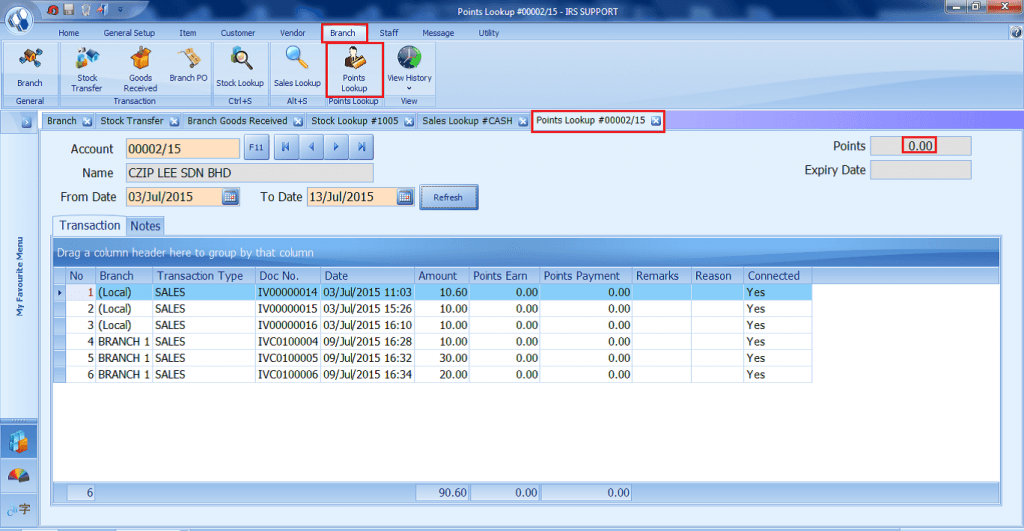
Branch – Points Lookup
- To check customer’s point entitled.
- To trace customer’s point transaction history.
- To check customer’s point from other outlets.
- 1. Go to Branch > Points Look up
- 2. Select Customer / Account
- 3. Choose the Date Range.
- 4. Click Refresh.
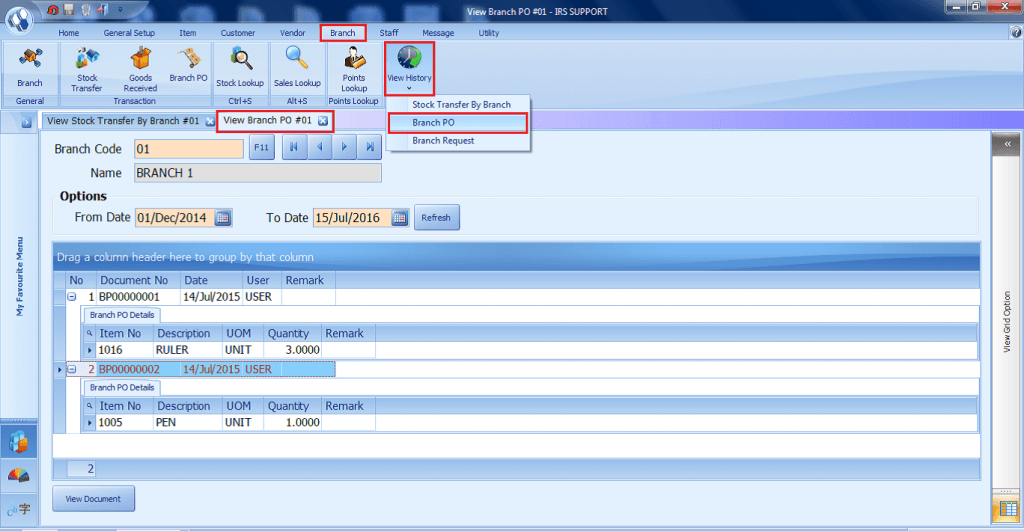
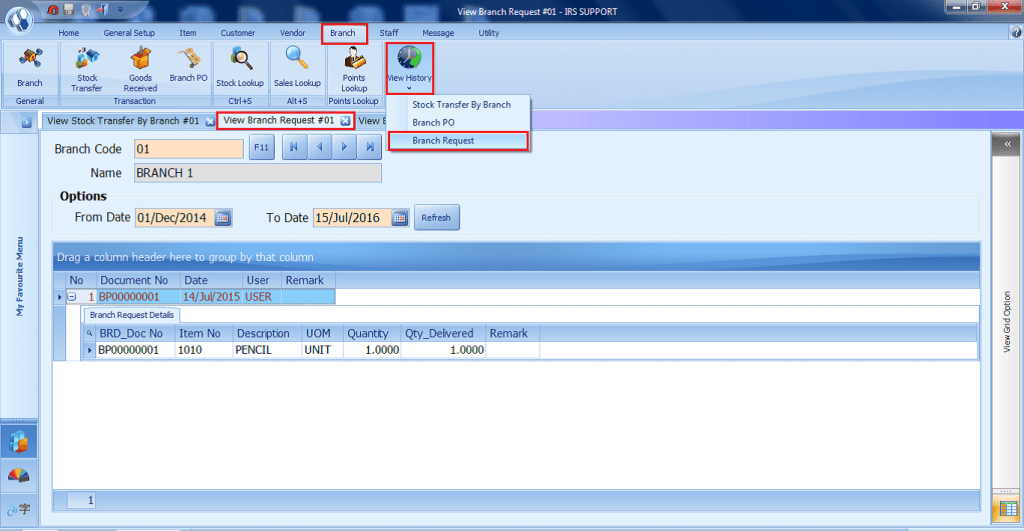
Branch – View History
View Stock Transfer By Branch
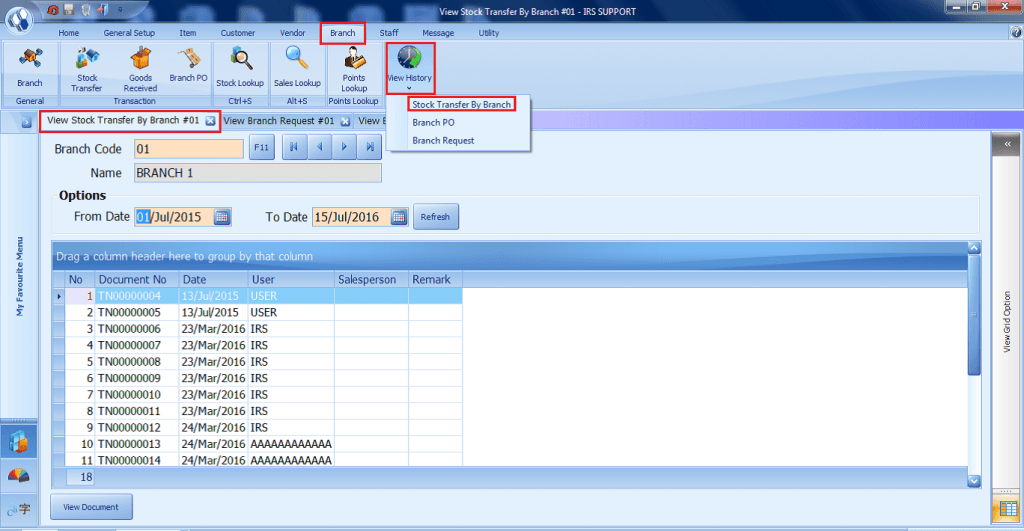
View Branch Purchase Order
View Branch Request
Share Link: https://www.irs-software.com/faqwd/irs-multi-store-system/
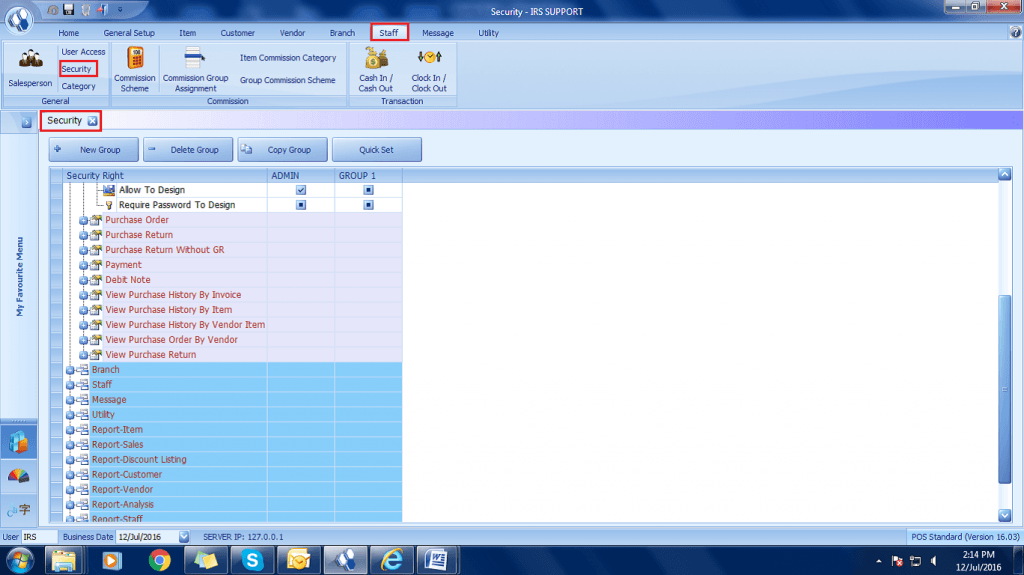
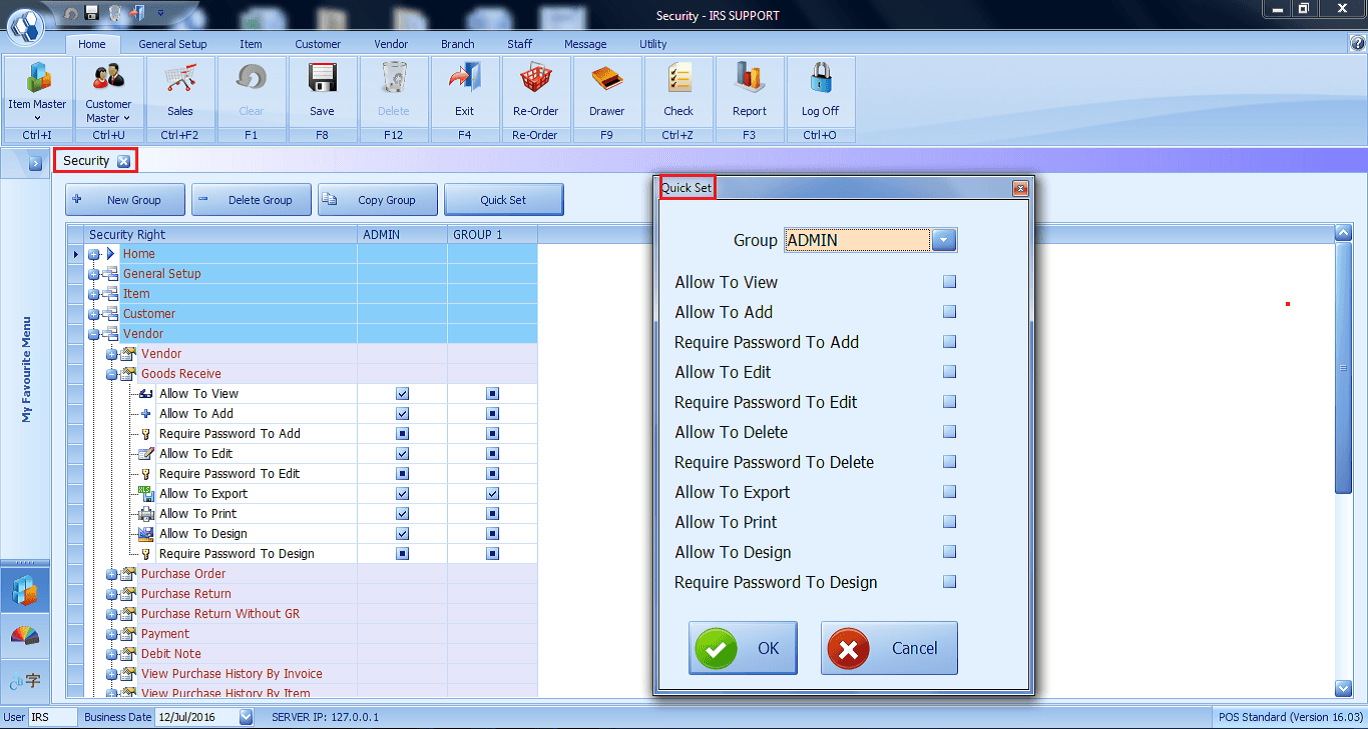
- 11. POS SecurityMore
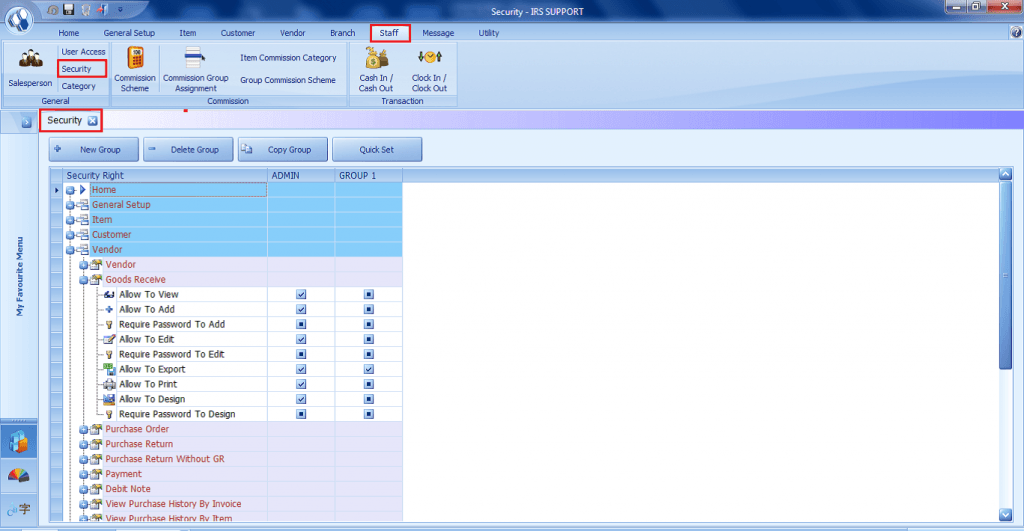
Staff - Security
- Security feature allows Administrator to select and apply permission rights for all functions for a particular user group.
- Staff > Security
- A user can be assigned to a certain user group or multiple user groups.
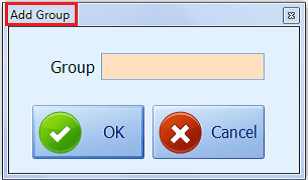
Add User Group
- To add new User Group.
- Staff > Security > New Group
- Enter the Group Name.
- Click OK to save.
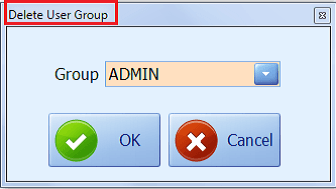
Delete User Group
- To delete User Group.
- Staff > Security > Delete Group
- Select the group to delete.
- Click OK to save.
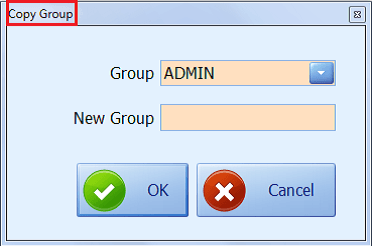
Copy User Group
- To copy / clone User Group.
- Staff > Security > Copy Group
- Select the group to copy.
- Enter the new group name.
- Click OK to save.
Quick Set
- Quick Set – Access Action feature allows to select and apply permission rights for all functions for a particular user group. Selecting this feature saves times as users need not go to each function and check the permission rights.
- Staff > Security > Quick Set
Share Link: https://www.irs-software.com/faqwd/pos-security/
- 12. MessageMore
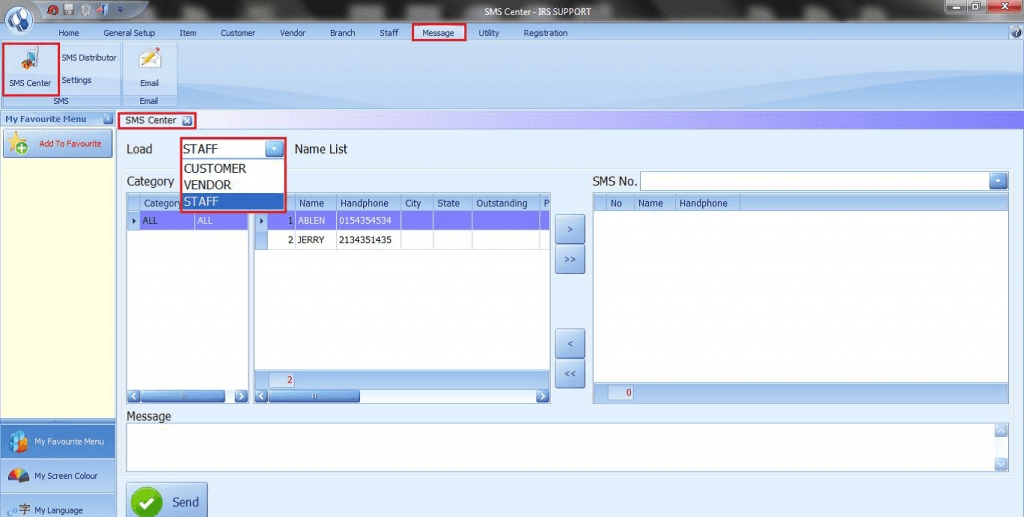
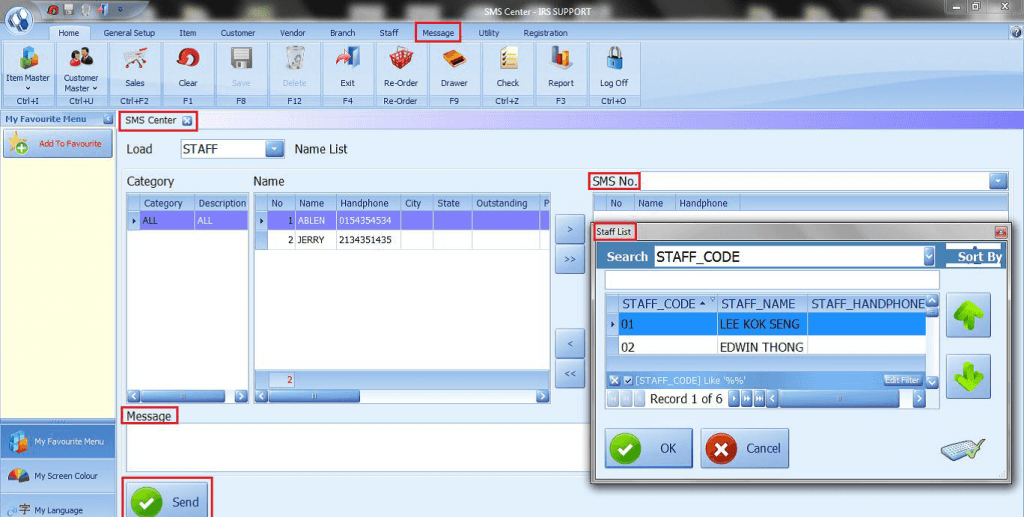
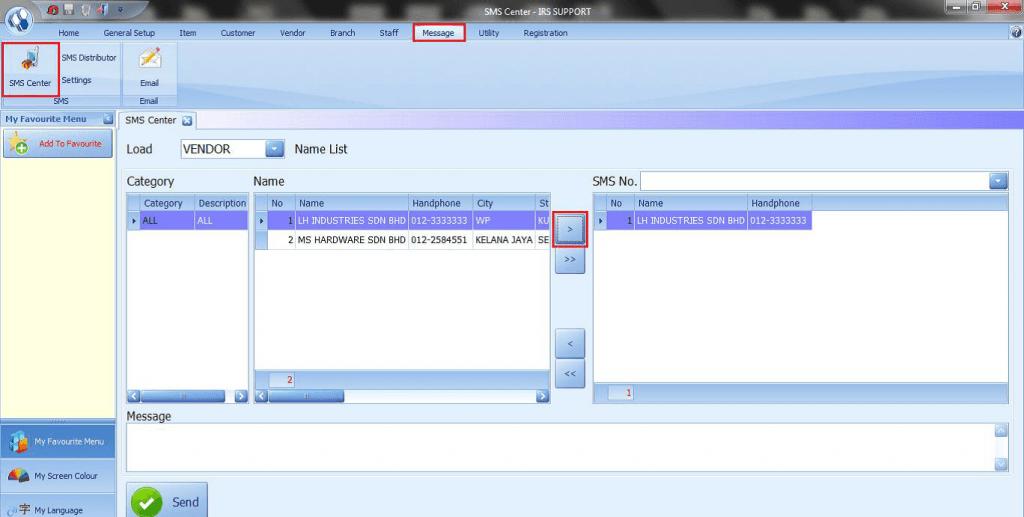
Message - SMS Center - How to send SMS
- Message feature enables the user to send messages to customers, vendors, and staff in real-time.

- 1. Select the Receiver from the Name List.
- 2. Select and Add the Name to the list.
- 3. Enter the message.
- 4. Click on the Send button.
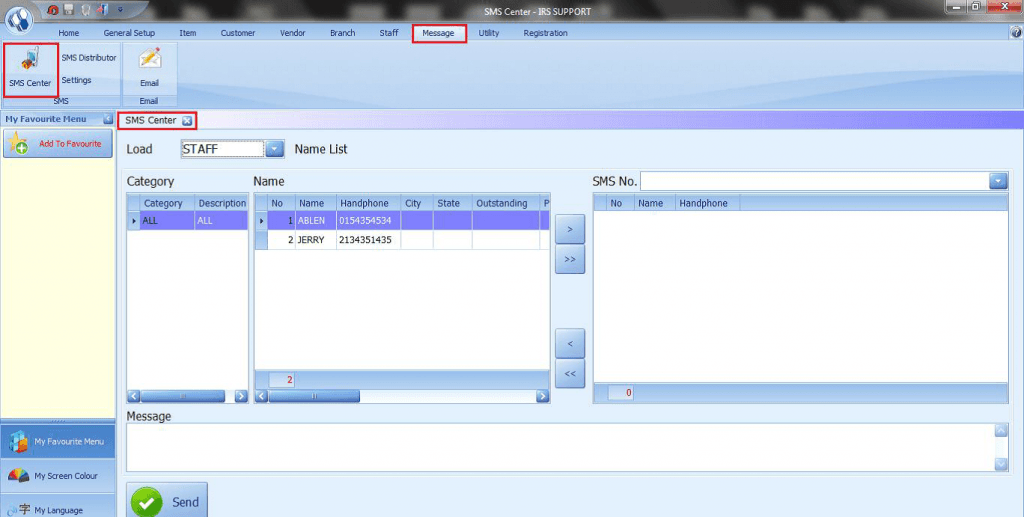
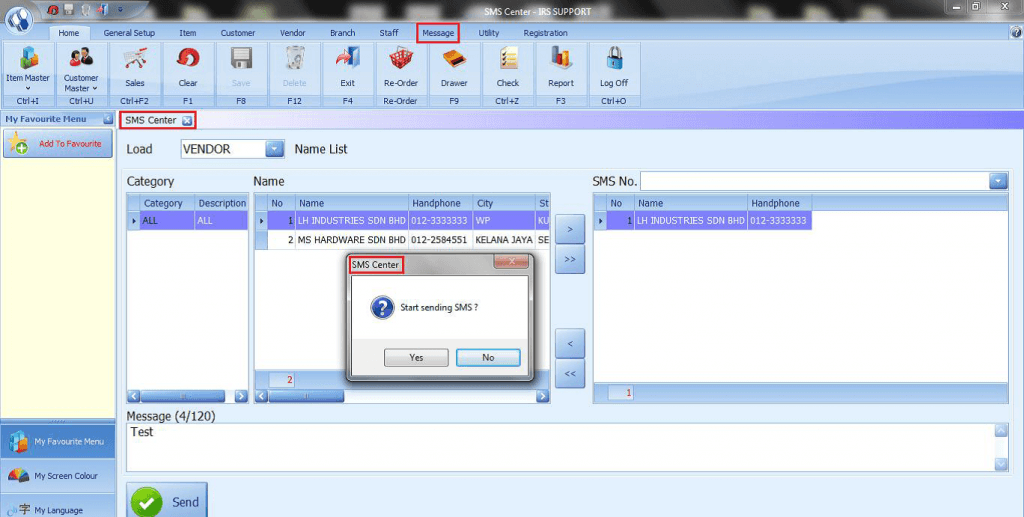
- The user has the choice to Resend, Select All, Deselect All or Delete the SMS messages
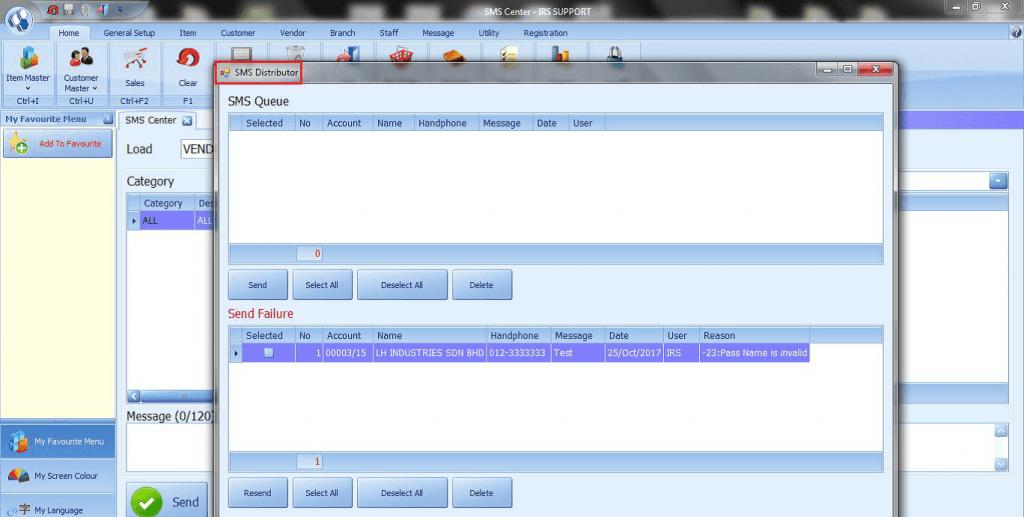
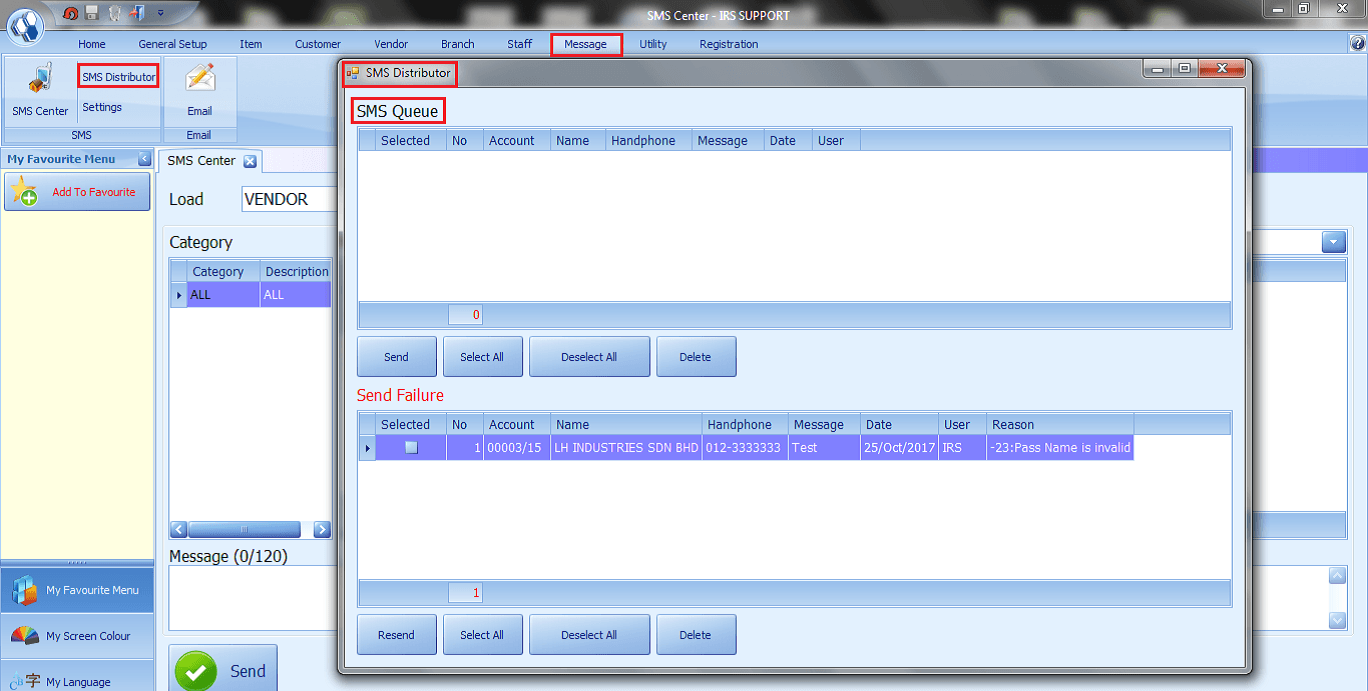
Message > SMS Distributor
- This option allows the user to check the status of SMS.
- SMS Queue – Check SMS Status from SMS Queue column
- Send Failure – Check SMS status from Send Failure column
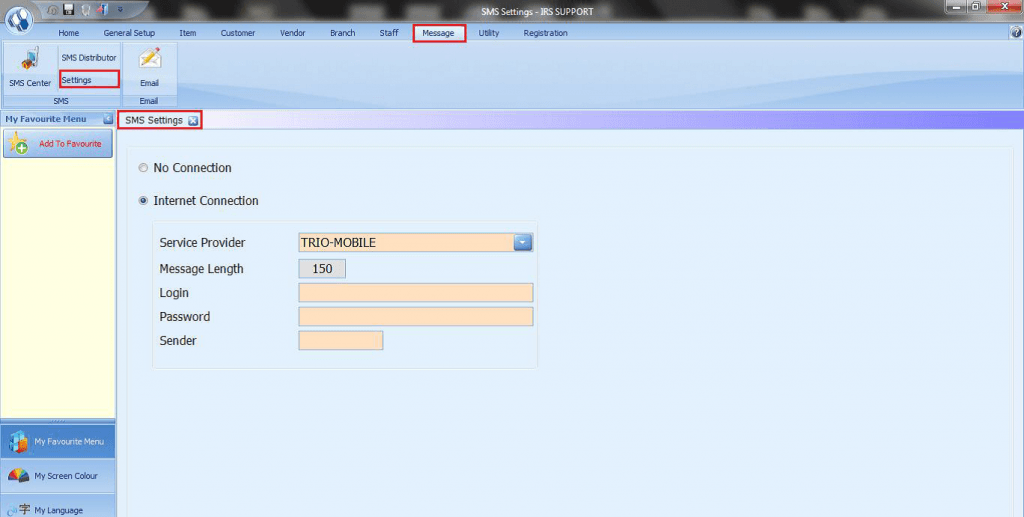
Message - SMS Settings
- This section allows the user to maintain the message settings.
- Select Internet Connection to enable SMS Service.
- Enter the Login, password and sender name.
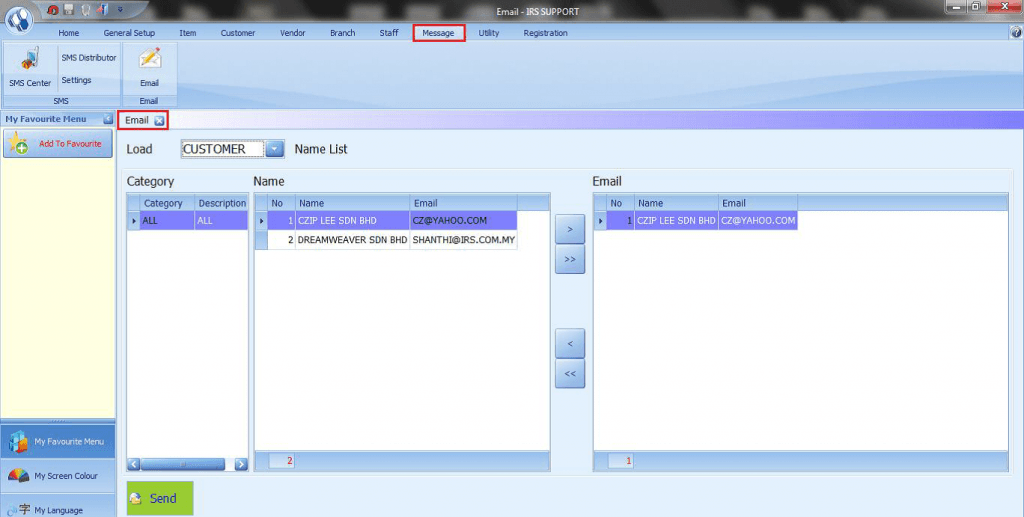
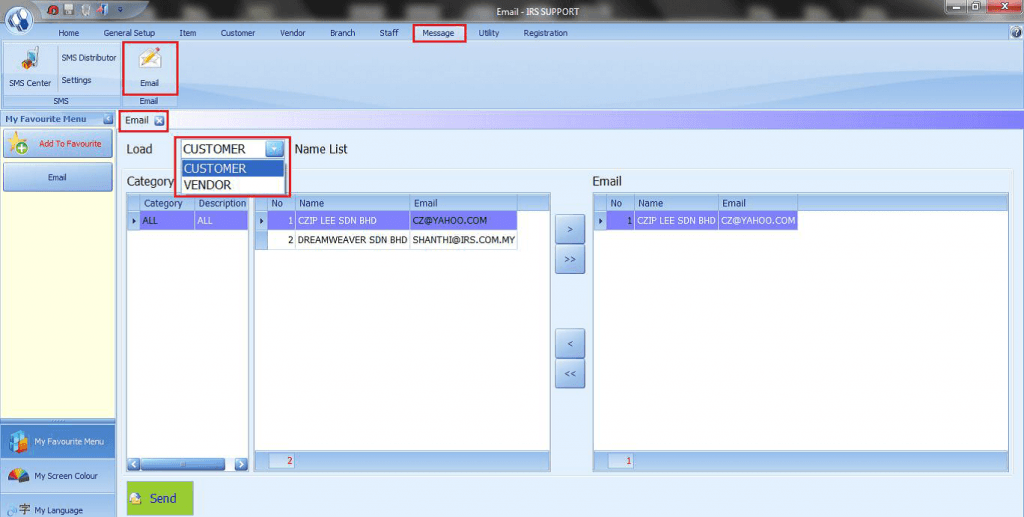
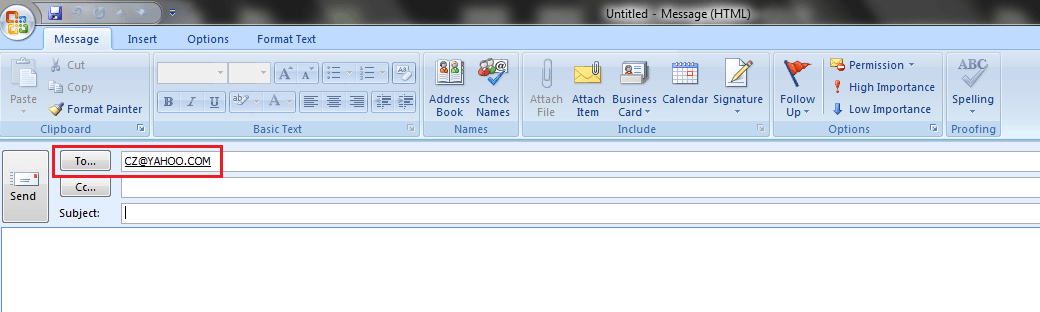
Message – Email – How to send Email
- 1. Select the receiver from the Name List.
- 2. Select and Add the Email to the list.
- 3. Click on the send button.
- 4. The system directs to the Microsoft outlook of the user.
Share Link : https://www.irs-software.com/faqwd/message/
- 13. Clock In and Clock OutMore
Clock In / Clock Out
- This section allows users to record the time the staff clock in and clock out.
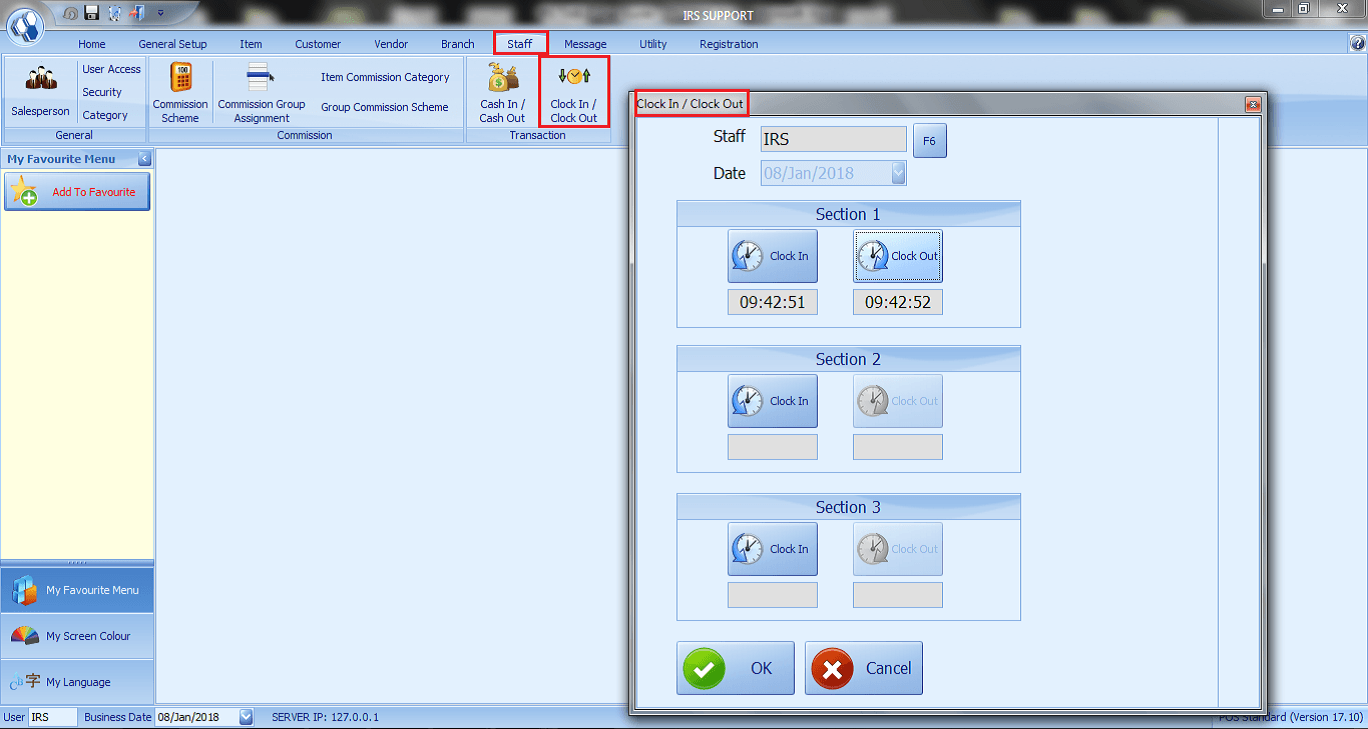
How to record Staff Clock In and Clock Out
- 1. How to click in or Clock out to record the time.
- 3. Click save to save the record.
Share Link: https://www.irs-software.com/faqwd/clock-in-and-clock-out/
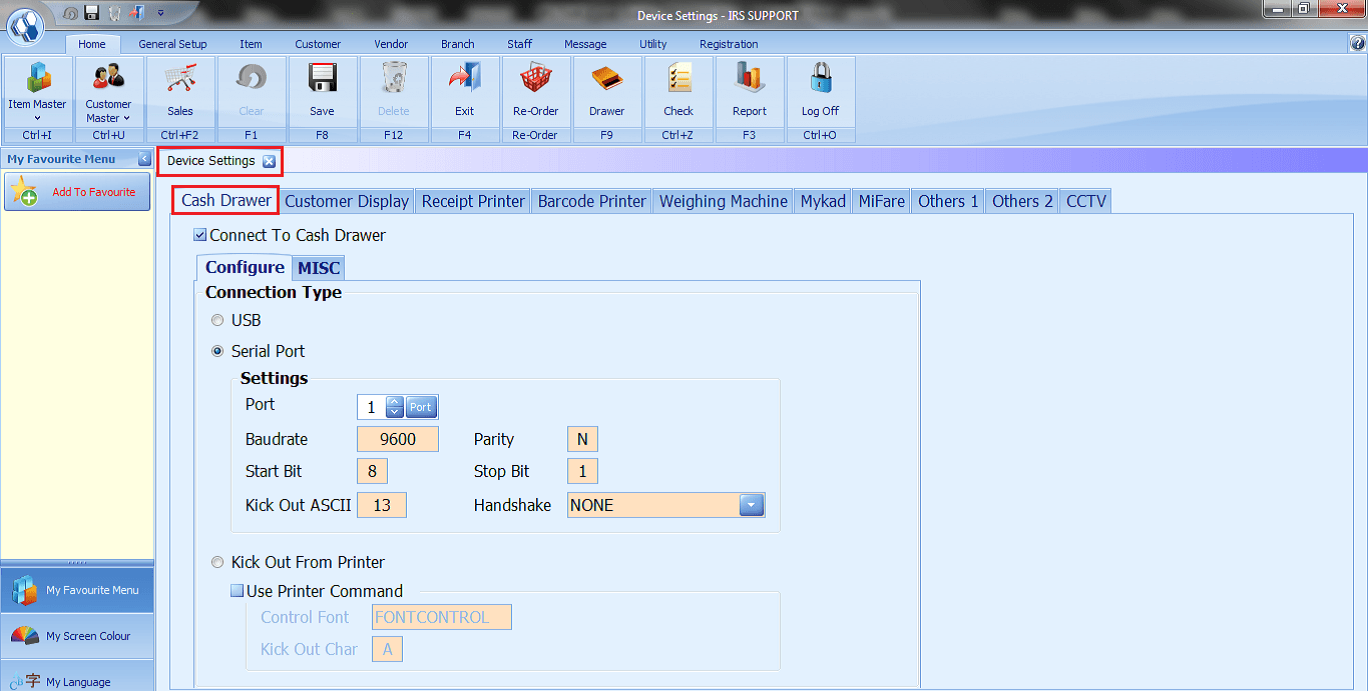
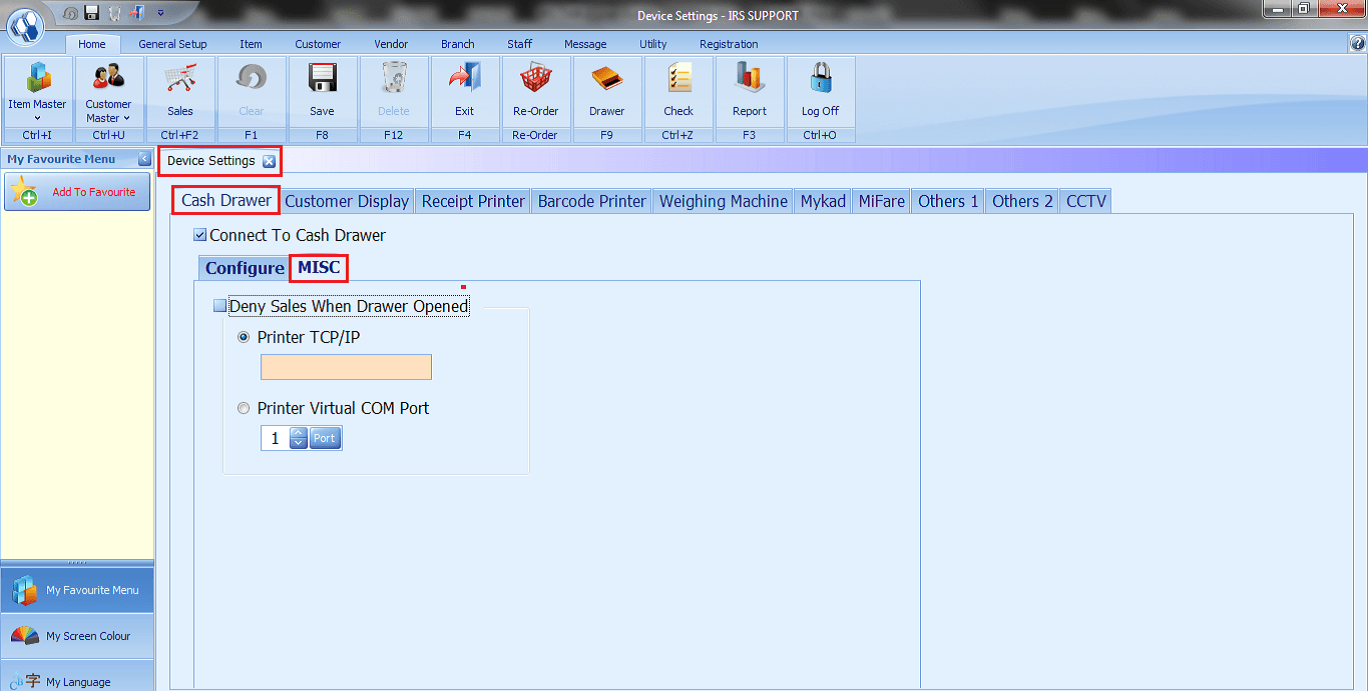
- 1. Device Settings – Cash DrawerMore
Instructions – Cash Drawer
- Step 1 – Tick to enable/use a cash drawer.
- Step 2 – Select USB for USB port connection or
- Step 3 – Select Serial Port for Serial port connection.
- Step 4 – Select the Port number (if using serial port).
- Step 5 – Select Kick Out from Printer for the drawer to printer connection.

Share Link: https://www.irs-software.com/faqwd/device-settings-cash-drawer/
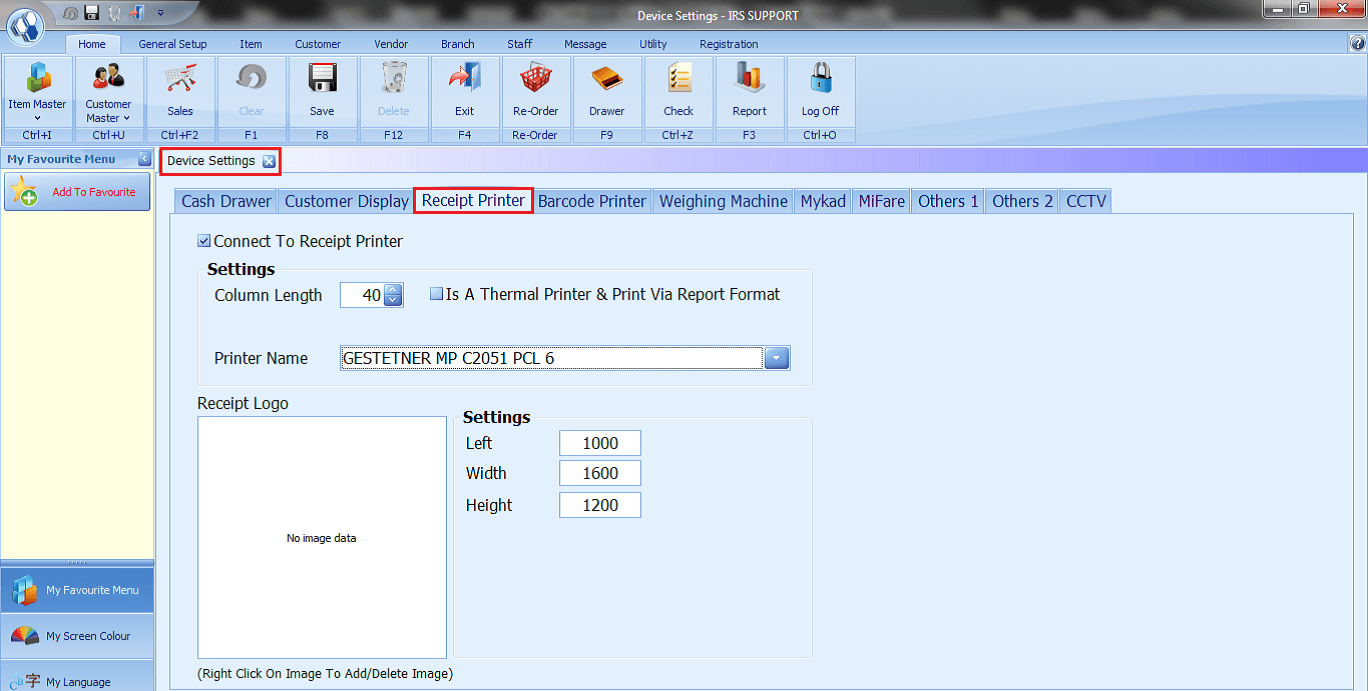
- 2. Device Settings – Receipt PrinterMore
Instructions – Receipt Printer
- Step 1 – Tick to use / enable a receipt printer.
- Step 2 – Select the receipt printer model.
Share Link: https://www.irs-software.com/faqwd/device-settings-receipt-printer/
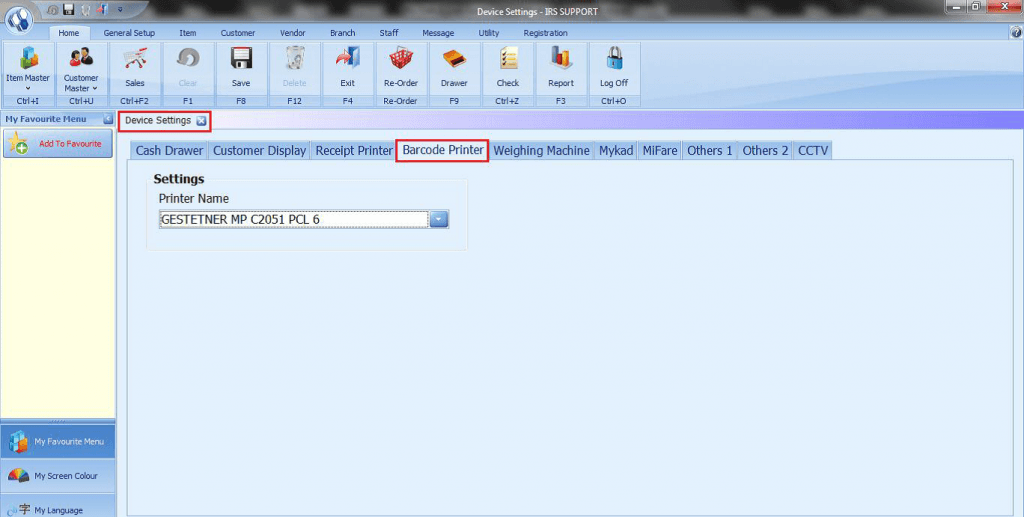
- 4. Device Settings – Barcode ScannerMore
Instructions – Barcode Scanner
Share Link: https://www.irs-software.com/faqwd/device-settings-barcode-scanner/
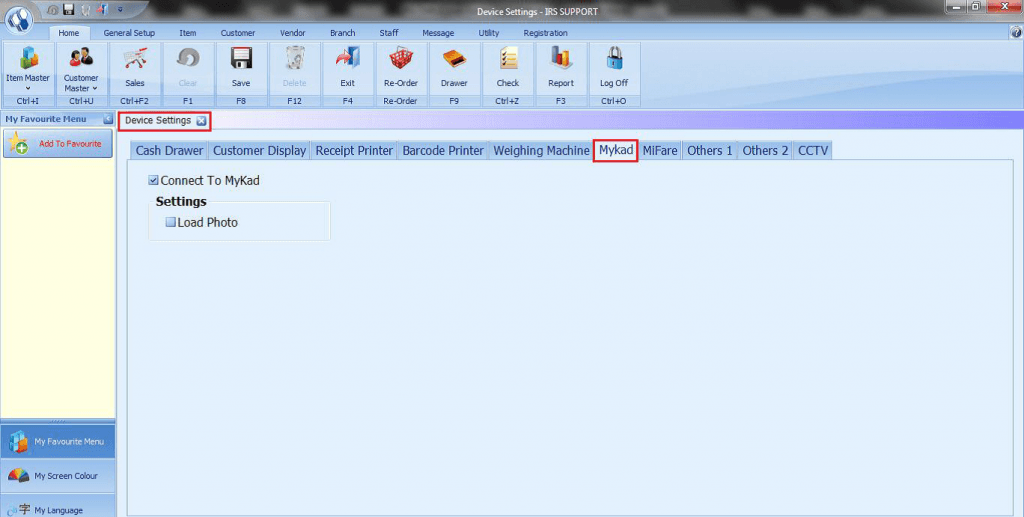
- 5. Device Settings – My Kad
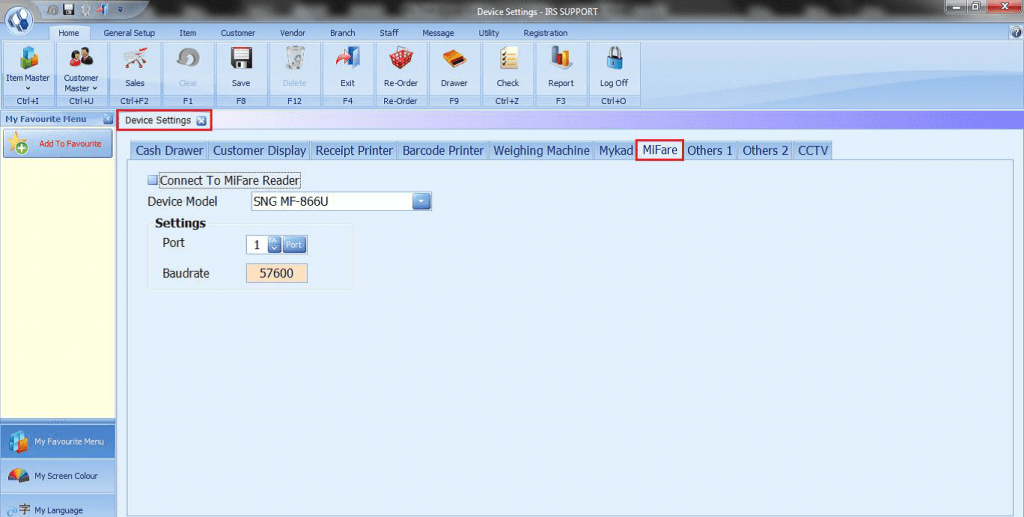
- 6. Device Settings – MiFare
- 7. Device Settings – MSR, QR Code and Payment TerminalMore
Instructions – MSR, QR Code and Payment Terminal
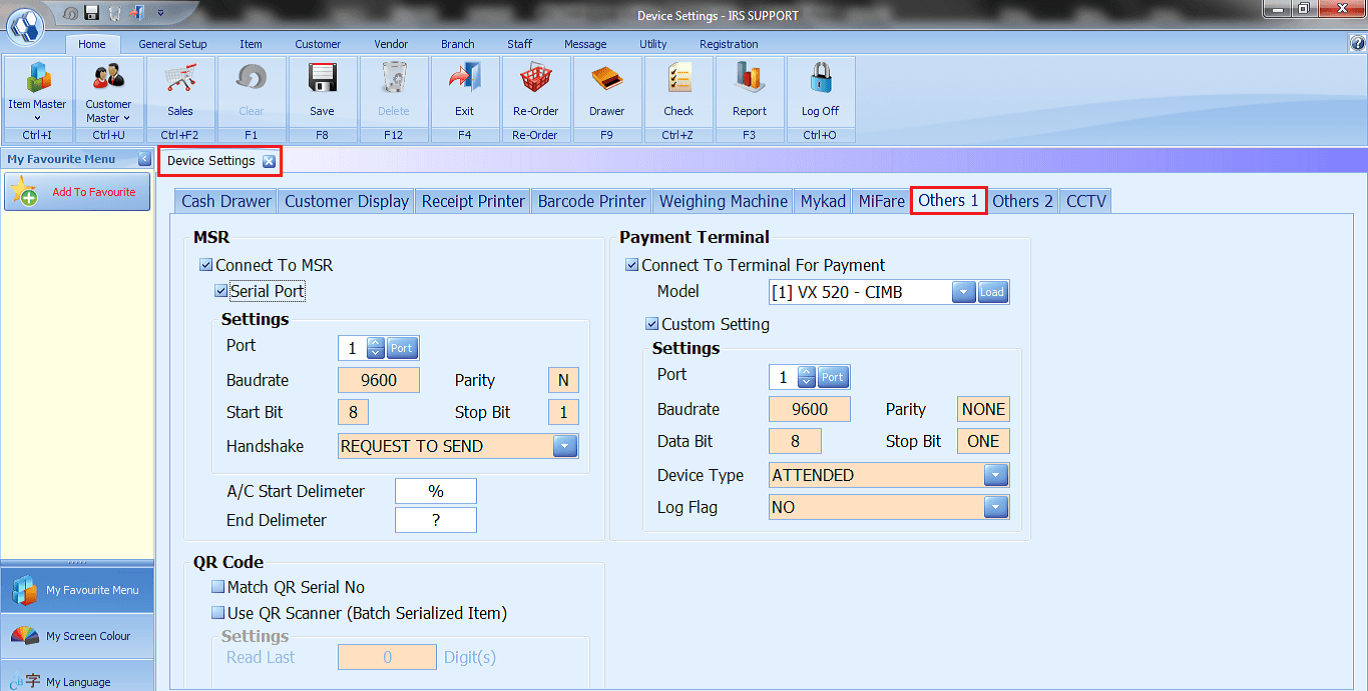
Share Link: https://www.irs-software.com/faqwd/device-settings-msr-qr-code-and-payment-terminal/
- 8. Device Settings – MSR, QR Code and Payment TerminalMore
Instructions – Fingerprint Scanner and Device Database
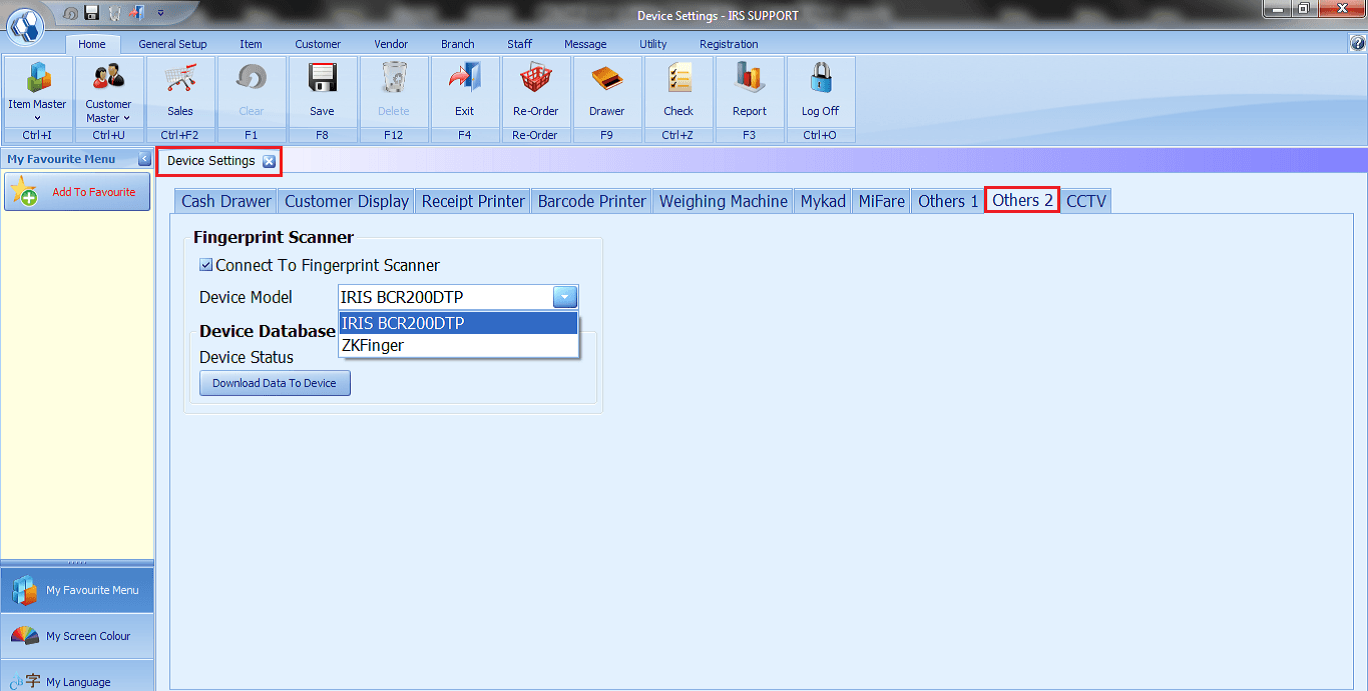
Share Link: https://www.irs-software.com/faqwd/device-settings-msr-qr-code-and-payment-terminal-2/
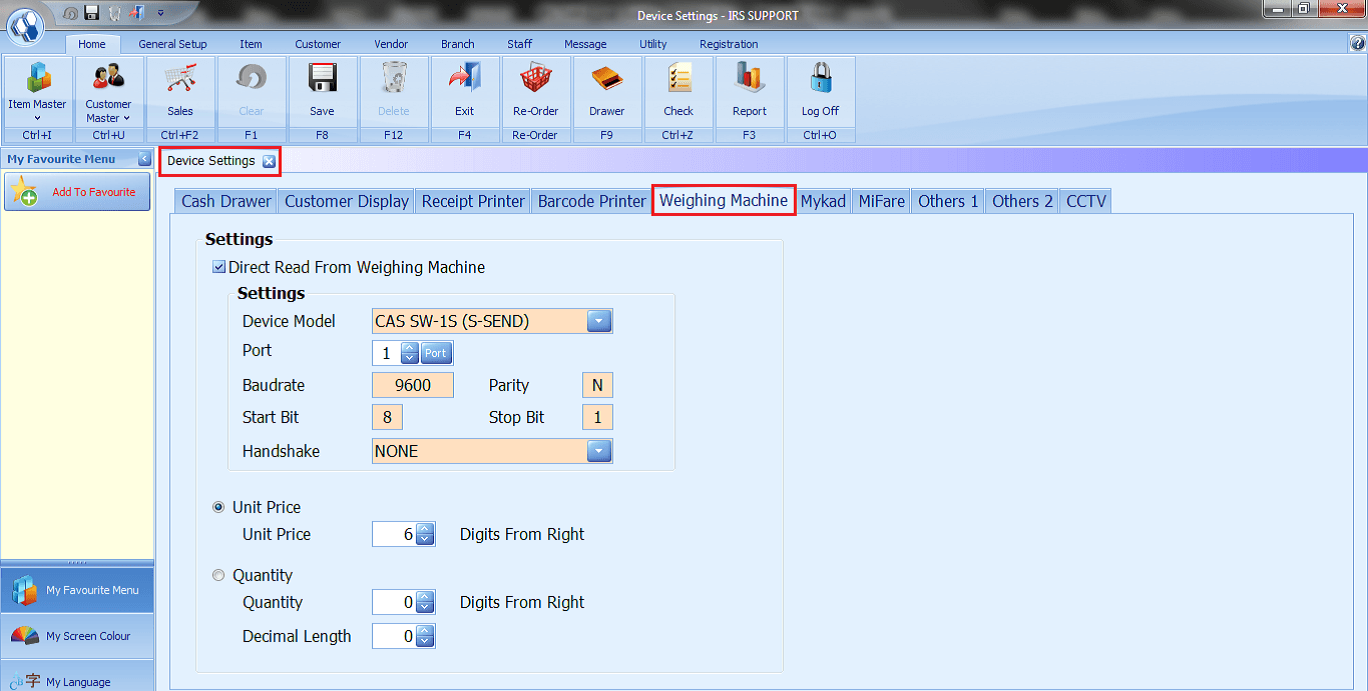
- 9. Device Settings – Weighing MachineMore
Instructions – Weighing Machine
Share Link: https://www.irs-software.com/faqwd/device-settings-weighing-machine/
- 10. Device Settings – Customer DisplayMore
Instructions – Customer Display
- Step 1 – Tick to use / connect with customer dislplay.
- Step 2 – Select the port number.
- Step 3 – Write in any idle message for appearing on the customer display
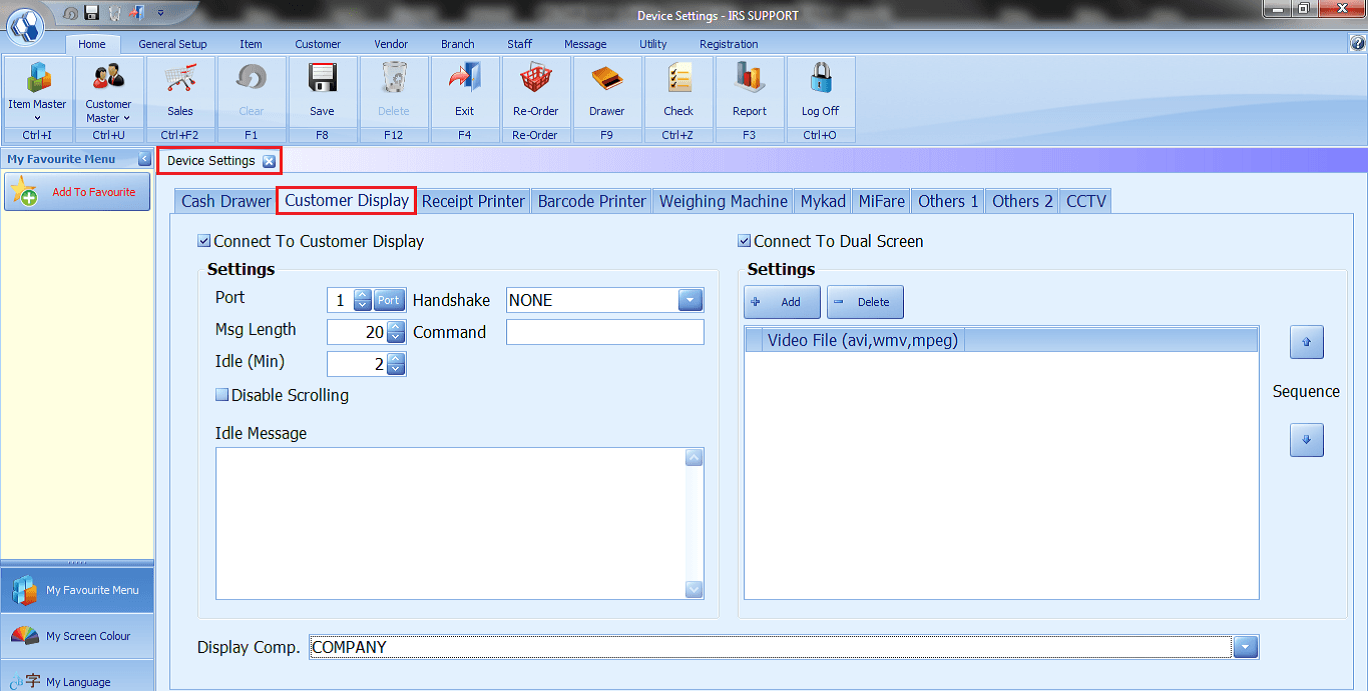
Share Link: https://www.irs-software.com/faqwd/device-settings-customer-display/
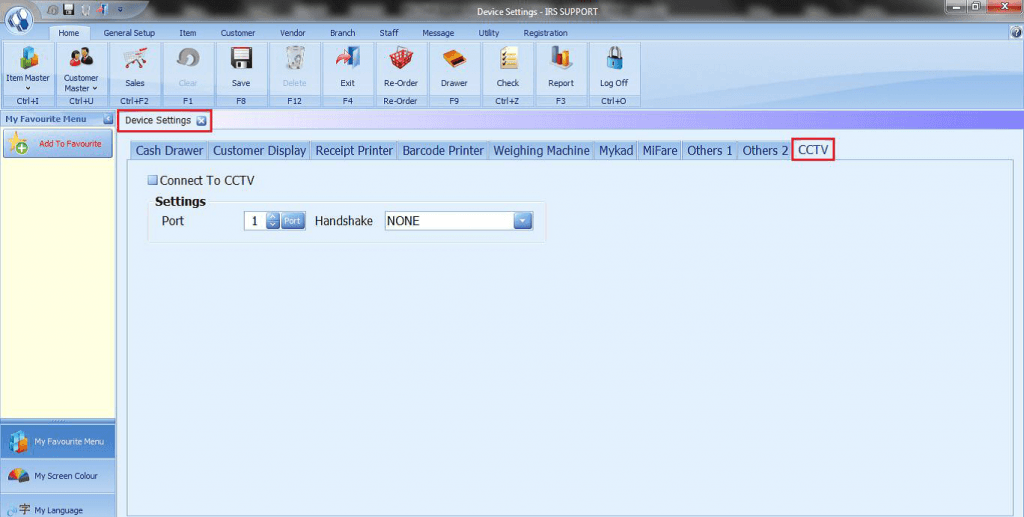
- 11. Device Settings – Closed-Circuit Television (CCTV)More
Instructions – Closed-Circuit Television (CCTV)
Share Link: https://www.irs-software.com/faqwd/device-settings-closed-circuit-television-cctv/